Embedded C/C++ Unit Testing with Mocks
Writing a unit test from scratch for an embedded software project is almost always an exercise in frustration, patience, and determination. This is because of the constraints, as well as breadth, of embedded software. It combines hardware drivers, operating systems, high-level software, and communication protocols and stacks all within one software package and is usually managed by a single team. Due to these complexities, the number of dependencies of a single file can quickly grow out of control.
One paradigm that we can use to our advantage as embedded developers when writing unit tests is mocks. They serve as a replacement for a module dependency, are quick and easy to write, and make it easy to test your code in a white-box fashion.
In this article, we do a deep-dive into unit testing with mocks. We’ll go over where they fit into your unit testing infrastructure, how to write them in C/C++, and finally run through some real-world examples. At the end, we’ll briefly talk about integration tests.
This post builds upon Unit Testing Basics post, where we covered everything you would need to know to get started writing unit tests for your embedded software project in C or C++ using CppUTest. We are going to jump quickly into the content so it’s best to have read that post first.
Table of Contents
Stubs, Mocks, and Fakes Review
As a quick review, let’s summarize the differences between fakes, stubs, and mocks.
- Fakes are a working implementation, but usually substitute their dependencies with something simpler and easier for a test environment. Example: an in-memory key/value store vs a NOR-flash backed Key/Value store.
- Stubs are a trivial implementation that returns canned values, generally always returning valid or invalid values.
- Mocks are an implementation that is controlled by the unit test. They can be pre-programmed with return values, check values of arguments, and help verify that functions are called.
Each one serves a purpose in unit testing. Although each type might not be utilized in every unit test you write, I can guarantee you that there’s a place for all of them within the suite of tests for your firmware.
Mocks in Detail
A mock is a simulated function or module that mimics the behavior of a real implementation but is fully controlled by the unit test itself. The programmer can validate how many times a mock is called and verify the value of all arguments passed into the mock. The programmer also dictates what actions the mock takes, from calling other fakes or stubs, to returning particular return values, or modifying certain output parameters.
Mocks are especially useful when testing failure paths that would likely never happen, or be disastrous if they did happen. For example, a mock would be a good choice if you are writing a vehicle software module that behaves differently if the airbags have triggered or not. You really would not want to have to test this in QA every time you make a change.
Since mocks generally do not include any other dependencies, mocks are also the best tool in the toolbox for isolating and testing every facet of the module under test (strive for that 100% code coverage).
However, this strength is also a weakness. Using mocks everywhere becomes cumbersome and verbose, given that every call, parameter, and return value has to be explicitly defined or ignored. Everything in testing is a trade-off, and choosing when to use mocks is no exception.
When to Use Mocks
You should considering using a mock:
- When you only want to include single
.cor.cppsource file under test. - When you you need something more than a stub, but don’t want to go through the trouble of modeling the subsystem behavior perfectly in a fake.
- When you have complex retry logic in a system and want to trigger every retry path.
- When you find yourself manually pre-programming return values while using a stub or a fake. I did this many times before finally understanding how to use a mock. I was doing something like this.
Although it’s not a binary decision or suggestion, I find that to reach 100%
code coverage on my projects or in particular files, I commonly have to use
mocks. 100% code coverage means that every branch in the codebase was taken at
least once, which in turn means that every one of the (buffer == NULL)
branches needs to be taken.
With a stub, I can’t change the return values dynamically. With a fake, the implementation should be functionally accurate to the real module, so it would usually never fail.
That leaves me with a mock!
Here are some common use cases for mocks that we’ll cover in this post:
- A malloc implementation that can be pre-programmed with return values (return real buffers vs NULL).
- A mock flash driver that returns error codes and forces different paths in a higher level module.
- A Bluetooth socket implementation that is fed artfully crafted packed data to instrument protocols.
C/C++ Mocking Libraries
Here are the mocking libraries that I most commonly see used within embedded projects.
- CppUMock
- Fake Function Framework (fff) - Although the name suggests it generates fakes implementations, they are actually mocks.
- CMock
There is one other frequently mentioned mocking library, cmocka, but I don’t often see it in the embedded space.
As with the unit testing framework itself, it does not matter what mocking library you choose. As long as it plugs into your build system and it makes sense to you, use it.
If I had to recommend which one you should use, I would say use CppUMock (and CppUTest) if you are starting from scratch, and if you just want a mocking library to hook into your already existing setup, go with fff.
CppUMock
CppUMock is the mocking library that is included with CppUTest, the popular C/C++ unit testing framework that was used within the book Test Driven Development for Embedded C by James W. Grenning1. This is also the framework I find myself reaching for most often, as it is full-featured, works with both C and C++, and is the most configurable.
In the following example, we create a mock for my_malloc which should be
called by allocate_buffer so that we can validate that allocate_buffer
behaves correctly if malloc fails and succeeds.
// The mock is written explicitly
void *my_malloc(size_t size) {
  mock()
      .actualCall(__func__)
      .withParameter("size", size);

  if (mock().hasReturnValue()) {
    return mock().returnPointerValue();
  }

  // Actually return a real buffer if a return
  // value isn't set
  return malloc(size);
}

TEST(TestAllocateBuffer, Test_AllocateBufferBasic) {
  // Set return value
  mock()
      .expectOneCall("my_malloc")
      .withParameter("size", 32)
      .andReturnValue(NULL);

  uint8_t *buf = allocate_buffer(32);

  // Validate expectations
  mock().checkExpectations();
  POINTERS_EQUAL(NULL, buf);

  // Get a real buffer we can write into
  // No expected return value will pass us a real buffer
  mock()
      .expectOneCall("my_malloc")
      .withParameter("size", 32)
  uint8_t *buf = allocate_buffer(32);
  CHECK(buf != NULL);
}
Notice above that since we define the mock my_malloc ourselves, we can add
extra functionality to it, such as returning a real malloc buffer when the
programmer doesn’t explicitly set it to return NULL. With other mocking
libraries, this isn’t easily achieved and will require allocating a buffer
before and setting that as a return value.
At first, I thought the verbosity of CppUMock was its primary weakness, but as I
explored the other alternatives, I realized it was actually its greatest
strength. Where fff heavily relies on macros and CMock relies on generating
mocks using Ruby, CppUMock mocks are just normal functions with some extra
book-keeping done using expectCall and actualCall.
When using CppUMock, if you have a few functions you are trying to mock out, it’s probably best to keep them defined in the test file, especially if you think it’s an isolated case. If you are mocking out a large number of functions, or think it might be used by other teammates or in future tests, go ahead and move it to its own file. Mocks can be easily generated for CppUMock using any of the following tools: CppUMockGen, mockify, or cpputest_mockify.
The Memfault Firmware SDK
has a good example of a dedicated mock file,
mock_memfault_platform_debug_log.cpp.
This is a mock for the logging system, which I feel is a neat example because it
allows the developer to assert on how memfault_platform_log was called but it
also prints the logs to standard out as one would expect.
Fake Function Framework (fff)
Fake Function Framework (fff) is the simplest way to get started with mocking. It is a header-only library which makes it trivial to include in your project.
Below, we implement the same functionality as the example from the CppUMock section.
TEST(TestAllocateBuffer, Test_AllocateBufferBasic) {
  // Set return value
  MOCK_my_malloc.return_value = NULL;

  uint8_t *buf = allocate_buffer(32);

  // Validate expectations
  LONGS_EQUAL(1, MOCK_my_malloc.call_count);
  LONGS_EQUAL(MOCK_my_malloc.arg0_val, 32);
  POINTERS_EQUAL(NULL, buf);

  // Get a real buffer we can write into
  void *real_buf = malloc(32);
  MOCK_my_malloc.return_value = real_buf;
  uint8_t *buf = allocate_buffer(32);
  CHECK(buf != NULL);
}
The primary reason I choose not to use fff is because I find the use of the macros difficult to understand at a glance. The CppUMock function chain calls might be verbose, but they read like spoken word and are easy for anyone to parachute into the codebase and easily grasp what is happening.
Here is an example unit test file from the marel-keytech/openCANopen project that uses fff as it’s mocking library.
CMock
CMock is a mocking library from the group behind ThrowTheSwitch.org, which also makes the Unity unit testing framework2. It is compatible with C and includes some tooling around running and generating boilerplate for you given a set of header files. The flow is similar to CppUMock in that you define your expectations first and then call the implementation under test.
TEST(TestAllocateBuffer, Test_AllocateBufferBasic) {
  // Set return value and expectation
  my_malloc_ExpectAndReturn(32, NULL);

  uint8_t *buf = allocate_buffer(32);

  // Validate expectations
  POINTERS_EQUAL(NULL, buf);

  // Get a real buffer we can write into
  void *real_buf = malloc(32);
  my_malloc_ExpectAndReturn(32, real_buf);
  uint8_t *buf = allocate_buffer(32);
  CHECK(buf != NULL);
}
The main reason I do not use the tools from ThrowTheSwitch is that they require Ruby, and I haven’t seen any significant number of embedded engineers or projects in the wild using Ruby. With this in mind, I prefer to use other frameworks and tools so that my team and I do not need to manage a Ruby environment (alongside the usual GCC and Python environments).
Real World Unit Test Example
Throughout this post, we are going to build a way for a remote system (such as an iOS app) connected to the device over some transport (e.g. BLE or serial) to be able to read and write key/value pairs to and from the device’s internal file system.
This is likely a system that most embedded engineers have either built or worked with.
Below is a diagram of our unit test stack, which looks similar to a real device’s end-to-end stack except for the fake NOR flash at the bottom.
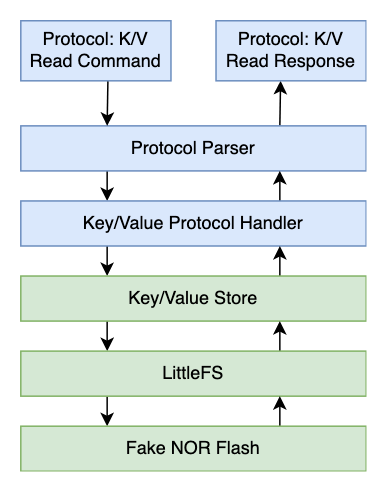
Even though each module is linked to one another, they can be tested individually and that’s what we’ll be doing today.
What this means in the context of a C/C++ project is that only the source files
of a single module will be included in a unit test. If we are testing a
module called kv_store, then a Makefile which compiles the unit test could
look something like this:
SRC_FILES = \
  $(PROJECT_SRC_DIR)/kv_store/kv_store.c \
  $(UNITTEST_ROOT)/mocks/mock_littlefs.cpp \
  $(UNITTEST_ROOT)/fakes/fake_mutex.c

TEST_SRC_FILES = \
  $(UNITTEST_SRC_DIR)/test_kv_store.cpp
Notice we aren’t including a bunch of RTOS source files or LittleFS modules, but rather fakes and mocks of each of those. This way, we ensure that we are only testing a single module and the test is as simple as possible.
With this in mind, we can start building some new modules and unit tests using mocks.
We’ll be building upon the Unit Testing Basics example code. The green boxes shown above are modules we’ve already implemented in the previous post, and the blue ones are the ones we’ll be implementing today.
Let’s get started!
Example Project Setup
If you want to follow along yourself, please reference the Project CppUTest Harness section from the previous post to get everything set up.
Protocol Parser Background
The protocol we are going to make a parser for is very simple. Each message has a Command, a payload Size, and a Payload.

We added the command field because we want to build a flexible protocol that can tell the device to do more things than just read and write key/value (“kv”) pairs.
Some other common remote commands I’ve seen implemented include:
- Reading the version of the firmware loaded on the device
- Ping/Pong command to ensure the device is awake and functional
- A way to remotely reboot or factory reset devices (ensure this endpoint is secured in some way)
All of these are possible using the command field, but today, we are going to focus on reading and writing key/value pairs on the device.
Building the Protocol Parser
We create a header, protocol.h, which contains a prototype for a function that
will accept bytes structured in the way defined above, as well as error codes
that the function may return. It also has two output arguments, resp_buffer
and resp_len, which is where we’ll write the response bytes and response
length to.
// protocol/protocol.h

#pragma once

#include <stdbool.h>
#include <stddef.h>
#include <stdint.h>

typedef enum {
  kProtocolCode_Ok = 0,
  kProtocolCode_MalformedMsg = 1,
  kProtocolCode_CommandNotFound = 2,

  kProtocolCode_32bit = 0x7FFFFFFF,
} eProtocolCode;

eProtocolCode protocol_handle(
    const uint8_t *buffer, size_t len,
    uint8_t *resp_buffer, size_t *resp_len);
Although simple, it should work for our use-case. Let’s build the implementation.
// protocol/protocol.c

#include "protocol/protocol.h"
#include "protocol/registry.h"

#include <stdbool.h>
#include <stddef.h>
#include <string.h>

eProtocolCode protocol_handle(
    const uint8_t *buffer, size_t len,
    uint8_t *resp_buffer, size_t *resp_len) {
  // Need at least a command and size
  if (len < 8) {
    return kProtocolCode_MalformedMsg;
  }
  uint8_t *iter = (void *)buffer;

  // Parse the desired command code
  uint32_t code = *(uint32_t *)(void *)iter;
  iter += sizeof(uint32_t);

  // Parse the payload size
  uint32_t payload_size = *(uint32_t *)(void *)iter;
  iter += sizeof(uint32_t);

  //
  // Here, we would pass our data to a protocol handler!
  //
}
Above, we take in a buffer and length, ensure we have 8 bytes for the command and size pieces, and then parse them. Now, we need to build a way to register commands in our system and then allow this function to call them based on the command field.
We’ll create another module to help register these commands, called the
registry.
// registry.h

#pragma once

#include <stddef.h>

typedef void (*ProtocolHandler)(const uint8_t *buffer, size_t len,
    uint8_t *resp_buffer, size_t *resp_len);

typedef struct ProtocolCommand {
  uint32_t code;
  ProtocolHandler handler;
} sProtocolCommand;

extern const sProtocolCommand *const g_protocol_commands;
extern const size_t g_num_protocol_commands;
// registry.c

#include "protocol/registry.h"
#include "protocol/handlers.h"

#include <stddef.h>

// Command that are registered, as:
//   <command_code>, <command_handler>
static const sProtocolCommand s_protocol_commands[] = {
  // This handler is defined in "protocol/handlers.h"
  {1, protocol_handler_hello},
};

// Define constants so the protocol module can read the command registry.
const sProtocolCommand *const g_protocol_commands = s_protocol_commands;
const size_t g_num_protocol_commands = 1;
Above, we defined a function pointer, ProtocolHandler, which accepts the
payload buffer and payload length, as well as a response buffer and length
output arguments. To register each command, we add an array element to the list
s_protocol_commands. When a command is received through our protocol, we’ll
iterate over this list, look for a matching command code, and if we find one,
we’ll call the handler.
The final piece we need is to write the code that iterates over these commands.
This will go into protocol.c.
  ...
  //
  // Here, we would pass our data to a protocol handler!
  //

  // Find the right handler
  for (const sProtocolCommand *command = g_protocol_commands; \
    command < &g_protocol_commands[g_num_protocol_commands]; \
    ++command) {
    if (code == command->code) {
      command->handler(iter, len, resp_buffer, resp_len);
      return kProtocolCode_Ok;
    }
  }

  // Failed to find a command
  return kProtocolCode_CommandNotFound;
Whew, a lot of code, but we are done with the protocol parser and command handling! Let’s write some tests for it.
Creating a Protocol Parser Test
Even though we don’t have any handlers defined in our source code, nor a way to actually plumb data in or out of the protocol in real life, we can do so in a unit test using mocks!
I won’t be copying the full code into the blog post since most of it is boilerplate, but please reference the source code on Github for more context.
First, let’s write our test with no knowledge of mocking and see what happens.
static uint8_t s_resp_buffer[1024];
static const size_t s_resp_buffer_len = sizeof(s_resp_buffer);

TEST(TestProtocolParser, Hello) {
  const uint8_t in_bytes[] = {
      0xD2, 0x04, 0x00, 0x00, // Code (1234)
      0x04, 0x00, 0x00, 0x00, // Payload Size (4)
      0xFF, 0xFF, 0xFF, 0xFF, // Payload (junk)
  };

  size_t len = s_resp_buffer_len;
  eProtocolCode rv = protocol_handle(
      in_bytes, sizeof(in_bytes),
      s_resp_buffer, &len);

  CHECK_EQUAL(kProtocolCode_Ok, rv);
}
The memory buffer in_buffer matches our spec of code, size, and payload, and
we assert that the function returns a successful code.
However, if we try to compile this now, we get something like the following:
$ UNITTEST_MAKEFILE_FILTER="*protocol.mk" make
make -f interrupt/example/unit-testing/complex/tests/makefiles/Makefile_protocol.mk
compiling test_protocol.cpp
Linking build/protocol/protocol_tests
Undefined symbols for architecture x86_64:
  "_g_num_protocol_commands", referenced from:
      _protocol_handle in libprotocol.a(protocol.o)
  "_g_protocol_commands", referenced from:
      _protocol_handle in libprotocol.a(protocol.o)
ld: symbol(s) not found for architecture x86_64
Oops, we forgot to register a protocol handler function and implement it. Let’s define those above the test.
static void prv_command_hello(const uint8_t *buffer, size_t len,
    uint8_t *resp_buffer, size_t *resp_len) {
  // Ignore resp buffer, nothing to check
}

static const sProtocolCommand s_protocol_commands[] = {
  {1234, prv_command_hello},
};

const sProtocolCommand *const g_protocol_commands = s_protocol_commands;
const size_t g_num_protocol_commands = 1;
Now if we compile the test:
$ UNITTEST_MAKEFILE_FILTER="*protocol.mk" make
make -f interrupt/example/unit-testing/complex/tests/makefiles/Makefile_protocol.mk
compiling test_protocol.cpp
Linking build/protocol/protocol_tests
Running build/protocol/protocol_tests
.
OK (1 tests, 1 ran, 1 checks, 0 ignored, 0 filtered out, 0 ms)
The test compiles and runs successfully. Awesome! But we aren’t done. Notice our
prv_command_hello function does nothing, and we aren’t asserting that anything
happens other than the return value is kProtocolCode_Ok.
Mocking for Protocol Test
Since we only want to test the protocol parsing logic in protocol.c, this is a
great time to use a mock. We can convert prv_command_hello into a CppUMock by
modifying the body of the function.
static void prv_command_hello(const uint8_t *in_buffer, size_t in_len,
    uint8_t *resp_buffer, size_t *resp_len) {

  mock()
      .actualCall(__func__)
      .withParameter("len", in_len)
      .withMemoryBufferParameter("buffer", in_buffer, in_len);
  // Ignore resp buffer, nothing to check
}
By adding the mock()... call, we tell CppUMock that a particular function was
called with a parameter len of value in_len and memory buffer buffer with
a value and length of in_buffer and in_len. CppUMock records this call in
its internal book-keeping system, and then we can assert expectations on it!
Let’s add this handling now.
TEST(TestProtocolParser, Hello) {
  const uint8_t in_bytes[] = {
      0xD2, 0x04, 0x00, 0x00, // Code (1234)
      0x04, 0x00, 0x00, 0x00, // Payload Size (4)
      0xFF, 0xFF, 0xFF, 0xFF, // Payload (junk)
  };

  const uint8_t payload_bytes[] = {
      0xFF, 0xFF, 0xFF, 0xFF, // Payload
  };

  mock()
      .expectOneCall("prv_command_hello")
      .withMemoryBufferParameter("buffer",
                                 payload_bytes,
                                 sizeof(payload_bytes))
      .withParameter("len", sizeof(payload_bytes))
      .ignoreOtherParameters();

  size_t len = s_resp_buffer_len;
  eProtocolCode rv = protocol_handle(
      in_bytes, sizeof(in_bytes),
      s_resp_buffer, &len);

  CHECK_EQUAL(kProtocolCode_Ok, rv);
  mock().checkExpectations();
}
We’ve added a payload_bytes buffer to confirm that prv_command_hello
receives this exact memory buffer, a mock()... call to set an expectation that
the handler is called in a particular way, and finally call
mock().checkExpectations to confirm that what we expect happened actually
happened.
If the call to prv_command_hello had not been called, or the call differed
from what we expected, then mock().checkExpectations would have produced an
error, such as the following:
interrupt/example/unit-testing/complex/tests/src/test_protocol.cpp:45:
    error: Failure in TEST(TestProtocolParser, Hello)

  Mock Failure: Unexpected call to function: prv_command_hello
  EXPECTED calls that did NOT happen:
    prv_command_hello -> const unsigned char* buffer: <Size = 4 | HexContents = FF FF FF FF>,
        unsigned long int len: <4 (0x4)>,
        other parameters are ignored
  ACTUAL calls that did happen (in call order):
    <none>
The above error is saying that our unit test expected a call to
prv_command_hello that did not happen.
Implementing Key/Value Protocol Handlers
Thus far, we’ve only implemented a mock protocol handler. Our goal is to build a
key/value protocol handler that will read and write values. Let’s build the read
and write handlers now in a file called kv_store_protocol_handlers.c
// kv_store_protocol_handlers.c

void kv_store_read_protocol_cmd(
    const uint8_t *buffer, size_t len,
    uint8_t *resp_buffer, size_t *resp_len) {

  // Forgo error checking for simplicity
  const char *key = (char *)buffer;
  // Simply read the value into the resp_buffer
  kv_store_read(key, resp_buffer, (uint32_t)*resp_len, (uint32_t *)resp_len);
}

void kv_store_write_protocol_cmd(
    const uint8_t *buffer, size_t len,
    uint8_t *resp_buffer, size_t *resp_len) {

  // Buffer should be in format:
  // <key_bytes>\0<value_bytes>

  // Forgo error checking for simplicity
  const char *key = (char *)buffer;
  size_t key_len = strlen(key);

  // Compute val_ptr and val_len. 1 is the \0 char
  const uint8_t *val_ptr = buffer + key_len + 1;
  const size_t val_len = len - key_len - 1;

  kv_store_write(key, val_ptr, val_len);
  // Write an ACK of sorts
  *resp_buffer = 1;
  *resp_len = 1;
}
The read handler is simple. We can just cast the buffer to the key, and read the data back into the response buffer and we’re all set.
The write handler is a bit more complicated, but still relatively simple. The only tricky part is splitting the key and value parts of the data buffer.
Testing Key/Value Protocol Handlers
We now need to test our above implementations using unit tests.
In light of the amount of code in this post thus far, I’ll keep it shorter here. If you want to dive deeper, check out the source code to test_kv_store_protocol_handlers.cpp on Github
The only two external dependencies to kv_store_protocol_handlers.c are
kv_store_read and kv_store_write. We have a few options we could take.
If we included kv_store.c into our unit test build, we’d also have to provide
implementations for kv_store.c dependencies, which include LittleFS and
Mutexes. This is not what we want.
We could create a stub or fake for kv_store_read and kv_store_write. This
would allow us to compile our unit test, but we want to verify that these
functions were called with the correct arguments and values, so these aren’t
ideal.
The last option, and the approach I took, was to write mock implementations for
kv_store_read and kv_store_write so that we could verify the argument and
return values.
Below is our mock implementation and unit test for kv_store_read:
bool kv_store_read(
    const char *key,
    void *buf,
    uint32_t buf_len,
    uint32_t *len_read) {
  return mock()
      .actualCall(__func__)
      .withStringParameter("key", key)
      .withOutputParameter("buf", buf)
      .withOutputParameter("len_read", len_read)
      .returnBoolValueOrDefault(true);
}

TEST(TestKvStoreProtocolHandlers, Read) {
  // Key: "hello"
  const uint8_t in_bytes[] = {
      'h', 'e', 'l', 'l', 'o', '\0' // Key
  };

  // Value: "world"
  const uint8_t out_bytes[] = {
      'w', 'o', 'r', 'l', 'd'
  };
  const uint32_t out_len = sizeof(out_bytes);

  mock()
      .expectOneCall("kv_store_read")
      .withStringParameter("key", "hello")
      .withOutputParameterReturning("buf", out_bytes, sizeof(out_bytes))
      .withOutputParameterReturning("len_read", &out_len, sizeof(out_len));

  kv_store_read_protocol_cmd(
      in_bytes, sizeof(in_bytes),
      s_resp_buffer, &s_resp_buffer_len);

  mock().checkExpectations();
  // Verify that our response buffer was correctly populated
  MEMCMP_EQUAL(out_bytes, s_resp_buffer, sizeof(out_bytes));
}
Adding and Testing Retry Logic
It’s typical for code that deals with hardware to have a retry mechanism built
in. Testing this retry logic in code is usually cumbersome and generally
ignored, but I want to bring comfort and say that using mocks makes it easy!
Let’s add a very simple retry loop around kv_store_read which retries the
operation 3 times.
// kv_store_protocol_handlers.c

void kv_store_read_protocol_cmd(
    const uint8_t *buffer, size_t len,
    uint8_t *resp_buffer, size_t *resp_len) {

  [...]

  bool success = false;
  int retries_left = 3;
  while (--retries_left >= 0) {
    success = kv_store_read(key, resp_buffer, (uint32_t)*resp_len, (uint32_t *)resp_len);
    if (success) {
      break;
    }
  }
}
Since we have mocked out kv_store_read, testing this retry logic is as simple
as adding a few more expectCall operations using CppUMock, where the first two
fail and the final one succeeds.
  // First, expect 2 failures
  mock()
      .expectNCalls(2, "kv_store_read")
      .withStringParameter("key", "hello")
      .withOutputParameterReturning("buf", out_bytes, sizeof(out_bytes))
      .withOutputParameterReturning("len_read", &out_len, sizeof(out_len))
      .andReturnValue(false);
  // On the third try, return a success
  mock()
      .expectOneCall("kv_store_read")
      .withStringParameter("key", "hello")
      .withOutputParameterReturning("buf", out_bytes, sizeof(out_bytes))
      .withOutputParameterReturning("len_read", &out_len, sizeof(out_len))
      .andReturnValue(true);

  // Should still pass!
  kv_store_read_protocol_cmd(
      in_bytes, sizeof(in_bytes),
      s_resp_buffer, &s_resp_buffer_len);
Retry logic and complimentary tests are critical for communication protocols and stacks, and I highly recommend doing everything you can in the unit test phase to verify correctness. Some of the most difficult bugs to investigate and fix are those around BLE or Wi-Fi with devices half-way across the globe.
Fast and Easy Integration Testing
In this post, we’ve taken extreme measures to ensure that we are only testing a single module’s source code, with every other dependency being a stub, fake, or a mock, instead of the real implementation. This is useful for testing the correctness of each specific module, but it does not give us confidence that all the modules will correctly work linked together.
The type of test that tests many modules as a group for interoperability is called an integration test. These tests are usually left to QA or developer self-testing. Another approach would be to do automated testing with an emulator like Renode.
However, wouldn’t it be nice if we could do similar tests within our unit test infrastructure? Yes it would!
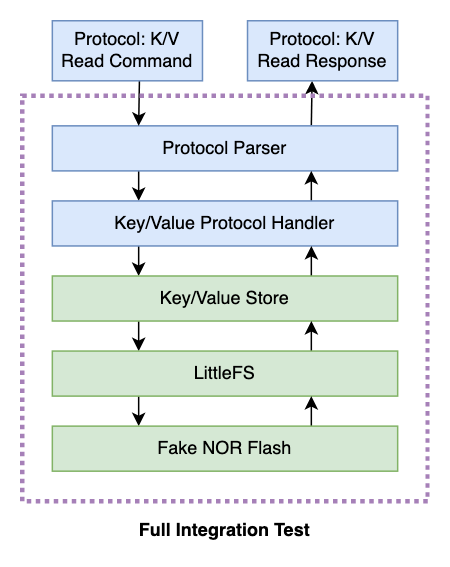
Recall our protocol diagram which takes data from a remote device, writes key/value pairs to flash, and provides responses.
Let’s try to create a test that tests this end-to-end within a unit test environment. Since we’ve already written unit tests for the Key/Value store with LittleFS in our previous post, we can use the same initialization routines and copy them into a new test.
The way I usually go about writing these tests is I first include all of the source files in the Makefile that I think I’ll need to include. In our particular case, it looks something like:
COMPONENT_NAME=integration_protocol_kv_store

SRC_FILES = \
  $(PROJECT_SRC_DIR)/littlefs/lfs.c \
  $(PROJECT_SRC_DIR)/littlefs/lfs_util.c \
  $(PROJECT_SRC_DIR)/littlefs/emubd/lfs_emubd.c \
  $(PROJECT_SRC_DIR)/kv_store/kv_store.c \
  $(PROJECT_SRC_DIR)/protocol/protocol.c \
  $(PROJECT_SRC_DIR)/protocol/registry.c \
  $(PROJECT_SRC_DIR)/kv_store/kv_store_protocol_handlers.c \
  $(UNITTEST_ROOT)/fakes/fake_mutex.c \

TEST_SRC_FILES = \
  $(UNITTEST_SRC_DIR)/test_integration_protocol_kv_store.cpp

include $(CPPUTEST_MAKFILE_INFRA)
Note that I’ve included real implementations for everything my module needs
except for fake_mutex.c, since I do not want to include any RTOS primitives
into the unit test. It’s not worth the hassle.
After including all of these, it’s time to get everything initialized correctly,
since most of the modules will need some sort of _init() routine called.
Thankfully, this is was mostly done for us in our previous test_kv_store.cpp.
TEST_GROUP(TestIntegrationProtocolKvStore) {
  void setup() {
    fake_mutex_init();

    lfs_emubd_create(&cfg, "blocks");
    lfs_format(&lfs, &cfg);
    lfs_mount(&lfs, &cfg);

    kv_store_init(&lfs);
  }

  void teardown() {
    lfs_emubd_destroy(&cfg);
    lfs_unmount(&lfs);

    CHECK(fake_mutex_all_unlocked());
  }
};
Now it’s time to write the real meat of the integration test. We’ll test only the protocol’s K/V Read command.
static uint8_t s_resp_buffer[1024];
static const size_t s_resp_buffer_len = sizeof(s_resp_buffer);


TEST(TestIntegrationProtocolKvStore, Read) {
  // Raw input into the protocol
  const uint8_t in_bytes[] = {
      0xE8, 0x03, 0x00, 0x00,       // Code (1000)
      0x06, 0x00, 0x00, 0x00,       // Payload Size (6)
      'h', 'e', 'l', 'l', 'o', '\0' // Payload ("hello")
  };

  const uint8_t val_bytes[] = {
      'w', 'o', 'r', 'l', 'd'       // Payload
  };

  // Initialize the value in the K/V store
  bool success = kv_store_write("hello", val_bytes, sizeof(val_bytes));
  CHECK_TRUE(success);

  // Push the raw bytes into our protocol
  size_t len = s_resp_buffer_len;
  eProtocolCode rv = protocol_handle(
      in_bytes, sizeof(in_bytes),
      s_resp_buffer, &len);

  // Ensure we receive the correct response!
  CHECK_EQUAL(kProtocolCode_Ok, rv);
  MEMCMP_EQUAL(val_bytes, s_resp_buffer, sizeof(val_bytes));
}
We are passing in a set of raw bytes into our protocol handler, and essentially
letting it run its course. This data flows in and out of five layers of
code, as shown in our diagram, and eventually returns data to our unit test with
s_resp_buffer. We confirm the data is correct using CppUTest’s MEMCMP_EQUAL
operation.
Feel free to check out the source code on Github
Do these integration tests give us the optimal 100% real-world test that QA or in-field testing provides? Of course not, but it gets us 90% of the way there which is infinitely better than nothing.
Integration Tests in Practice
This type of integration test can give us embedded software developers a lot of bang for our buck, but also cause frustration.
Benefits
- A large amount of code and logic can be tested using continuous integration
- Ensuring correctness after a large refactor of a module that resides in the middle of an integration test becomes trivial.
- Enables short-staffed and budget-conscious teams to push out building a complex test automation system with real hardware using something like Robot Framework3.
Drawbacks
- Changing the API of a single commonly used module within integration tests will require updating all of those tests.
- They are susceptible to breaking in undefined ways since many source files are thrown into the same test.
- Integration tests are, in some ways, easier to write since they don’t require new stub, fake, or mock files for each test that gets written. They might become the new normal, which would mean that each module would become less well tested and coverage of 100% might be more difficult to attain.
With the pros and cons taken into account, I can’t argue with any amount of testing, especially if it’s fast, reliable, and tests the code in meaningful ways. Even if I’ve battled a stale unit or integration test 2 years after it was written, I reminded myself that I would not want to be testing it manually.
Final Thoughts
I’m a believer that proper unit testing and integration testing can prevent many of the firmware bugs that devices experience in the field. Except for the firmware code that directly pokes in register values into hardware, all of the software that goes into embedded software can and should be unit testing in some fashion.
If you have interesting stories or creative ways that you’ve used unit tests or integration tests to validate your embedded software, I’d love to hear about them in the comments!
You can find the examples shown in this post here.
See anything you'd like to change? Submit a pull request or open an issue on our GitHub
References
 Tyler Hoffman has worked on the embedded software teams at Pebble and Fitbit. He is now a founder at Memfault.