Embedded C/C++ Unit Testing Basics
Complex embedded projects have thousands and frequently tens of thousands lines of code. The majority of that code is entirely software (rather than “firmware”), and software in every industry is typically unit tested. However, in the embedded and firmware industry, unit testing is typically an after-thought or a task that is begun after working on a project for months or even years.
Today’s firmware projects require filesystems, BLE and Wi-Fi stacks, specialized data structures (both in-memory and in-flash), and complex algorithms, such as those interpreting accelerometer and gyroscope data. All of these items can be easily unit tested after becoming acquainted with best practices and writing a few tests of your own.
In this post, we go into detail on how to properly build abstractions to stub, fake, and mock out implementations of low level embedded software and provide a full real-world example of a unit test using the CppUTest 3.8 unit test framework.
This is the second post in our Building Better Firmware series, following the post about Continuous Integration for firmware projects, which is a wonderful pre-cursor to this post.
Table of Contents
Unit Testing Overview
Unit testing is a method of testing software where individual software components are isolated and tested for correctness. Ideally, these unit tests are able to cover most if not all of the code paths, argument bounds, and failure cases of the software under test.
Through proper use of unit tests, and especially while using practices from Test Driven Development (TDD)1, the time it takes to stabilize embedded software can decrease dramatically, making individuals and teams more productive and firmware less likely to experience functional bugs, control flow bugs, and even fatal issues, such as memory leaks and (gasp!) bootloops.
Life Before Unit Testing
Here are a few examples that I’ve experienced in the past that were alleviated by the team doubling down on unit testing the firmware.
- You find testing on target hardware slow and inconvenient, especially when multiple devices (e.g. a mobile phone) or prior setup (e.g. a factory reset) is required
- Bugs and regressions occur repeatedly in a single piece of software.
- Deadlocks, HardFaults and Memory Leaks are the norm and have become accepted (unit testing example for preventing deadlocks included below!).
- The amount of time spent debugging and testing firmware is 60% or more2.
- The first instinct when starting a new software module is to write a chunk of code and test on hardware.
Life After Unit Testing (Possibly)
At a previous company, after scrapping most legacy code and writing new modules with 90%+ code coverage and through the use of TDD, this is what development felt like sometimes.
- You write a new file, maybe an in-flash log storage module, and it works the first time when flashed on the device (no better feeling).
- Regressions are caught immediately when runnings tests locally or in CI.
- Memory leaks are raised as errors in unit tests.
- Testing a majority of the firmware only takes a minute.
- The overall codebase has better structure and cleaner boundaries between modules.
Disclaimers
Unit tests in the embedded space is a controversial topics, so I want to clear set up expectations up front.
- This post covers how to test embedded software. Testing firmware drivers and hardware is very different and time is best spent writing functional and integration tests that run on target to validate hardware components. As soon as drivers are written and stable, switch to the unit test approaches provided in this post.
- I do not suggest rewriting all of your code to accommodate unit tests, or writing tests for the current code base, but I heavily suggest writing unit tests for most new modules and heavily suggesting them in code reviews.
- Integration tests and on-target tests have their place. This infrastructure is a huge time and money investment, and the tests run in minutes and hours. Keep these to a minimum at first to ensure hardware stability, and leave software stability to unit tests. If time allows, then build these types of tests.
Framework-less Unit Tests
It is very common to initially write unit tests using one-off .c files. Below
is an example of a test that is commonly found in firmware projects or written
by the author of a piece of firmware code.
#include <assert.h>

// In my_sum.c
int my_sum(int a, int b) {
  return a + b;
}

// In test_my_sum.c
int main(int argc, char *argv[]) {
  assert(2 == my_sum(1, 1));
  assert(-2 == my_sum(-1, -1));
  assert(0 == my_sum(0, 0));
  // ...
  return(0);
}
This works for a short period of time, but as a firmware project grows in complexity, lines of code, and number of developers, there are a few things that become a requirement.
- Running Unit Tests in Continuous Integration
- Reporting results of the tests, e.g. number of tests failed, runtime duration, etc.
- Reporting code coverage to give insight into how much of a codebase is unit tested3.
- Ability for a developer to create a new unit test easily and quickly.
The most scalable way to write unit tests in C is using a unit testing framework, such as:
Even though CppUTest and Google Test are written in C++, they can be used to
test C source code, as long as the C header files includes are wrapped with
extern "C".
extern "C" {
  #include "my_sum.h"
}
Minimal Unit Test Example
Let’s come up with a bare bones unit test to instrument our simple my_sum
module.
NOTE: Our examples use the CppUTest framework. If you want to follow along, check out the Setting Up CppUTest section first.
The source code for the my_sum.c module is as follows:
#include "my_sum.h"

int my_sum(int a, int b) {
  return (a + b);
}
A unit test generally contains the following pieces:
- Setup and Teardown functions, which run before and after each test respectively.
- Individual tests that test logical components or paths of a module.
- Many checks, such as
LONGS_EQUALwhich compares integer values andSTRCMP_EQUALwhich would compare string values.
Our basic unit test is as follows:
#include "CppUTest/TestHarness.h"

extern "C" {
  #include "my_sum.h"
}

TEST_GROUP(TestMySum) {
  void setup() {
    // This gets run before every test
  }

  void teardown() {
    // This gets run after every test
  }
};

TEST(TestMySum, Test_MySumBasic) {
  LONGS_EQUAL(7, my_sum(3, 4));
}
Although the example is basic, let’s go over what is happening here.
- We import
my_sum.hinside of theextern "C" {}section so that it is compiled as C instead of C++. - We have empty
setup()andteardown()functions since the modules we are testing don’t require any initial setup or cleanup routines. - We have a single
LONGS_EQUALstate, which compares<expected> == <actual>after themy_sumfunction is called. - We did not include any fakes or stubs, as our module didn’t have any dependencies.
If this test passes, we get something like:
Running build/sum/sum_tests
.
OK (1 tests, 1 ran, 1 checks, 0 ignored, 0 filtered out, 0 ms)
And if the test fails (for example, change 7 to 6):
Running build/sum/sum_tests

src/test_my_sum.cpp:17: error: Failure in TEST(TestMySum, Test_MySumBasic)
  expected <6 0x6>
  but was  <7 0x7>

.
Errors (1 failures, 1 tests, 1 ran, 1 checks, 0 ignored, 0 filtered out, 1 ms)
To build and run this unit test, we give the unit test harness the test name, the list of files to compile into the test binary, and any extra compilation flags necessary.
COMPONENT_NAME=sum

SRC_FILES = \
  $(PROJECT_SRC_DIR)/my_sum.c \

TEST_SRC_FILES = \
  $(UNITTEST_SRC_DIR)/test_my_sum.c
Here, we have SRC_FILES, which would contain any sources files used by the
test, and TEST_SRC_FILES which contains the test files that contain the tests
themselves.
Unit Testing Best Practices
The “Minimal Example” is a contrived example and very rarely will there be a test with no other dependencies. Firmware is naturally coupled with other parts of hardware, and that makes it difficult at first to set up a unit test.
For example, a flash storage module may call an analytics_inc() function to
record the number of writes, a watchdog_feed() function during a large flash
erase operation, and timer_schedule() to help defragment the flash later in
the future. If we are testing only the flash key/value store, we do not want
to include the analytics, watchdog, and timer source files into our unit test.
That brings us to a few best practices to follow, especially when writing unit tests for complex and entangled code.
- Each
TEST()within a unit test file should ideally test a single path or feature of the module. A test calledTestEverythingis an anti-pattern. - Each test should be quick. A few milliseconds is ideal, and one second is the worst case run time.
- Each unit test should ideally include one real implementation of a module. The rest should be stubbed or fake versions of the modules not under test.
- Those stubbed and fake versions of modules should be written early, reused, and shared.
Which brings us to explaining what are stubs, fakes, and mocks?
Stubs, Fakes, and Mocks
When starting to write unit tests, it is common to write alternate implementations to modules that make sense for a particular unit test.
Since unit tests will be run on the host machine, they won’t have hardware, such
as an LED. But if a module within a unit test calls Enable_LED(), we could
instead have a virtual LED and a state boolean value saving whether the LED is
on or off.
These alternate implementations of modules have different types. Let’s explain them.
- Fakes are a working implementation, but will usually substitute their dependencies with something simpler and easier for a test environment. Example: an in-memory key/value store vs a NOR Flash backed Key/Value store.
- Stubs are a trivial implementation that returns canned values, generally always returning valid or invalid values.
- Mocks are an implementation that is controlled by the unit test. They can be pre-programmed with return values, check values of arguments, and help verify that functions are called.
After having worked at two software oriented hardware companies with 20+ firmware engineers each, my favorite way to organize the test directory is as follows:
├── header_overrides
│   ├── string.h
│   └── error_codes.h
├── fakes
│   ├── fake_analytics.c
│   ├── fake_analytics.h
│   ├── fake_kv_store.c
│   ├── fake_mutex.c
│   └── fake_mutex.h
├── stubs
│   ├── stub_analytics.h
│   ├── stub_kv_store.h
│   └── stub_mutex.h
├── mocks
│   ├── mock_analytics.h
│   └── mock_kv_store.h
├── src
│   ├── AllTests.cpp
│   ├── test_kv_store.cpp
│   ├── test_littlefs_basic.cpp
│   └── test_littlefs_format.cpp
└── makefiles
    ├── Makefile_littlefs_basic.mk
    ├── Makefile_littlefs_format.mk
    └── Makefile_settings_file.mk
where
- header_overrides/ - headers that override complex, auto-generated, or target specific headers.
- src/ - The unit tests themselves.
- makefiles/ - Makefiles to build the individual unit tests.
Stubs
These are used when the implementation of specific functions or their return
values do not matter to the module under test. They are primarily used to fix
the linker’s ld: symbol(s) not found errors. These should generally have only
a return statement that always returns true, false, 0, NULL, or whatever
makes sense in the context of the module.
If there is anything more complex than a return statement, consider implementing a Fake instead.
Examples:
- Hardware or peripheral initialization functions since they have little relevance in testing on the host (x86 machine).
- A time module which returns the time of day (just return a random time).
- Mutex stubs when the locking or unlocking isn’t being tested. (shown below)
#include "mutex/mutex.h"

// Stubs

Mutex *mutex_create(void) {
  return NULL;
}

void mutex_lock(Mutex *mutex) {
  return;
}

void mutex_unlock(Mutex *mutex) {
  return;
}
Fakes
A Fake is commonly used in firmware where it is impractical to use the real implementation for reasons such as:
- It requires specific hardware (flash chip, peripherals, LED’s, etc.)
Examples:
- A mutex module which checks at the end of the test that all mutexes were properly unlocked (example provided later in the post).
- A RAM based NOR flash implementation, which flips bits from
1to0when written to and requires “erasing” (flipping bits back to1) before writing new data. - A RAM based key-value store (example shown below).
#include "kv_store.h"

#include <inttypes.h>
#include <stdbool.h>

typedef struct {
  char *key;
  void *val;
  uint32_t len;
} KvEntry;

static KvEntry s_kv_store[256];

bool kv_store_write(const char *key, const void *val, uint32_t len) {
  // Write key/value into RAM store
}

bool kv_store_read(const char *key, void *buf,
                   uint32_t buf_len, uint32_t *len_read) {
  // Read key/value from RAM store into buffer
}

bool kv_store_delete(const char *key) {
  // Delete key/value from RAM store
}
Mocks
Mocks are incredibly useful if you want to declare each and every return value of a given function. Using many mocks in a single unit test is also the easiest way to test every single code path of the module under test, as you can force any function to return error codes, NULL values, and invalid pointers.
These are the most powerful, provide the programmer the most control, and isolate the module under test the best, but they are also the most cumbersome and verbose to use, as every return value has to be pre-programmed.
Common mocking frameworks include:
- CppUMock
- CMock
- Fake Function Framework (fff) - Although the name suggests it generates fakes implementations, they are actually mocks
We are not going to cover examples of mocks and how to implement them (the topic is big enough for another post), but some pseudo code is shown below to give an understanding:
Learn more about mocks in our separate post, Unit Testing with Mocks.
TEST(TestKvStore, Test_InitMutexCreated) {
  // On the next call to `my_malloc`, return the value `NULL`.
  MOCK_my_malloc.return_value = NULL;

  // This calls `my_malloc` in its implementation.
  void *buf = allocate_buffer();

  // Ensure that `my_malloc` was called once and only once.
  LONGS_EQUAL(1, MOCK_my_malloc.call_count);
  // Ensure that the buffer returned was indeed `NULL` since `my_malloc` returned `NULL`.
  POINTERS_EQUAL(NULL, buf);
}
Examples:
- A malloc implementation that can be pre-programmed with return values (return real buffers vs NULL).
- A mock flash driver which returns error codes and forces different paths in a higher level module.
- A Bluetooth socket implementation which is fed artfully crafted packed data to instrument protocols.
Later in this post, we will go over how to set up CppUTest to run these examples by downloading the example code, as well as give some short instructions to how to set up your own project to run unit tests.
For now, the concepts are more important than the framework and process used to unit test firmware code.
Real World Unit Test Example
Let’s come up with a more complicated example which more accurately mirrors what
a developer on a firmware team would experience. This example uses a stub, a
fake, setup() and teardown() functions, and it also compiles littlefs in
its entirety, a filesystem by ARM designed for microcontrollers4.
Overview
We are tasked with writing a Key/Value storage module in a firmware project. The requirements are as follows:
- The module should have the ability to read, write, and delete key/value pairs.
- The backing data should be stored in
littlefs. - The number of times a key/value pair is read, written, or deleted is counted
using an
analytics.cmodule with a function call toanalytics_increment. This might be used to track roughly how often the flash chip is written to. - The module should be locked by a mutex so that only one consumer can be
writing, reading, or deleting from the
/kvdirectory oflittlefs.
In an ideal world, and in our realistic one as well, it is possible for us to write this entire module and test it without actually using real hardware.
Let’s get started!
Basic Implementation of Key/Value Store
Below is our first attempt at kv_store.c which is the skeleton of our file.
#include "kv_store.h"
#include <inttypes.h>
#include "lfs.h"

void kv_store_init(lfs_t *lfs) {
}

bool kv_store_write(const char *key, const void *val, uint32_t len) {
  return true;
}

bool kv_store_read(const char *key, void *buf,
                   uint32_t buf_len, uint32_t *len_read) {
  return true;
}

bool kv_store_delete(const char *key) {
  return true;
}
Believe it or not, we are ready to create a unit test to test that things are working. It’s usually easier to write a unit test earlier rather than later since the number of dependencies can grow out of hand quickly.
Below is a unit test which we mainly create to test compilation and the harness.
#include "CppUTest/TestHarness.h"

extern "C" {
  #include "kv_store/kv_store.h"
}

TEST_GROUP(TestKvStore) {
  void setup() {
  }

  void teardown() {
  }
};

TEST(TestKvStore, Test_SimpleKvStore) {
  // Just make sure that our file is hooked up
  LONGS_EQUAL(true, kv_store_read(NULL, NULL, 0, NULL));
}
Let’s run the test and see what prints!
$ cd complex/tests
$ make
compiling kv_store.c
Building archive build/kv_store/lib/libkv_store.a
Linking build/kv_store/kv_store_tests
Running build/kv_store/kv_store_tests
.
OK (1 tests, 1 ran, 1 checks, 0 ignored, 0 filtered out, 1 ms)
Looks like our test passes and we are ready to move onto a (more) realistic test.
Add littlefs Implementation
Our requirement was that our kv_store implementation must use littlefs to
store its data. At first, the task seems daunting! How are we supposed to write
to a filesystem that doesn’t exist on our host machine? Also, a filesystem is a
complicated piece of software!
Thankfully, littlefs includes an emulated version of its filesystem which
runs directly on a PC. These source files are under littlefs/emubd, and we can
add them to our unit test to make a fully functional littlefs filesystem. In
this example, we can imagine that the emubd portion of littlefs is a fake.
The strategy we use to store various key/value pairs is that each key will be
a new filename under the /kv directory, and the value will be written as the
file data.
Let’s try writing the source code!
#define SETTINGS_DIR "/kv"

static char s_fname[256];
static lfs_file_t s_file;
static lfs_t *s_lfs_ptr;

static const char *prv_prefix_fname(const char *key) {
  snprintf(s_fname, sizeof(s_fname), "%s/%s", SETTINGS_DIR, key);
  return s_fname;
}

void kv_store_init(lfs_t *lfs) {
  s_lfs_ptr = lfs;
  lfs_mkdir(s_lfs_ptr, "/kv");
}

bool kv_store_write(const char *key, const void *val, uint32_t len) {
  lfs_file_open(s_lfs_ptr, &s_file, prv_prefix_fname(key), LFS_O_WRONLY | LFS_O_CREAT);
  uint32_t rv = lfs_file_write(s_lfs_ptr, &s_file, val, len);
  lfs_file_close(s_lfs_ptr, &s_file);
  return (rv == len);
}

bool kv_store_read(const char *key, void *buf,
                   uint32_t buf_len, uint32_t *len_read) {
  int rv = lfs_file_open(s_lfs_ptr, &s_file, prv_prefix_fname(key), LFS_O_RDONLY);
  if (rv < 0) {
    return false;
  }

  uint32_t len = lfs_file_size(s_lfs_ptr, &s_file);
  if (buf_len < len) {
    return false;
  }

  len = lfs_file_read(s_lfs_ptr, &s_file, buf, buf_len);
  lfs_file_close(s_lfs_ptr, &s_file);
  *len_read = len;
  return len;
}

bool kv_store_delete(const char *key) {
  lfs_remove(s_lfs_ptr, prv_prefix_fname(key));
  return true;
}
This is a reasonable start for our module. It could use more error checking, but
the basics are there. Let’s test things out. One thing to note is that we’ll
have to add the source files for littlefs, so we add those in our Makefile as
shown below. If we try to run the unit test without adding the source files, we
run into linker errors telling us that symbols are missing.
$ make
Linking build/kv_store/kv_store_tests
Undefined symbols for architecture x86_64:
  "_lfs_file_close", referenced from:
      _kv_store_write in libkv_store.a(kv_store.o)
      _kv_store_read in libkv_store.a(kv_store.o)
  "_lfs_file_open", referenced from:
      _kv_store_write in libkv_store.a(kv_store.o)
      _kv_store_read in libkv_store.a(kv_store.o)
  ...
We can simply add these source files to our compilation and then all should be well. If these new files had dependencies of their own, we’d have to fix those linker errors as well.
COMPONENT_NAME=kv_store

SRC_FILES = \
  $(PROJECT_SRC_DIR)/littlefs/lfs.c \
  $(PROJECT_SRC_DIR)/littlefs/lfs_util.c \
  $(PROJECT_SRC_DIR)/littlefs/emubd/lfs_emubd.c \
  $(PROJECT_SRC_DIR)/kv_store/kv_store.c \

TEST_SRC_FILES = \
  $(UNITTEST_SRC_DIR)/test_kv_store.c

include $(CPPUTEST_MAKFILE_INFRA)
Add littlefs Initialization
Just because we got the files to compile in our unit test does not mean
littlefs will magically work. We need to initialize the filesystem and set up
and tear it down before and after each test respectively.
To learn how to do this, we can go to the existing littlefs tests directory
and take inspiration from the template and a basic file test, both linked below.
This ultimately results in the following changes necessary for the unit test file.
extern "C" {
  ...
  #include "lfs.h"
  #include "emubd/lfs_emubd.h"

  // Contains lfs, cfg, variables with default configuration.
  #include "defs/lfs_default_config.h"
}

TEST_GROUP(TestKvStore) {
  void setup() {
    lfs_emubd_create(&cfg, "blocks");
    lfs_format(&lfs, &cfg);
    lfs_mount(&lfs, &cfg);

    kv_store_init(&lfs);
  }

  void teardown() {
    lfs_emubd_destroy(&cfg);
    lfs_unmount(&lfs);
  }
};
The unit test will now, at the start of every test, create a directory called
blocks/, format and mount the filesystem there, and initialize the key/value
store, and at the end of the test, destroy and unmount the filesystem so the
next test starts with a clean environment.
Since we now have a filesystem backing our key/value store, we can write a simple test!
TEST(TestKvStore, Test_SimpleKvStore) {
  bool success;

  const char *key = "hello";
  const char *val = "world";
  success = kv_store_write(key,  (void *)val, sizeof(val));
  CHECK(success);

  char buf[16];
  uint32_t read_len;
  success = kv_store_read(key, buf, sizeof(buf), &read_len);
  CHECK(success);
  STRCMP_EQUAL(val, buf);

  // Buffer length too short. Should return false.
  success = kv_store_read(key, buf, 0, &read_len);
  CHECK_FALSE(success);
}
This test writes a key “hello” with the value “world”, reads the value stored at key “hello” into a buffer, and compares it against the expected value “world”.
We also check the failure case of kv_store_read by passing in a buffer that is
too small.
It passes! This means our littlefs was set up correctly, and that our initial
logic in kv_store.c was (mostly) correct.
Add Analytics
Our next requirement was to add analytics tracking how many times key/value
pairs were written, read, and deleted. We can do this by simply calling a
function analytics_inc which will increment the count of the given key by one.
The additions to our source code are shown below:
...
#include "analytics/analytics.h"

bool kv_store_write(const char *key, const void *val, uint32_t len) {
  ...
  analytics_inc(kSettingsFileWrite);
  return (rv == len);
}

bool kv_store_read(const char *key, void *buf,
                   uint32_t buf_len, uint32_t *len_read) {
  ...
  analytics_inc(kSettingsFileRead);
  return len;
}

bool kv_store_delete(const char *key) {
  ...
  analytics_inc(kSettingsFileDelete);
  return true;
}
If we run the test now, as usual, we will receive linker errors.
Linking build/kv_store/kv_store_tests
Undefined symbols for architecture x86_64:
  "_analytics_inc", referenced from:
      _kv_store_write in libkv_store.a(kv_store.o)
      _kv_store_read in libkv_store.a(kv_store.o)
      _kv_store_delete in libkv_store.a(kv_store.o)
Since this isn’t a core functionality of the kv_store module, and it’s likely
something we don’t need to verify, we are going to provide a stub for this
function, rather than use the real implementation or a fake.
We can do that by creating a header called stub_analytics.h
// Analytics Stub
#include "analytics/analytics.h"

void analytics_inc(eAnalyticsKey key) {
  return;
}
which we include in our unit test as shown below.
extern "C" {
  ...
  #include "stubs/stub_analytics.h"
}
Add Mutex Locking
Almost done! We’ve also been advised to add locking around our filesystem calls
to ensure that only one client can read and write to the /kv directory at one
time.
In our implementation, we add mutex_lock() and a mutex_unlock() at the start
of the function and just before the analytics_inc calls respectively.
#include "mutex/mutex.h"

static Mutex *s_mutex;

void kv_store_init(lfs_t *lfs) {
  ...
  s_mutex = mutex_create();
}

bool kv_store_write(const char *key, const void *val, uint32_t len) {
  mutex_lock(s_mutex); // New
  ...
  mutex_unlock(s_mutex); // New
  analytics_inc(kSettingsFileWrite);
  return (rv == len);
}

bool kv_store_read(const char *key, void *buf,
                   uint32_t buf_len, uint32_t *len_read) {
  mutex_lock(s_mutex); // New

  int rv = lfs_file_open(s_lfs_ptr, &s_file, prv_prefix_fname(key), LFS_O_RDONLY);
  if (rv < 0) {
    return false;
  }

  uint32_t len = lfs_file_size(s_lfs_ptr, &s_file);
  if (buf_len < len) {
    return false;
  }

  len = lfs_file_read(s_lfs_ptr, &s_file, buf, buf_len);
  lfs_file_close(s_lfs_ptr, &s_file);
  *len_read = len;

  mutex_unlock(s_mutex); // New
  analytics_inc(kSettingsFileRead);
  return true;
}

bool kv_store_delete(const char *key) {
  mutex_lock(s_mutex); // New
  ...
  mutex_unlock(s_mutex); // New
  analytics_inc(kSettingsFileDelete);
  return true;
}
If we run our test now, we’ll receive linker errors for the missing mutex_*
symbols. Since mutexes are rather important to this module, and we wouldn’t want
to forget to unlock a mutex, we are going to try writing a fake mutex
implementation instead of a stub.
Fake Mutex Implementation
The reason we chose to write a fake implementation for the mutex module is that
we want to ensure that equal number of lock and unlock calls are made so
that there are no bugs when we actually use the kv_store in a real
environment.
This may seem difficult, but it’s rather easy. To create a fake, we create two
files, fake_mutex.h, and fake_mutex.c. The reason for both the .h and .c
files is because the fake implementation defines new functions that are only
relevant to using the fake in a unit test.
Here is most of the source code for fake_mutex.c.
#define NUM_MUTEXES 256

typedef struct Mutex {
  uint8_t lock_count;
} Mutex;

static Mutex s_mutexes[NUM_MUTEXES];
static uint32_t s_mutex_index;

// Fake Helpers

void fake_mutex_init(void) {
  memset(s_mutexes, 0, sizeof(s_mutexes));
}

bool fake_mutex_all_unlocked(void) {
  for (int i = 0; i < NUM_MUTEXES; i++) {
    if (s_mutexes[i].lock_count > 0) {
      return false;
    }
  }
  return true;
}

// Implementation

Mutex *mutex_create(void) {
  assert(s_mutex_index < NUM_MUTEXES);
  return &s_mutexes[s_mutex_index++];
}

void mutex_lock(Mutex *mutex) {
  mutex->lock_count++;
}

void mutex_unlock(Mutex *mutex) {
  mutex->lock_count--;
}
Let’s go over what the fake is doing.
- We allocate a large number (256) of mutex slots. Since we are running our test on a host, large allocations are fine. We have gigabytes of RAM, unlike the limited embedded counterparts.
- We define a new
typedef struct Mutextype which only stores thelock_count. If the typeMutexwas properly hidden within a.cfile in the real implementation, this should work. -
fake_mutex_initresets the state of this module. This should be called in thesetup()function of every unit test using this module. Otherwise, the state will be carried over between tests, which isn’t desired. -
fake_mutex_all_unlockedensures that all mutexes are unlocked when called. We can call this manually or at the end of every test in theteardown()function. -
mutex_createallocates a slot for a new mutex in our array and returns this pointer to the client. Since the client only uses theMutex *as an opaque type, it shouldn’t matter that it’s a fakeMutex. -
mutex_lockandmutex_unlockincrement and decrement the lock count respectively.
Now we can use this fake in our unit test. After adding the source file to our compilation scripts, we make the follow changes to the unit test.
TEST_GROUP(TestKvStore) {
  void setup() {
    fake_mutex_init();
    ...
  }

  void teardown() {
    ...
    CHECK(fake_mutex_all_unlocked());
  }
};
If we run our code above with the naive top/bottom mutex additions, we realize
quickly that we have a mistake. Our fake_mutex_all_unlocked check failed!
complex/tests/src/test_kv_store.cpp:42: error:
  Failure in TEST(TestKvStore, Test_SimpleKvStore)
complex/tests/src/test_kv_store.cpp:38: error:
  CHECK(fake_mutex_all_unlocked()) failed

.
Errors (1 failures, 1 tests, 1 ran, 5 checks, 0 ignored, 0 filtered out, 8 ms)
Looking back, hopefully the issue is obvious. We forgot to unlock on our failure
cases within kv_store_read. The follow change is necessary:
if (rv < 0) {
    mutex_unlock(s_mutex);  // ADD
    return false;
  }

  uint32_t len = lfs_file_size(s_lfs_ptr, &s_file);
  if (buf_len < len) {
    mutex_unlock(s_mutex);  // ADD
    return false;
  }
Thankfully we wrote and used our fake mutex implementation, as deadlocks are the worst to debug!
If you do find that deadlocks are a constant issue, do check out Memfault. It will help you track them down easily.
Setting Up CppUTest
CppUTest is one of many C/C++ unit test frameworks, and the reason it was chosen is because of my familiarity with it and that it doesn’t have any dependencies other than Make.
No matter what anyone says, the framework you use does not matter. As long as the framework has the minimum features listed above, it is as good as any.
Initial Setup
We first need to install a pre-compiled version of CppUTest so we can easily run tests without needing to compile the binary ourselves from source before every test run. The easiest way to do this is to use your system’s package manager.
On macOS, CppUTest can be installed using brew:
$ brew install cpputest
On Ubuntu, it can be installed using apt:
$ sudo apt install cpputest
Project CppUTest Harness
Since it is a decent amount of boilerplate due to the CppUTest harness setup required, this example will start with a clone of the example repository and then go over the components within it, briefly covering the CppUTest Makefiles.
Feel free to use the code in any way you like, and even copy it into your project. It should build quite easily once some paths are patched up.
$ git clone https://github.com/memfault/interrupt.git
$ cd interrput/examples/unit-testing/minimal/tests

# macOS
$ make

# Ubuntu
$ make CPPUTEST_HOME=/usr TARGET_PLATFORM=x86_64-linux-gnu

compiling test_my_sum.cpp
compiling AllTests.cpp
...
Linking build/sum/sum_tests
Running build/sum/sum_tests
.
OK (1 tests, 1 ran, 1 checks, 0 ignored, 0 filtered out, 1 ms)
To set CPPUTEST_HOME and TARGET_PLATFORM for your platform, edit the first few
lines of MarkefileWorkerOverrides.mk.
CPPUTEST_HOME ?= /usr/local/Cellar/cpputest/3.8
TARGET_PLATFORM ?=
Tips & Tricks
Debugging a Unit Test
Most unit test frameworks will generate separate binaries for each .cpp unit
test file written so that you can load them in a debugger (lldb or gdb).
$ lldb build/sum/sum_tests
(lldb) target create "build/sum/sum_tests"
Current executable set to 'build/sum/sum_tests' (x86_64).
(lldb) run
Process 257894 launched: 'build/sum/sum_tests' (x86_64)
.
OK (1 tests, 1 ran, 1 checks, 0 ignored, 0 filtered out, 0 ms)

Process 257894 exited with status = 0 (0x00000000)
Code Coverage
One of the wonderful parts about unit testing is that you can generate a code coverage report. This shows which paths were covered in a given set of unit tests, so you can be sure that the piece of code was tested in some capacity. Note that code coverage doesn’t measure the different behaviors a code path could take, but only that a particular code path was taken.
To generate a coverage report for our minimal example, let’s first install lcov.
# macOS
$ brew install lcov

# Linux
$ sudo apt install lcov
Next, we’ll run our unit tests while testing for coverage.
$ make lcov
make -f minimal/tests/makefiles/Makefile_sum.mk
make[1]: Entering directory 'minimal/tests'
Running build/sum/sum_tests
.
OK (1 tests, 1 ran, 1 checks, 0 ignored, 0 filtered out, 0 ms)
make[1]: Leaving directory 'minimal/tests'
lcov --base-directory . --directory . -c -o build/lcov.info --exclude "*cpputest/*" --exclude "*tests/*"
...
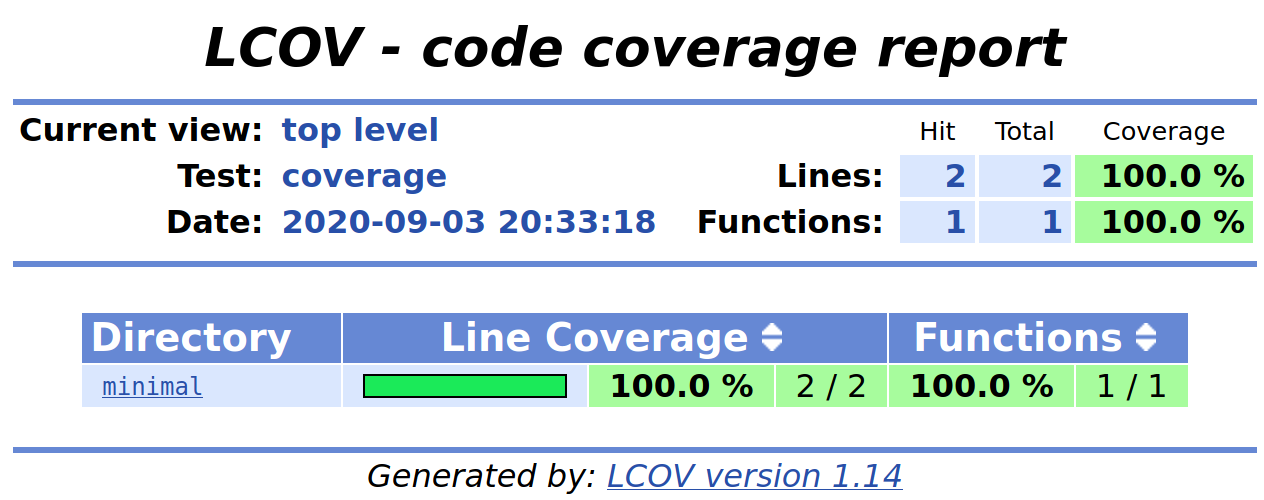
Overall coverage rate:
lines......: 100.0% (2 of 2 lines)
functions..: 100.0% (1 of 1 function)
You can see the very end reports a simple coverage report in the terminal, but a more detailed report can be found in the HTML website that was generated. We can open it from the terminal:
# macOS
$ open build/test_coverage/index.html

# Linux
$ firefox build/test_coverage/index.html
Below is the coverage report for our minimal example. It’s quite basic because there isn’t much code being tested.
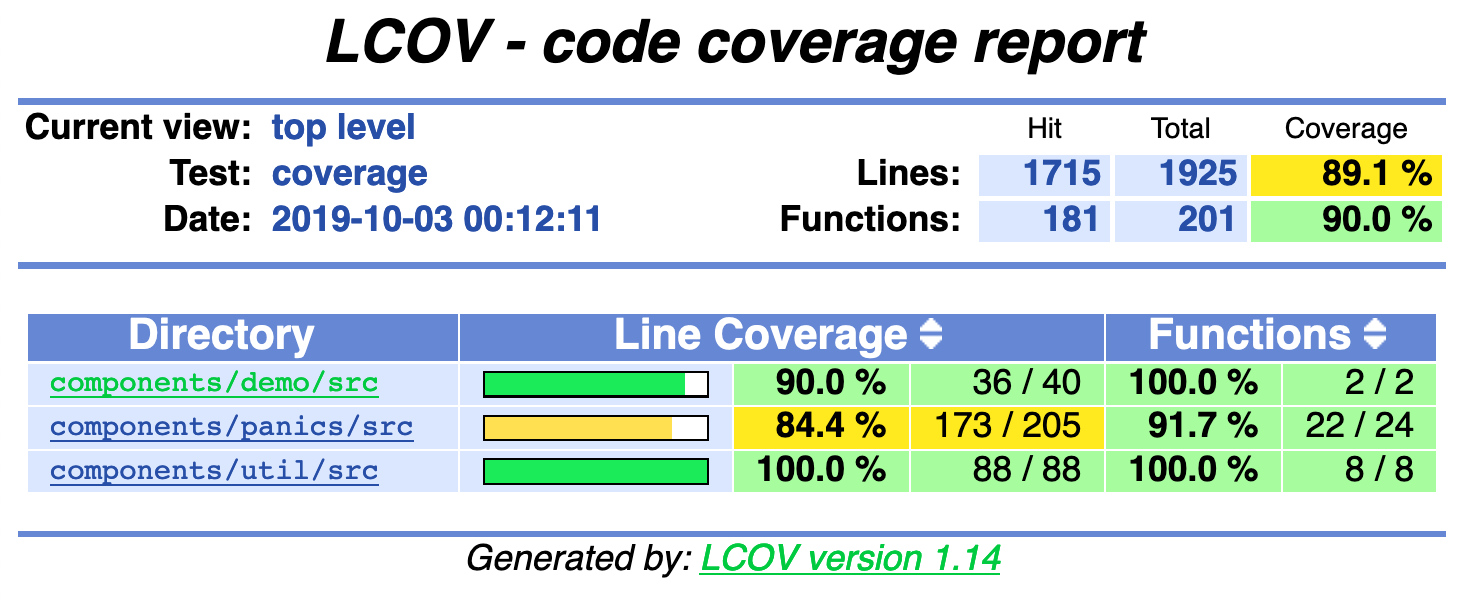
Below is a more realistic report from the Memfault Public SDK5.
Address Sanitizing
To raise use-after-free and buffer overflow errors in unit tests, use the
compiler option -fsanitize=address when compiling unit tests.
You can find out more about the Address Sanitizer by reading the documentation6.
Common Issues with C/C++ Unit Tests
Writing unit tests in C isn’t as simple as writing tests in some languages. Here are some common errors and mistakes that everyone runs into and possible solutions.
Linker Error: Symbol not found
Linking build/kv_store/kv_store_tests
Undefined symbols for architecture x86_64:
  "_analytics_inc", referenced from:
      _kv_store_write in libkv_store.a(kv_store.o)
      _kv_store_read in libkv_store.a(kv_store.o)
      _kv_store_delete in libkv_store.a(kv_store.o)
ld: symbol(s) not found for architecture x86_64
This error is generated by the linker to tell the user that there are undefined
symbols. In the example above, the function analytics_inc is called from three
different functions, but isn’t defined anywhere.
The possible solutions to the issue are:
- Create a fake, stub, or mock file which implements this function and add it either to the headers or compile it into the library
- Define the function within the unit test file itself, probably at the top of
the file. If it is a C function being called by C code, place it within the
extern "C" {}section. - As a last resort, one can compile out the function calls and implementations
using a define for unit tests. e.g.
#if !INSIDE_UNITTESTS
Linker Error: Duplicate symbol
Linking build/kv_store/kv_store_tests
duplicate symbol '_mutex_create' in:
    build/kv_store/objs/complex/tests/src/test_kv_store.o
    build/kv_store/lib/libkv_store.a(fake_mutex.o)
ld: 1 duplicate symbol for architecture x86_64
This error is generated by the linker when more than one implementation of a function is found and used. This is usually because more than one of the following were included in the unit test: real implementation, fake, stub, or mock.
In the example above, I had included a fake_mutex.c file and included the
stub_mutex.h header, which caused a duplicate mutex_create symbol. The
solution would be to remove one or the other.
State carrying over between tests
If there is a fake or module which contains static or global state, and it is being used across multiple tests in a single file, then that state ideally should be cleared out. This is usually done by:
- Defining a
fake_<module>_resetif the module is a fake. - Defining a
<module>_deinitif the module is a real one that is used in production code. Make sure to compile this function out of the production code by using#if !INSIDE_UNITTESTS, or ensuring the linker removes it from the final binary. Code space is precious!
Final Thoughts
Unit testing was something that a co-worker of mine suggested to me 4 years ago when writing a complicated raw flash storage to filesystem migration for our firmware. After having spent a month doing cycling between the 1. Write Code, 2. Setup hardware, 3. Test, which took 10 minutes each iteration, I invested 2 days writing a unit test and was able to shrink the test cycle down to 2 seconds. The rest of the project took two days.
Everyone has a moment where unit testing finally clicks for them and this was mine.
I hope this post has been useful and that it has inspired you to consider writing a unit test for your next new embedded software module.
Want to keep reading? Check out our next post about unit testing, Unit Testing with Mocks.
You can find the examples shown in this post here.
Reference & Links
See anything you'd like to change? Submit a pull request or open an issue on our GitHub
 Tyler Hoffman has worked on the embedded software teams at Pebble and Fitbit. He is now a founder at Memfault.