Building Better Firmware with Continuous Integration
Larger firmware projects sometimes have tens, even hundreds of engineers working in a single code base. This introduces new challenges: builds break, lesser used features get forgotten about, new features miss support for older hardware platforms. Without solid tooling and processes, this can slow development to a grind.
In the software world, the established solution is Continuous Integration. A hallmark of engineering at large tech companies like Facebook and Google, continuous integration has found its way into firmware projects1.
In this post, we introduce Continuous Integration as a modern technique to allow larger teams to move fast without breaking things. We’ll explain what Continuous Integration is, why you may want to use it, and walk you through setting up CircleCI on a firmware project step by step.
This is the first post in our Building Better Firmware series. Future posts will cover testing techniques, test driven development, fuzzing, and continuous deployment.
Table of Contents
What is Continuous Integration?
Strictly speaking, Continuous Integration is the practice of regularly integrating code into a mainline repository. In other words: merging your work into master as often as possible.
To achieve Continuous Integration, teams rely on a well established set of techniques:
-
Revision Control: Continuous Integration depends on a solid Version Control System. Nowadays, it often is a git repository, but mercurial (hg), perforce, or SVN are fine options.
-
Automated Builds: If anything, a project must compile. This is often easier said than done! As the set of build configurations grows, running through each of them can be both time consuming, and error prone. Builds must therefore be automated.
-
Automated Tests: Engineers do not always anticipate the impact their change can have on other part of the codebase. As the pace of changes increase, testing everything manually becomes intractable and automated tests must be put in place.
These techniques have become synonymous with Continuous Integration, as they are universally implemented by teams who want to integrate code regularly. In this blog post, we use Continuous Integration, or “CI” to mean the use of these techniques to integrate code on an ongoing basis.
Why Continuous Integration
Continuous Integration requires efforts, rigor, and infrastructure. It can even be very expensive! So why do it at all? In my opinion, there is a scale at which there are no alternatives.
First and foremost, CI enforces the level of discipline required to keep a codebase working at scale. As complexity and velocity grow:
- Finding when and where an issue was introduced gets more difficult
- Side effects are less well understood, making it more likely that a change in one part of the codebase will break a feature in another.
- Testing every feature and hardware configuration takes more and more time.
Additionally, CI infrastructure serves as a reference environment which can be used to reproduce builds and generate shipping images. No more “it works on my machine”. If it fails in CI, it must be considered broken.
Continuous Integration Systems
Many tools exist today that can be used to implement Continuous Integration. You may have heard of Jenkins, a popular open source tool, but many others exist: TravisCI, CircleCI, TeamCity, Bamboo, Build Bot, …
Fundamentally, continuous integration systems all do roughly the same thing:
- Monitor your repository for changesets (either pull requests, or merges)
- For each changeset, execute a set of build & test steps
- Report the success or failure of build & test steps
- Save the resulting artifacts (e.g. firmware binary) for future use
A good continuous integration system for firmware development should have the following features:
-
Windows support: many firmware engineers work on Windows, so it is important that this platform be supported by your CI system.
-
Configuration-as-code: the build and test steps should be declared in files checked-in alongside your code. Imagine the case where multiple branches require slightly different build instructions: a build system that saves configuration in a database separate from the code would not be able to build every branch.
-
A hosted solution: so you don’t have to set up and maintain your own servers, with the ability to go on-premise in the future.
-
VCS Integration
At Memfault, we use CircleCI2 for continuous integration. It ticks all 4 of the above requirements, has a generous free plan, and in our limited testing runs much faster than the competition.
Setting up CircleCI for a Firmware project
Are you convinced you need a CI system? Let me walk you through setting up CircleCI to build and test your firmware project.
Setting the stage
We will be using the ChibiOS project as our example. ChibiOS is an open source real time operating system available for a wide range of microcontrollers. More specifically, we will be using one of the example projects contained within the ChibiOS project: FATFS + USB Example on STM32F103.
Before we go and set up CI, we must make sure we can build the project locally.
# Clone the project
$ git clone https://github.com/ChibiOS/ChibiOS
# Extract dependencies
$ cd ChibiOS/ext
$ 7za x fatfs-0.13c_patched.7z
# Build the example
$ cd ../demos/STM32/RT-STM32F103-STM3210E_EVAL-FATFS-USB
$ make -j
Which should give us:
[...]
Linking build/ch.elf
Creating build/ch.hex
Creating build/ch.bin
Creating build/ch.dmp

   text	   data	    bss	    dec	    hex	filename
  50450	    228	  98072	 148750	  2450e	build/ch.elf
Creating build/ch.list

Done
Note:
7zais the command line utility for 7zip, which is available for all platforms.
We need administrative access to the project on Github to setup CI on it, so you’ll want to fork the ChibiOS repository under your profile or organization. You can find our fork at https://github.com/memfault/ChibiOS.
Creating a CircleCI Project
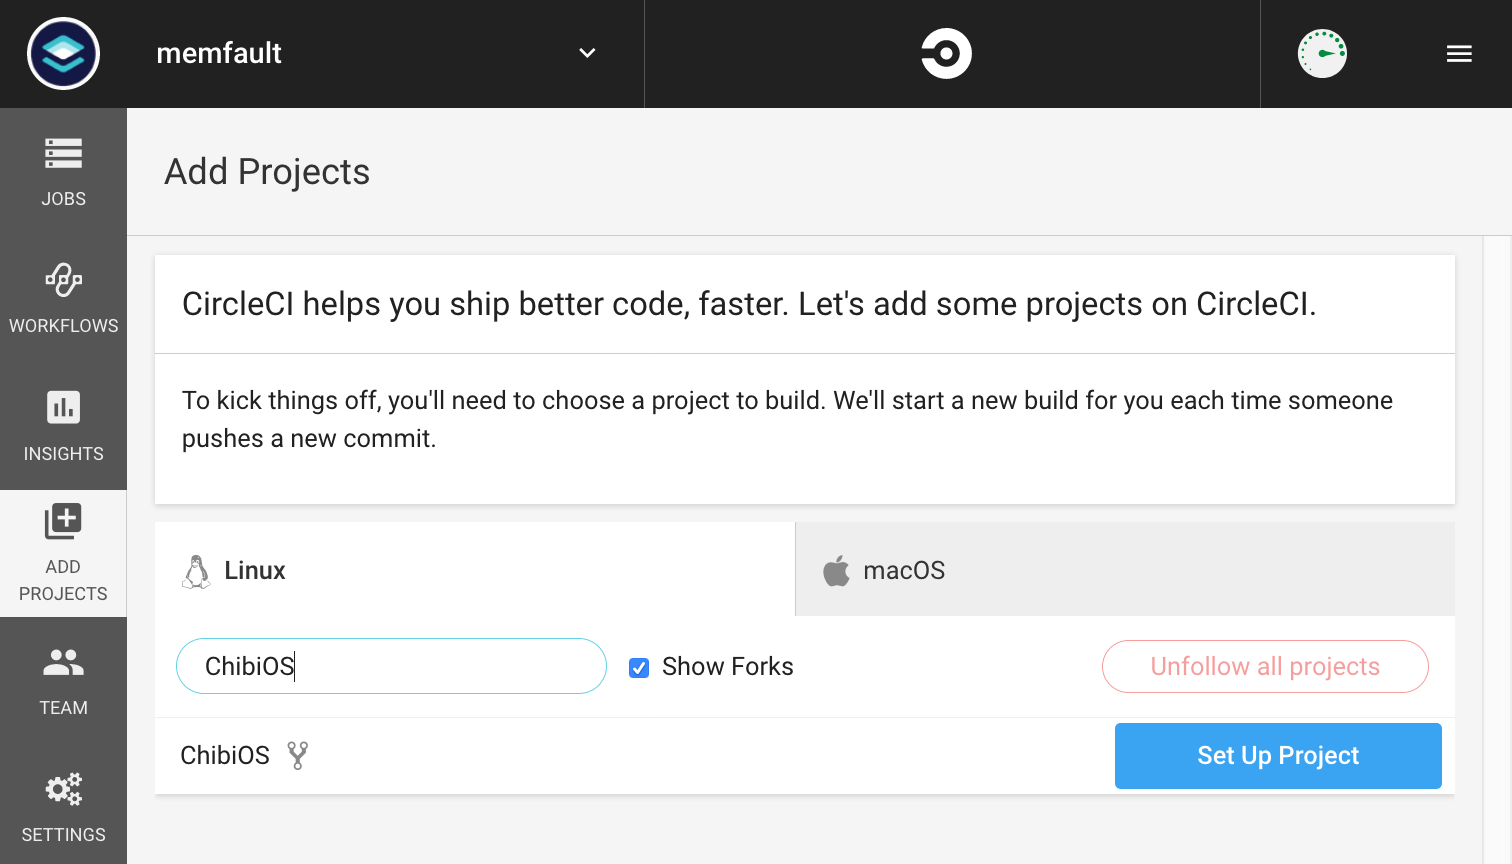
We’re now ready to set up CircleCI. Head to https://circleci.com, create an account, select “Add Projects” in the sidebar, and search for your ChibiOS repository.
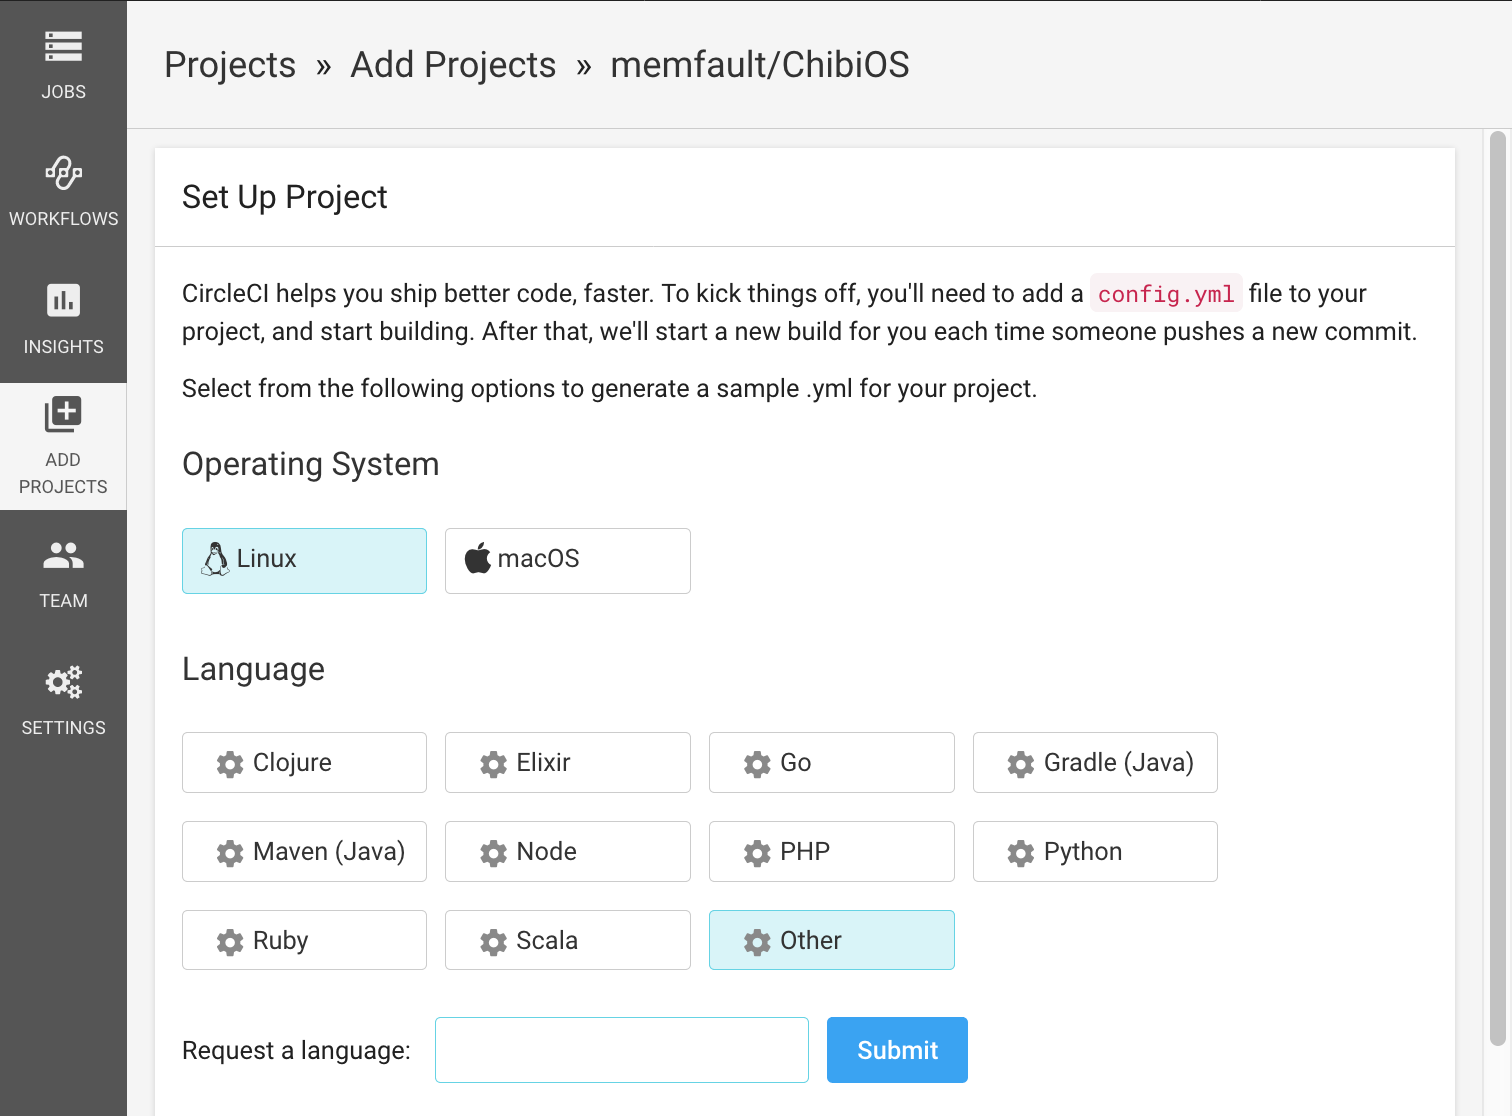
Click “Set Up Project” and follow the instructions. ChibiOS is a C project with robust tooling to build it on Linux, so we recommend you select “Linux” as the operating system, and “Other” as the language.
CircleCI Hello World
Now that we have a project set up, we need to tell our CI system how to build and test our firmware. In Circle CI this is done by defining a set of Steps, Jobs, and Workflows.
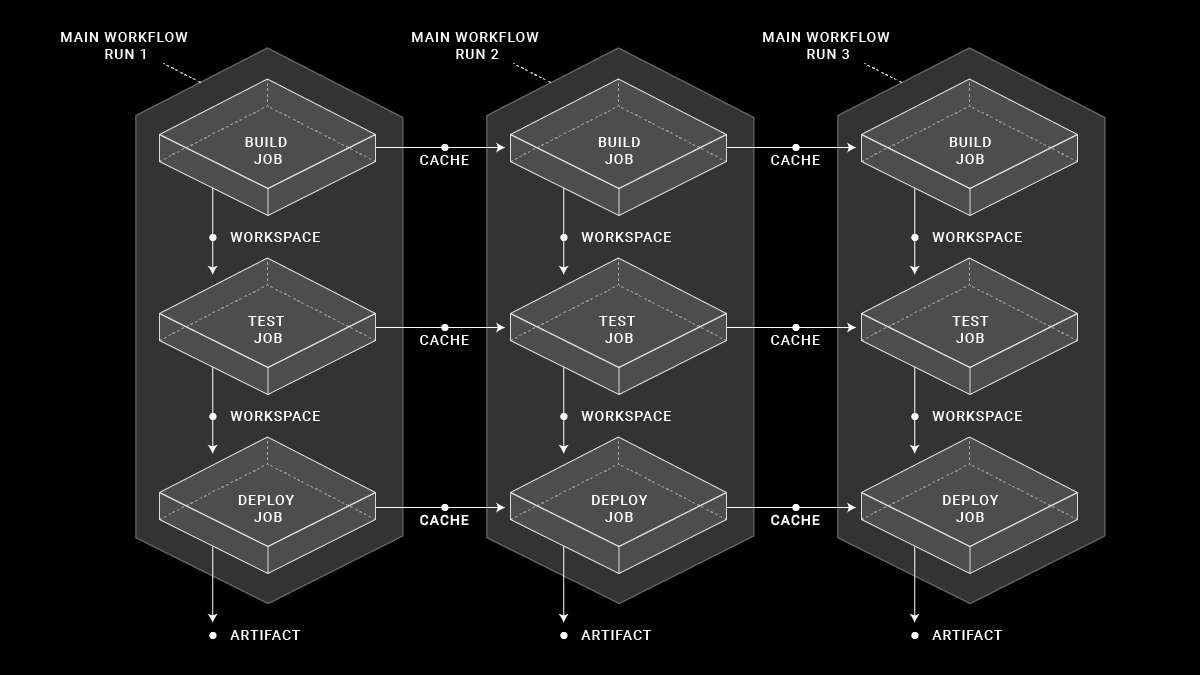
Simply stated, a Step is a single command to be run as part of your build and test process. It is the unit of work of our CI system. A Job is a collection of steps executed sequentially in a specific environment. A Workflow is a collection of jobs executed either sequentially or in parallel based on more complex logic.
You can read more about Steps, Jobs, and Workflows in CircleCI’s documentation3
For our hello world example, we will have a single job, with the following steps:
- Check out the code repository
- Print “Hello, world”
- Print the current date and time
This is a trivial thing to do with a bash script:
$ git clone git@github.com:memfault/ChibiOS.git
$ git checkout <commit-to-build>
$ echo Hello, world
$ date
Circle CI doesn’t use bash scripts, but instead defines steps, jobs, and
workflows via a custom YAML file which should be placed at the root of your
repository under .circleci/config.yml.
The subset of the syntax we’ll need here is pretty simple:
version: 2
jobs:
  <job>:
    <environment>
    steps:
      - run:
          name: <name>
          command: <shell command>
      - run:
          name: <name>
          command: <shell command>
  <job>:
  ...
We can fill our steps by simply copying the commands from our bash script
version: 2
jobs:
  build:
    <environment>
    steps:
      - run:
          name: clone
          command: git clone git@github.com:memfault/ChibiOS.git

      - run:
          name: checkout
          command: git checkout <revision>

      - run:
          name: Greeting
          command: echo Hello, world.

      - run:
          name: Print the Current Time
          command: date
You will note that we need to know what revision to build in order to run this
script. Rather than use a variable, CircleCI has a built-in step called
checkout4 you can use which automatically does the right thing:
version: 2
jobs:
  build:
    <environment>

    steps:
      - checkout

      - run:
          name: Greeting
          command: echo Hello, world.

      - run:
          name: Print the Current Time
          command: date
All that is left is setting the environment. This section defines what system
image is used to run your job. The simplest thing to do here is to set a Docker
image from the Docker Registry as your base image. Any Docker image will do, in
this case we will use the latest Debian image: debian:stretch.
Our hello world example is now complete:
version: 2
jobs:
  build:
    docker:
      - image: debian:stretch

    steps:
      - checkout

      - run:
          name: Greeting
          command: echo Hello, world.

      - run:
          name: Print the Current Time
          command: date
Save this file in your repository as .circleci/config.yml, and push it:
$ git commit -m 'Add sample .yml CircleCI file'
[master c347b244e] Add sample .yml CircleCI file
 1 file changed, 16 insertions(+)
 create mode 100644 .circleci/config.yml

$ git push memfault master
Enumerating objects: 5, done.
Counting objects: 100% (5/5), done.
Delta compression using up to 8 threads
Compressing objects: 100% (3/3), done.
Writing objects: 100% (4/4), 473 bytes | 473.00 KiB/s, done.
Total 4 (delta 1), reused 0 (delta 0)
remote: Resolving deltas: 100% (1/1), completed with 1 local object.
To github.com:memfault/ChibiOS.git
   fd444de36..c347b244e  master -> master
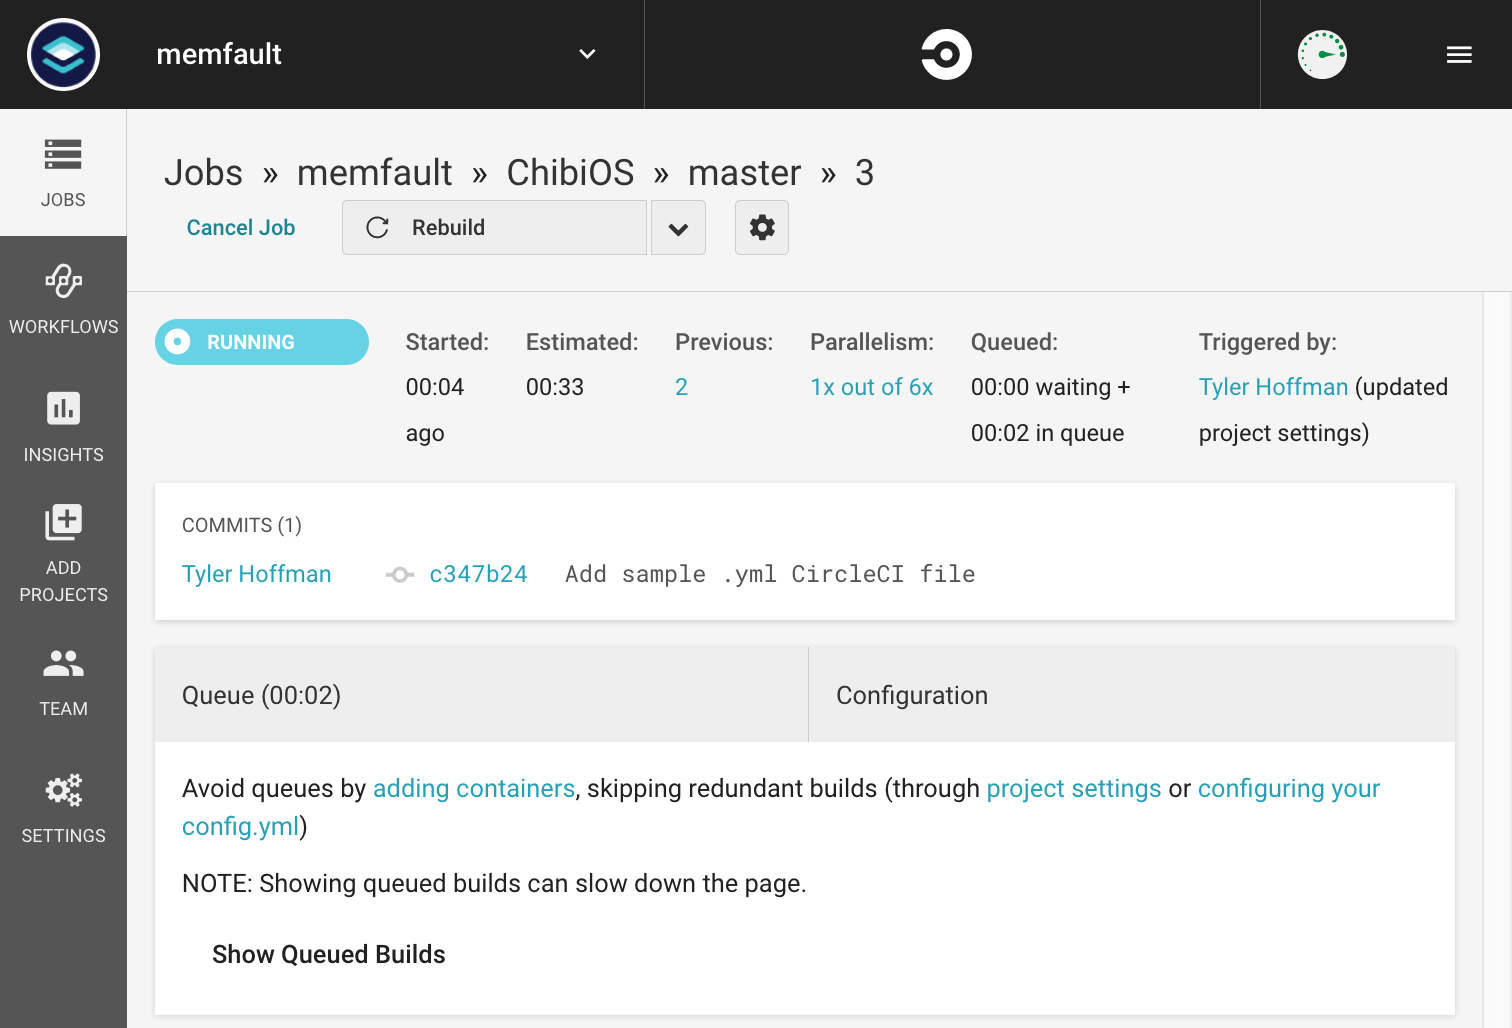
Now head to https://circleci.com and observe that a new job has started:
Wait a bit, and you can look at the build result:
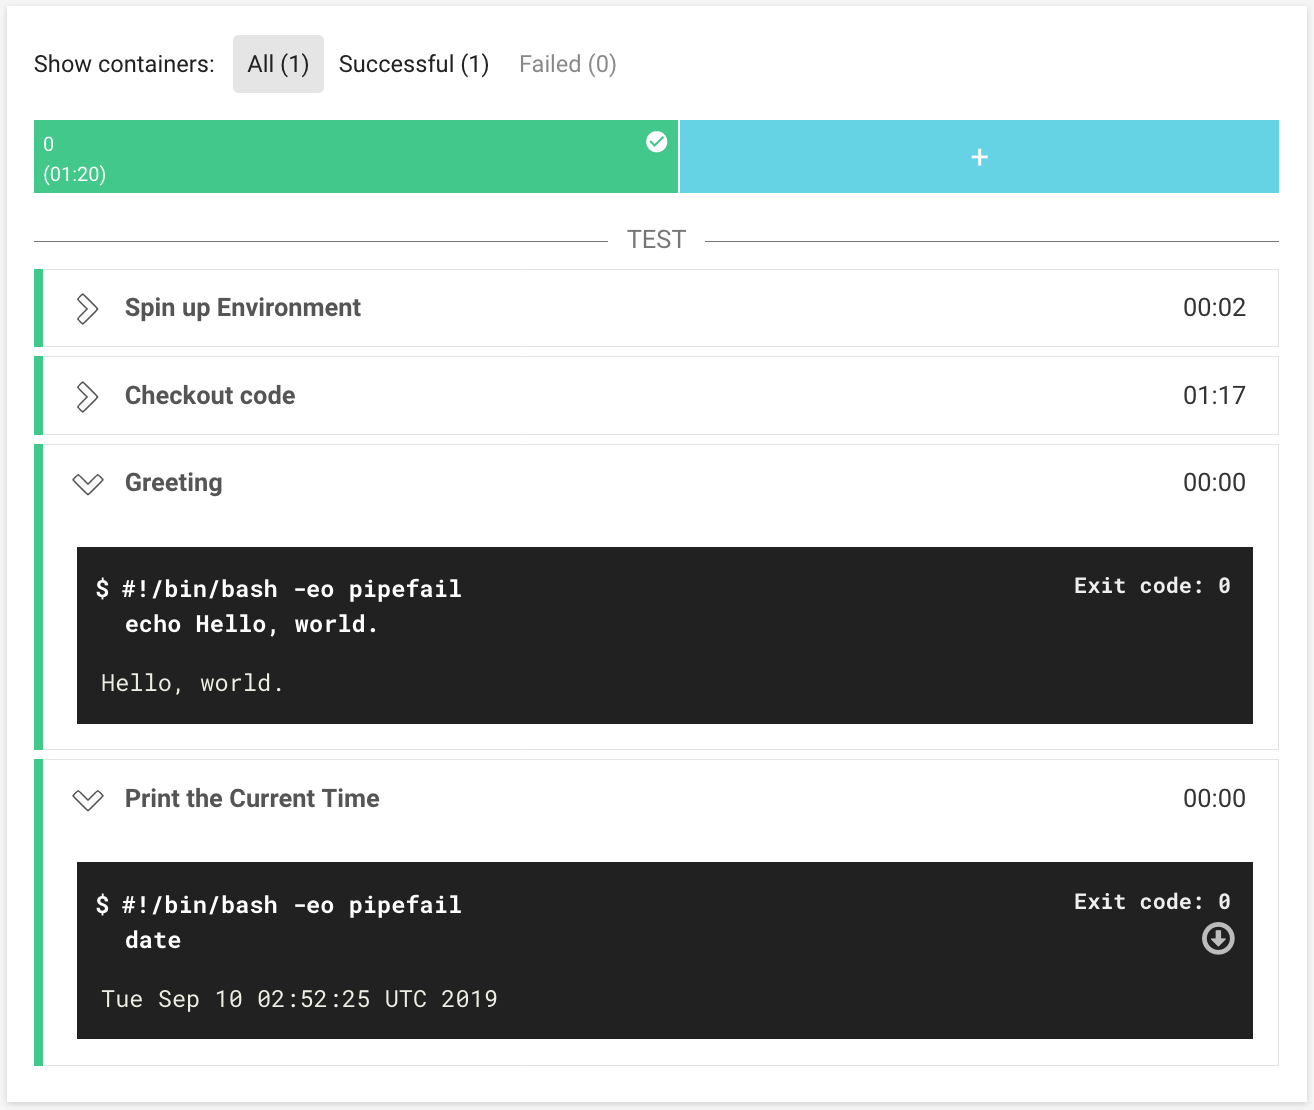
You should see the output of your two commands, and a successful result.
Testing CircleCI Configs Locally
When adding to a Circle CI config, it’s often useful to test things out locally. This can easily be done using command line tool5. For example:
$ brew install circleci
# Check for syntax errors in the config.yml file
$ circleci config validate
# Run a the config in a local Docker instance
$ circleci local execute
Automated Builds
Our hello world job is instructive, but not all that useful. Let’s modify it to compile our project.
First, we must choose an environment. The debian:stretch image is very bare
bones, so to avoid having to install many common packages, we instead use the
circleci/python:3.6.9-stretch image which comes with batteries included.
Next, we’ll want to install some firmware specific tools such as our compiler. This is easily done with a Step.
- run:
    name: Install apt dependencies
    command: sudo apt install p7zip-full gcc-arm-none-eabi binutils-arm-none-eabi
Note: once your build system stabilizes, you’ll likely want to set up your own docker images with your compiler pre-installed so you do not have to incur the cost of download + installation on every build. For now, this is good enough.
Next, we run the compilation steps we’ve previously tested locally.
- run:
    name: Build Demo
    command: |
      cd ext
      7za x fatfs-0.13c_patched.7z
      cd ../demos/STM32/RT-STM32F103-STM3210E_EVAL-FATFS-USB
      make
Last but not least, we want to stash the resulting elf file so we can download it later. This is especially useful if you want to test a previous build of your codebase without having to recompile it yourself.
CircleCI provides another Step type to do just this: store_artifact. It is
very simple to use:
- store_artifacts:
    path: ./demos/STM32/RT-STM32F103-STM3210E_EVAL-FATFS-USB/build/ch.elf
You can download artifacts via the CircleCI on each build’s page, or via their API. More information can be found in their documentation6
Put together, this is the .circleci/config.yml file we end up with:
version: 2
jobs:
  build:
    docker:
      - image: circleci/python:3.6.9-stretch
    steps:
      - checkout
      - run:
          name: Install apt packages
          command: 'sudo apt install p7zip-full gcc-arm-none-eabi binutils-arm-none-eabi'
      - run:
          name: Build Demo
          command: |
            cd ext
            7za x fatfs-0.13c_patched.7z
            cd ../demos/STM32/RT-STM32F103-STM3210E_EVAL-FATFS-USB
            make
      - store_artifacts:
          path: ./demos/STM32/RT-STM32F103-STM3210E_EVAL-FATFS-USB/build/ch.elf
Let’s commit this change in a branch, and open a pull request.
$ git checkout -b circleci/auto-build
$ git add .circleci/config.yml
$ git commit -m "Add automated build to circleci config"
$ git push -u origin circleci/auto-build
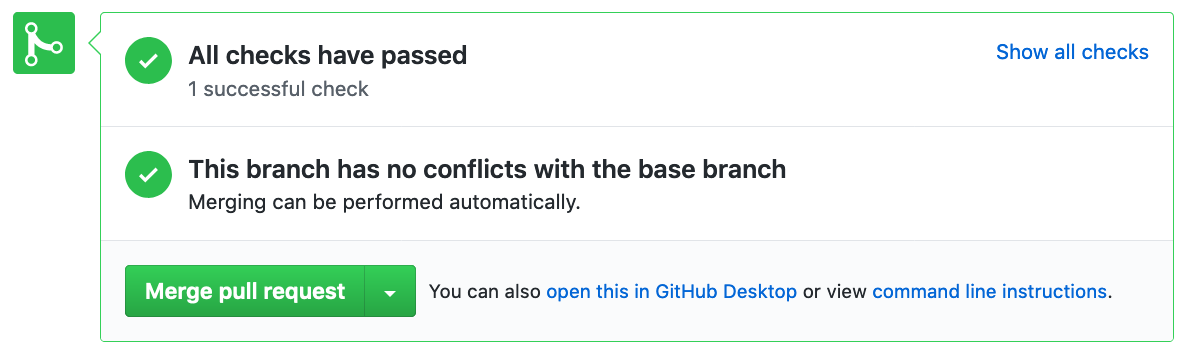
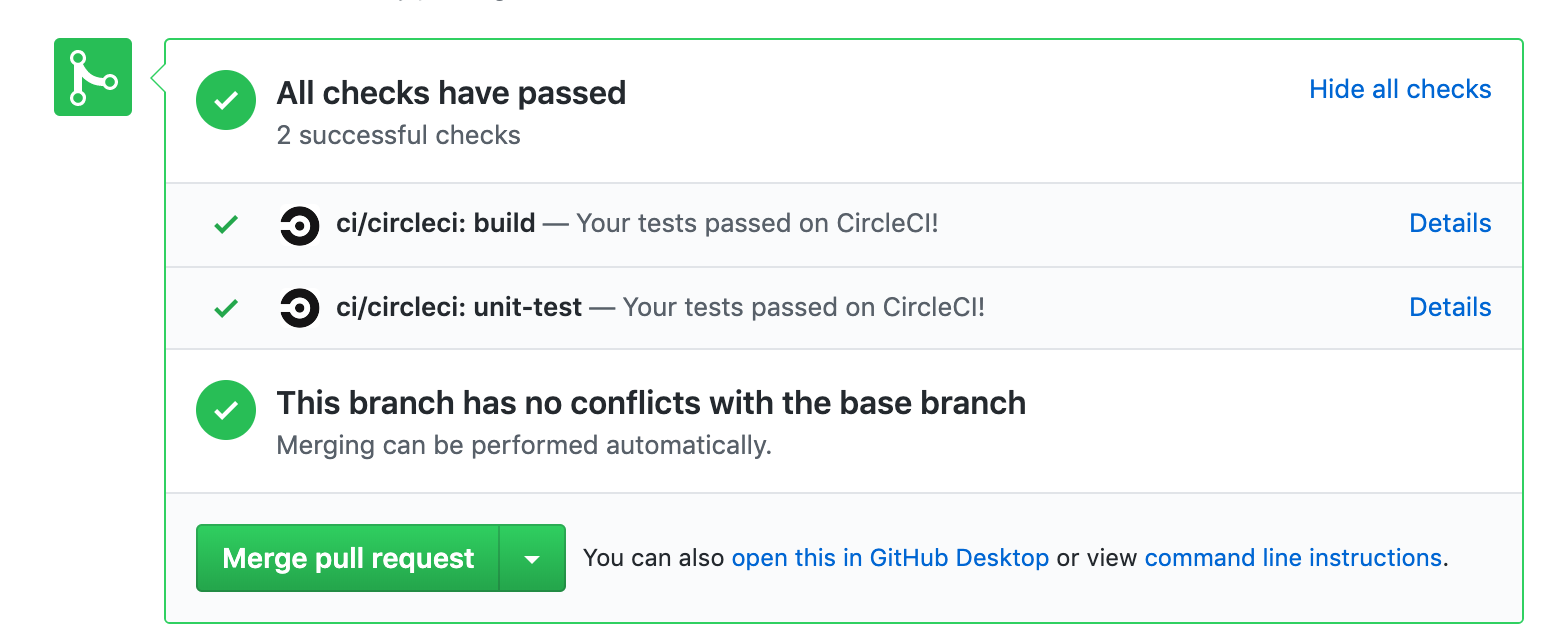
CircleCI will notice the pull request, pick up the new config.yml file and
start running our build. If all goes well, we will see “All checks have passed”
in Github:
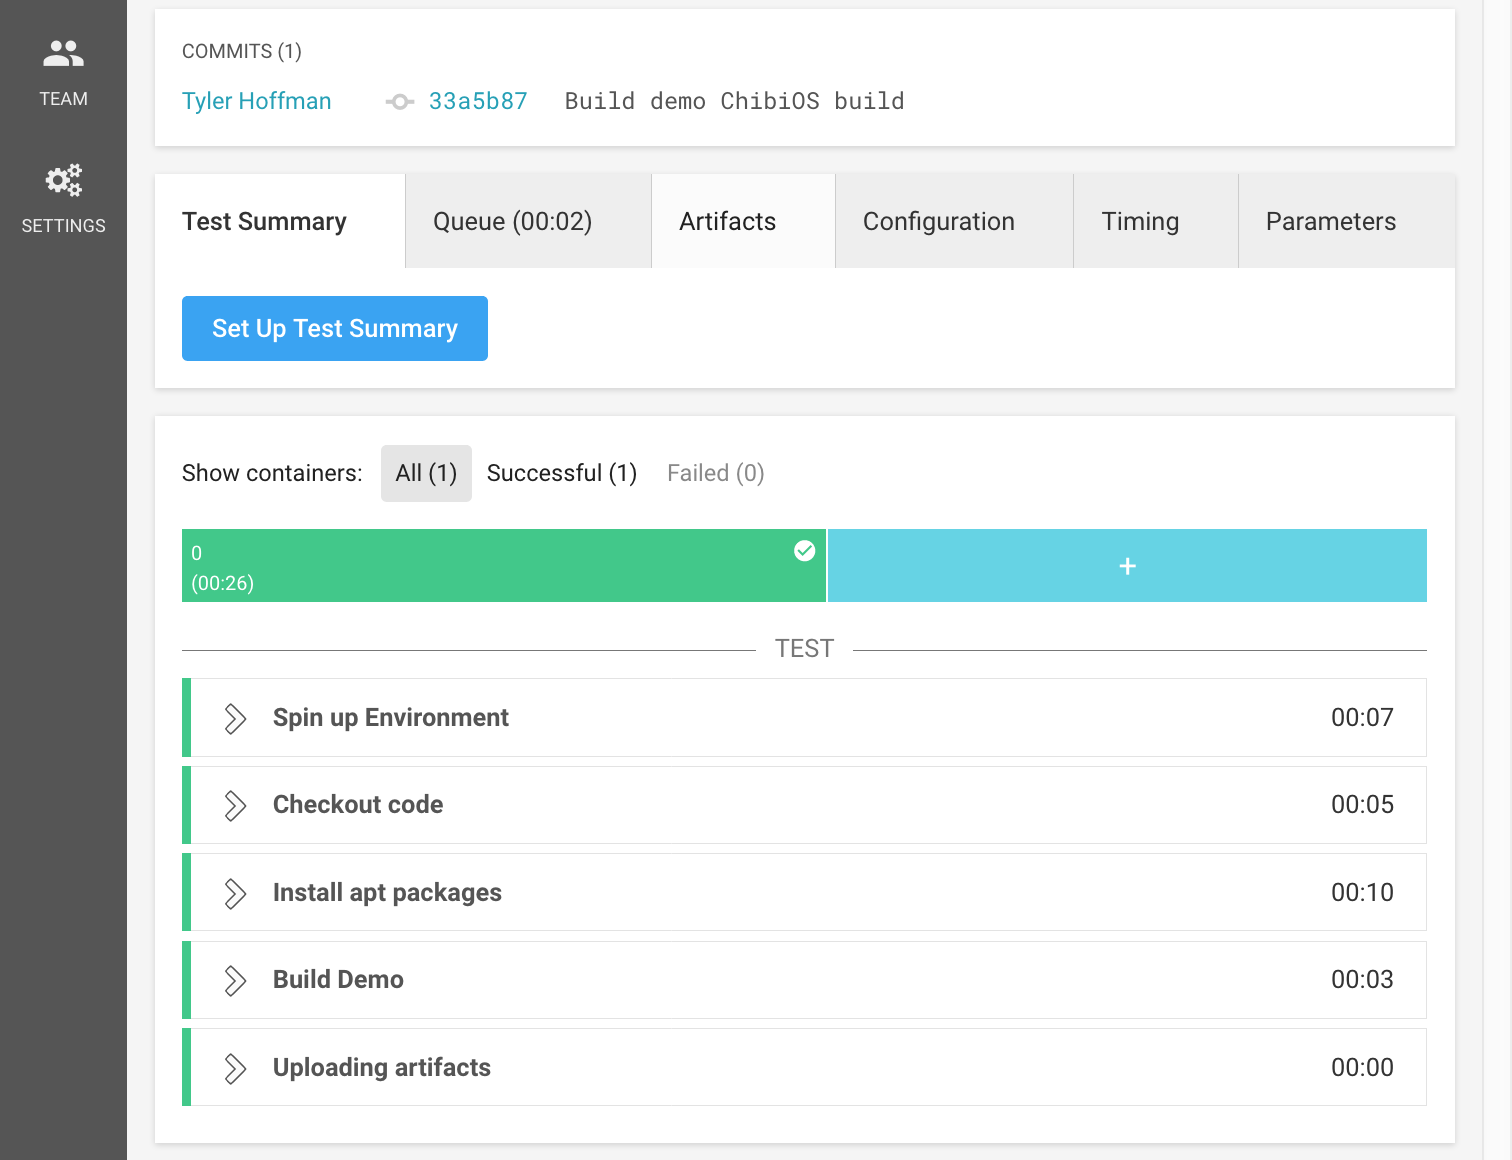
Clicking through the check information in GitHub links us back to our CircleCI job page:
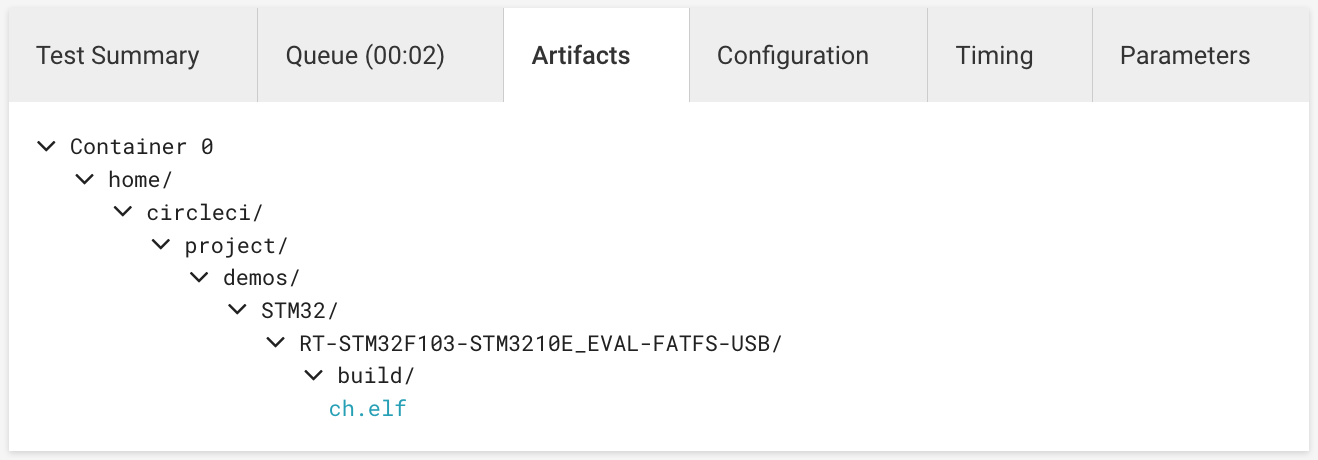
Where we can now find our artifacts!
Automated Tests
While setting test hardware that communicates with CircleCI is difficult, there is much you can do by cross-compiling your code to x86, or by running your code in simulation. ChibiOS comes with all of the above, so let’s add them to our CircleCI configuration!
Unit Testing on x86
A common technique to test code without hardware in the loop is to cross compile it to x86 and execute it on a host machine. This will not achieve 100% coverage, as some low level behavior is impossible to duplicate, but is meaningful nonetheless.
Consider an implementation of inet_addr which parses an IP address from a
string into 4 bytes. You could reasonably test your code on x86 with a simple
main file:
/* test_inet_addr.c */
#include <assert.h>

int main(int argc, char **argv) {
    in_addr_t addr;
    addr = inet_addr("0.0.0.0");
    assert(addr.s_addr == 0);
    addr = inet_addr("0.0.0.1");
    assert(addr.s_addr == 1);
  // ... etc.
}
Building this file alongside your inet_addr implementation with GCC and running it on a POSIX host will effectively exercise your code.
ChibiOS comes with many such tests. For example, the RT kernel tests can be found under ChibiOS/test/rt. Running them is simple:
~/ChibiOS $ cd test/rt/testbuild
~/ChibiOS/test/rt/testbuild $ make
[...]
Compiling oslib_test_sequence_006.c
Compiling oslib_test_sequence_007.c
Compiling main.c
Linking build/ch
~/ChibiOS/test/rt/testbuild $ ./build/ch
[...]
----------------------------------------------------------------------------
--- Test Case 6.5 (Dynamic Objects FIFOs Factory)
--- Result: SUCCESS
----------------------------------------------------------------------------
--- Test Case 6.6 (Dynamic Pipes Factory)
--- Result: SUCCESS
----------------------------------------------------------------------------

Final result: SUCCESS
Let’s add the as a new job in CircleCI:
version: 2
jobs:
  build:
    # Unchanged
    [...]

  unit-test:
    docker:
      - image: circleci/python:3.6.9-stretch
    steps:
      - checkout
      - run:
          name: Install apt packages
          command: 'sudo apt install libc6-dev-i386'
      - run:
          name: Build Unit Tests
          command: |
              cd test/rt/testbuild
              make
      - run:
          name: Run Unit Tests
          command: |
              ./test/rt/testbuild/build/ch
By default, CircleCI will only execute the build job. To execute multiple
jobs, we need to set up a simple workflow:
version: 2
jobs:
  # Unchanged
  [...]

workflows:
  version: 2
  build_and_test:
    jobs:
      - build
      - unit-test
Once again, we open a pull request with our changes, and watch CircleCI run our tests.
Final Thoughts
I hope reading this post has inspired you to use CI for your next project.
You can find our final CircleCI config on Github
Of course, setting up CI is the easy part. Writing good tests, managing cost, and keeping build time low are all challenges you will face along the way. Future posts will cover those topics.
What other techniques do you use to improve your team’s productivity? Tell us all about it in the comments, or at interrupt@memfault.com.
Reference & Links
 François Baldassari has worked on the embedded software teams at Sun, Pebble, and Oculus. He is currently the CEO of Memfault.