Firmware Testing with Renode and GitHub Actions
Automated firmware testing on real embedded hardware is what every hardware company strives to build. The mission is to repeatedly verify that changes to firmware being merged into master and shipped to customers will not cause catastrophic failures like power regressions or bootloops.
The problem with automated firmware testing with real hardware is that it’s hard. Not only does the system require a stable firmware to build on top of, but it will also require extra hardware, like flashers and power supplies, and software to orchestrate the tests and capture results.
An alternative to building a complicated orchestration system for automated tests is to use the popular hardware emulator project, Renode, and its built-in Robot Framework integration. By using Renode in conjunction with GitHub Actions, we can ensure that every pull-request and commit to master passes all our tests.
In this post, I cover what it takes to build a simple firmware for use with Renode, how to build and administer tests with Robot Framework, and how to run these tests within GitHub’s continuous integration system.
Table of Contents
Automation Testing for Firmware
Test automation is the practice of testing software and/or hardware in a repeatable and scalable way where expected values are compared against actual values.
There are various forms of test automation, and they are usually run under a continuous integration system, such as Jenkins, GitHub Actions, or CircleCI.
- Software Unit Tests - Isolated tests that exercise a single module. Usually run on the host machine and sometimes on an emulator or real device.
- Integration Tests - Tests that exercise a collection of modules that interact with each other
- End-to-end Tests - Tests that exercise an entire technical stack end-to-end. These tests would usually communicate with some sort of backend in the cloud or a mobile phone.
These testing approaches are not limited entirely to software, as hardware can be tested in similar ways. “Hardware unit testing” is a concept where individual pieces of the larger hardware board are put under test to ensure the chip itself behaves correctly. Integration tests and end-to-end tests can also be performed on hardware, but the complexity increases exponentially as more hardware is thrown into the mix.
A middle ground between host-run tests and hardware tests is testing on an emulator which emulates the real hardware as much as possible. Renode, by Antmicro, has become our favorite emulator at Memfault, and its list of support boards is continually growing1. Renode emulates many peripherals of the board, including the UART, SPI, I2C, RAM, ROM, and GPIO’s.
Renode has a built-in integration with the open-source testing framework called Robot Framework2. Robot Framework is most popular in the web world, but it is generic and powerful enough to be used for many more use-cases. It provides the glue between various test scripts, test reporting, and multiple machines under test.
Using a Shell for Testing
Whether tests are being run within Renode or on real hardware, there should be a way to easily run tests on a device.
A common approach is to use a CLI-based shell over serial, which we wrote about in our post Building a Tiny CLI Shell for Tiny Firmware.
The idea is relatively simple.
- Create a test that will execute a series of shell commands on a device.
- After each command or series of commands, the results will be compared against expected values.
- At the end of the test run, the harness determines whether the test was successful or not.
Thankfully for us, Renode has several utilities and helpers built-in that we can take advantage of.
Setup
Example Repo
All the code in this post was written for the STM32F429 MCU by ST Micro. While the examples run fine on the STM32F429i discovery board, they were developed in Renode, a popular MCU emulation platform.
You can find the complete code example for this blog post in a separate GitHub repository.
$ git clone --recurse-submodules https://github.com/memfault/interrupt-renode-test-automation.git
Toolchain
I used the following tools to build my firmware:
- GCC 8.3.1 / GNU Arm Embedded Toolchain as our compiler3
- GNU Make 4.2.1 as the build system
Running automated tests with Renode, unfortunately, requires Python 2.7. To keep things simple for me, I decided to use a Conda environment to keep this entire environment isolated.
$ conda create -n renode
$ conda activate renode
$ conda install -c conda-forge -c memfault \
      python=2.7 gcc-arm-none-eabi make=4.2.1

$ which arm-none-eabi-gcc
/Users/tyler/miniconda3/envs/renode/bin/arm-none-eabi-gcc
Perfect, I now have arm-none-eabi-gcc and python2.7 in my path.
Want to learn more about Conda? Check out my previous post on using Conda environments for embedded development.
It turns out the Renode team packages the application in a Renode Conda package, but at the time of writing this post, not all platforms had the latest version released (v1.9, released in March). For that reason, I chose to install it locally for this post.
Renode & Robot Framework
To install Renode, I’ve found the best instructions to be on the
Renode GitHub Page. In the
example repo, I’ve created a start.sh script which points to my local Renode
installation on my Mac. If you are using another platform, you’ll have to update
this script to point to your own Renode start script.
#!/bin/sh

sh /Applications/Renode.app/Contents/MacOS/macos_run.command renode-config.resc
To run Robot Framework alongside Renode, we’ll also need to clone the Renode repository and all of its submodules, as well as install all of the required Python dependencies.
$ git clone --recurse-submodules git@github.com:renode/renode.git
$ cd renode

# Install Robot Framework and other dependencies
$ pip install -r tools/requirements.txt
Docker
To use Renode with Robot Framework in CI, it’s best to use the official Renode Docker image for running the tests. If you haven’t already, you’ll want to install Docker.
Example Firmware Overview
This post builds upon previous ideas and examples written on Interrupt. If you find yourself missing some context, the following posts would be useful:
Rather than the STM32Cube HAL, I used an open-source MCU HAL called libopencm3
with excellent support for the STM32. It is included as a submodule in the repo.
The primary way we’ll control the firmware is through a CLI shell written previously and linked above.
With the shell in place, this means that our main loop of the firmware is simply:
int main(void) {
    clock_setup();
    gpio_setup();
    usart_setup();

    printf("App STARTED\n");

    // Configure shell
    sShellImpl shell_impl = {
      .send_char = usart_putc,
    };
    shell_boot(&shell_impl);

    char c;
    while (1) {
        c = usart_getc();
        shell_receive_char(c);
    }

    return 0;
}
The supporting *_setup() calls and their implementations can be found in the
other .c files in
src/.
We can build our example firmware by invoking Make.
$ make -j4
Building libopencm3
  GENHDR  include/libopencm3/stm32/f4/irq.json
  [...]
  AR      libopencm3_stm32f4.a
  LD    build/renode-example.elf
Now we have our renode-example.elf file which we can load into Renode.
$ ./start.sh
And then we see our firmware’s shell in the UART window of Renode.
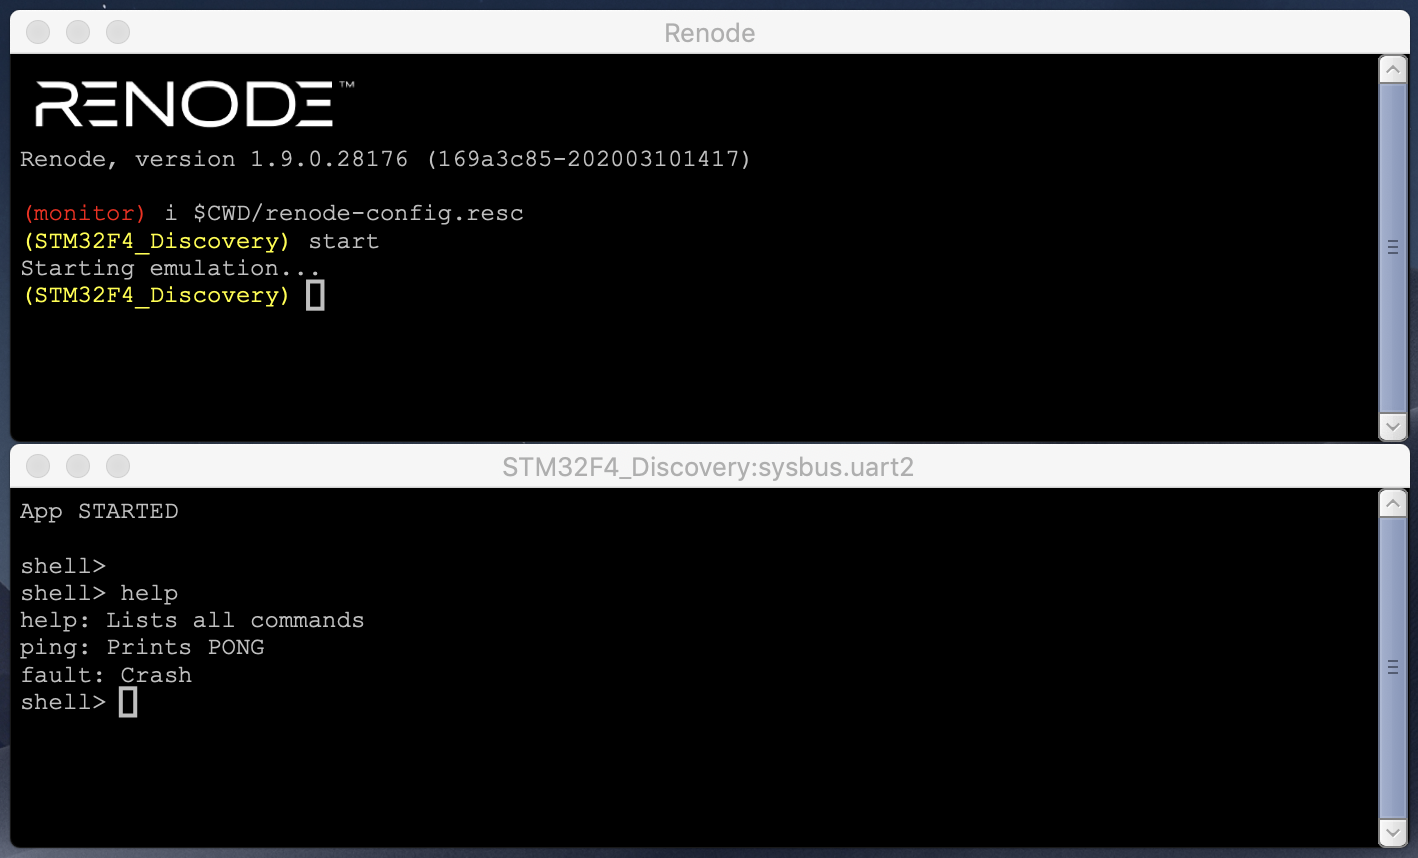
We can interact with it exactly as if it was connected to our computer over USB serial! This would have made writing and testing the firmware for my Tiny Shell post much easier. I’m glad I took the time now to learn Renode for the next time.
Anatomy of a Robot Framework Test
Now that we’ve verified that the firmware works within Renode, it’s time to
think about how we are going to test our firmware. We have two shell commands,
help and ping which are probably useful “sanity” checks that we can test, so
let’s start with those.
If we write ping as a command into our shell, the following is printed:
shell> ping
PONG
It makes logical sense to test that this exact text is printed. Although incredibly basic, this is the code that we are testing within our firmware:
int cli_command_ping(int argc, char *argv[]) {
    shell_put_line("PONG");
    return 0;
}
The following is a Robot Framework test file that calls the ping shell command
and expects that PONG is printed.
# test-basic.robot

*** Settings ***
# Boilerplate
Suite Setup       Setup
Suite Teardown    Teardown
Test Setup        Reset Emulation
Resource          ${RENODEKEYWORDS}

*** Variables ***
# Our shell prompt to expect
${SHELL_PROMPT}    shell>

*** Keywords ***
Start Test
    # Create the Machine
    Execute Command             mach create
    # Load the stm32f4 board definitions
    Execute Command             machine LoadPlatformDescription @platforms/boards/stm32f4_discovery-kit.repl
    Execute Command             machine LoadPlatformDescription @${PWD_PATH}/add-ccm.repl
    # Load the ELF file
    Execute Command             sysbus LoadELF @${PWD_PATH}/build/renode-example.elf
    # Connect the UART
    Create Terminal Tester      sysbus.uart2
    Start Emulation

*** Test Cases ***
Ping
    [Documentation]             Prints help menu of the command prompt
    [Tags]                      non_critical

    Start Test

    Wait For Prompt On Uart     ${SHELL_PROMPT}
    Write Line To Uart          ping
    Wait For Line On Uart       PONG        timeout=2
To help run this test locally, I’ve created a few extra helpers. First is a
script, run_tests.sh, which contains the following:
#!/bin/bash -e

RENODE_CHECKOUT=${RENODE_CHECKOUT:-~/code/renode}

${RENODE_CHECKOUT}/test.sh -t "${PWD}/tests/tests.yaml" --variable PWD_PATH:"${PWD}" -r "${PWD}/test_results"
RENODE_CHECKOUT is the Renode repo that we cloned (with all submodules
initialized!). The second line calls Renode’s test.sh helper with the test
manifest file and tells it where to output the results.
The test manifest file, tests.yaml contains a list of tests that test.sh
should iterate over, and it can be used if we want to add more than a single
Robot test file.
# tests.yaml
- robot:
    - tests/test-basic.robot
If we run our run_tests.sh script and see what we get!
# Ensure our Python2.7 environment is activated
$ conda activate renode

# Go!
$ ./run_tests.sh
Preparing suites
Started Renode instance on port 9999; pid 82717
Starting suites
Running tests/test-basic.robot
+++++ Starting test 'test-basic.Ping'
+++++ Finished test 'test-basic.Ping' in 1.55 seconds with status OK
Cleaning up suites
Closing Renode pid 82717
Aggregating all robot results
Output:  /Users/tyler/dev/interrupt-renode-test-automation/test_results/robot_output.xml
Log:     /Users/tyler/dev/interrupt-renode-test-automation/test_results/log.html
Report:  /Users/tyler/dev/interrupt-renode-test-automation/test_results/report.html
Tests finished successfully :)
Awesome. Our simple test was able to launch the firmware, execute the ping
command, receive a PONG response, and generate a report.
We can also add another test to this same file to test our help command, and
we can use multiple Wait For Line On Uart, one after the other. We can append
the following to the end of test_basic.robot:
*** Test Cases ***
Help Menu
    Start Test

    Wait For Prompt On Uart     ${SHELL_PROMPT}
    Write Line To Uart          help

    # Expect two lines
    Wait For Line On Uart       help: Lists all commands      timeout=2
    Wait For Line On Uart       ping: Prints PONG             timeout=2
This covers the basic functionality for tests, but there is so much more that can be done with this infrastructure.
More Robot Framework Tips & Tricks
The best place to start for inspiration for the various features of Renode’s integration with Robot Framework is to search around the Internet. I’ve searched for “Create Terminal Tester” on GitHub and grep.app and found great examples.
Built-In Libraries
The official
Robot Framework documentation
is the best reference to learn what commands come built-in. To use these
commands, you may need to include the library. For instance, if you wanted to
use the DateTime library4, you’d have to import it at the top of
your test suite.
*** Settings ***
Library           DateTime
UART Timeouts
To keep tests failing quickly, make sure not to forget adding
timeout=<seconds> to UART expectations.
Wait For Line On Uart help: Lists all commands timeout=2
If you are building Renode from source or have a release greater than 1.9.0, you
can also set this globally by overriding the ${DEFAULT_UART_TIMEOUT} variable
in your suite.
*** Variables ***
${DEFAULT_UART_TIMEOUT}     2
Regular Expressions on UART
You can expect and validate strings from the UART by using regular expressions, which allows developers to read in values that change between invocations of the test. For example, we can test the following shell command:
int cli_command_greet(int argc, char *argv[]) {
    char buf[64];
    snprintf(buf, sizeof(buf), "Hello %s!", argv[1]);
    shell_put_line(buf);
    return 0;
}
By using treatAsRegex=True and saving this value to p, we can then read it
out by using p.groups[0] and comparing it to the name provided in the test.
*** Test Cases ***
Greet
    Start Test

    Wait For Prompt On Uart         ${SHELL_PROMPT}
    Write Line To Uart              greet Tyler

    ${p}=  Wait For Line On Uart    Hello (\\w+)!     treatAsRegex=true     timeout=2
    Should Be True                  'Tyler' == """${p.groups[0]}"""
Comparison Operations
At Pebble, we used dynamic memory allocations. To help us sleep at night and confirm that we always had enough heap available on every build we shipped, we added tests ensuring our high-water-marks were within acceptable limits. A test we might have written at the time would measure the available heap space after all of the tests had finished.
*** Test Cases ***
High Water Mark
    Start Test

    Wait For Prompt On Uart         ${SHELL_PROMPT}
    Write Line To Uart              heap_free

    ${p}=  Wait For Line On Uart    (\\d+)     treatAsRegex=true  timeout=2
    ${i}=  Convert To Integer       ${p.groups[0]}

    # Ensure we have 5000 bytes free at the end of the tests
    Should Be True                  5000 < ${i}
In our automated tests, we did similar checks to make sure that our performance, power usage, stack, and heap usage were always within acceptable limits.
Line Endings
If your shell uses carriage returns as line endings, make sure to add the following option when creating the tester:
Create Terminal Tester ${UART} endLineOption=TreatCarriageReturnAsEndLine
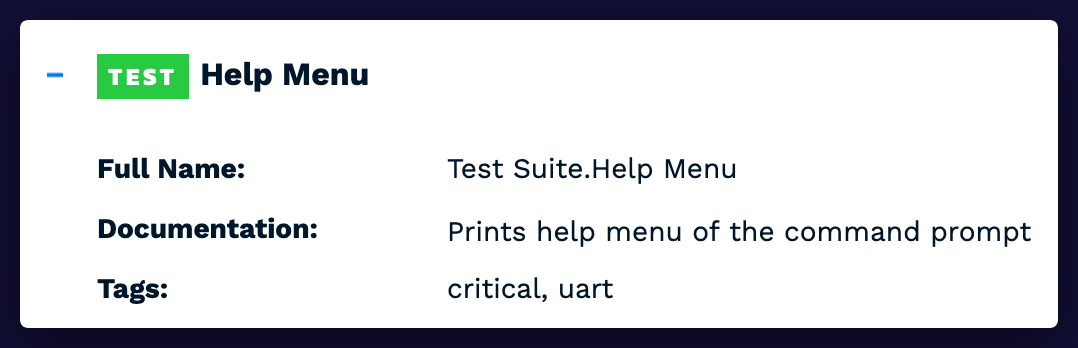
Tags & Documentation
You can add a Tags and Documentation attribute to each test, which will help bucket your tests up into logical groups and help developers know what each test is doing.
*** Test Cases ***
Command
    [Documentation]             Some command
    [Tags]                      critical  uart  factory
Adding the tag
non_criticalorskippedon a test will allow the test to fail but not mark the entire test run as a failure. You can use this for work-in-progress or flaky tests.
GitHub Actions CI & Renode
It’s now time to plug things into a continuous integration system for automated testing! In a previous post, we wrote about building firmware in CircleCI. This time, we are going to use GitHub Actions to build and test our firmware, as it’s likely the easiest for most people to get up and running.
To start, we’ll want to start by creating a file .github/workflows/main.yml in
our repo. The blank example from GitHub’s
starter-workflows
gives a quick introduction to how the system works. I’ve copied it down below
for easy reference.
# This is a basic workflow to help you get started with Actions

name: CI

# Controls when the action will run. Triggers the workflow on push or pull request
# events but only for the master branch
on:
  push:
    branches: [master]
  pull_request:
    branches: [master]

# A workflow run is made up of one or more jobs that can run sequentially or in parallel
jobs:
  # This workflow contains a single job called "build"
  build:
    # The type of runner that the job will run on
    runs-on: ubuntu-latest

    # Steps represent a sequence of tasks that will be executed as part of the job
    steps:
      # Checks-out your repository under $GITHUB_WORKSPACE, so your job can access it
      - uses: actions/checkout@v2

      # Runs a single command using the runners shell
      - name: Run a one-line script
        run: echo Hello, world!

      # Runs a set of commands using the runners shell
      - name: Run a multi-line script
        run: |
          echo Add other actions to build,
          echo test, and deploy your project.
Building Firmware in CI
It’s time to adapt the sample above to make it build our firmware. First, we’ll
need to make sure that the checkout routine clones submodules as well, since
our example repo has a couple of them.
jobs:
  build_and_test:
    runs-on: ubuntu-latest

    steps:
      - uses: actions/checkout@v2
        with: #
          submodules: true # CHANGED
Next, we’ll want to download and configure the ARM embedded toolchain since it
isn’t installed by default. Thankfully, there is already an Action,
fiam/arm-none-eabi-gcc, that we
can use to install the toolchain for us.
    steps:
    [...]

    # Get the arm-non-eabi-gcc toolchain
    - name: Install arm-none-eabi-gcc
      uses: fiam/arm-none-eabi-gcc@v1
      with:
          release: '9-2019-q4'
The last thing we need to do is to invoke make itself to start the build.
    steps:
    [...]

    - name: Build Firmware
      run: make -j4
Running Renode in CI
The next thing we need to do is to get Renode working in CI. The GitHub Action
runners are standard Linux boxes running Ubuntu. They also have many common
tools installed that you may need, such as Docker, Make, and many more can be
installed using apt-get.
For our particular use case, we want to be able to run Renode exactly the same way locally as we do in GitHub Actions. The easiest way to accomplish this is to use Docker.
I found a small script in the TensorFlow Micro project which does exactly what I was looking for. This script builds and runs the official Renode Docker image, the mounts the local project folder, starts the Renode Robot Framework tests, and outputs the results to the mounted folder.
I adapted the above file and saved it as
docker-test.sh.
The beauty of this script is that it can be run locally or in a CI runner!
Therefore, all we need to do in our main.yml file is call it.
    steps:
    [...]

    - name: Renode Tests
      run: ./docker-test.sh
Since the script docker-test.sh was configured to output the test artifacts to
the folder test_results/, we will want to capture that directory and save it
as an artifact in the CI build.
    steps:
    [...]

    - name: Upload Output Directory
      uses: actions/upload-artifact@v2
      with:
        name: Renode Test Results
        path: test_results/
Complete GitHub Action main.yml
name: Renode Automated Tests

on:
  push:
    branches: [master]
  pull_request:
    branches: [master]

jobs:
  build_and_test:
    runs-on: ubuntu-latest

    steps:
      - uses: actions/checkout@v2
        with:
          submodules: true

      # Get the arm-non-eabi-gcc toolchain
      - name: Install arm-none-eabi-gcc
        uses: fiam/arm-none-eabi-gcc@v1
        with:
          # The arm-none-eabi-gcc release to use.
          release: "9-2019-q4"

      - name: Build Firmware
        run: make -j4

      - name: Upload ELF
        uses: actions/upload-artifact@v2
        with:
          name: renode-example.elf
          path: build/renode-example.elf

      - name: Renode Tests
        run: ./docker-test.sh

      - name: Upload Output Dir
        uses: actions/upload-artifact@v2
        with:
          name: Renode Test Results
          path: test_results/
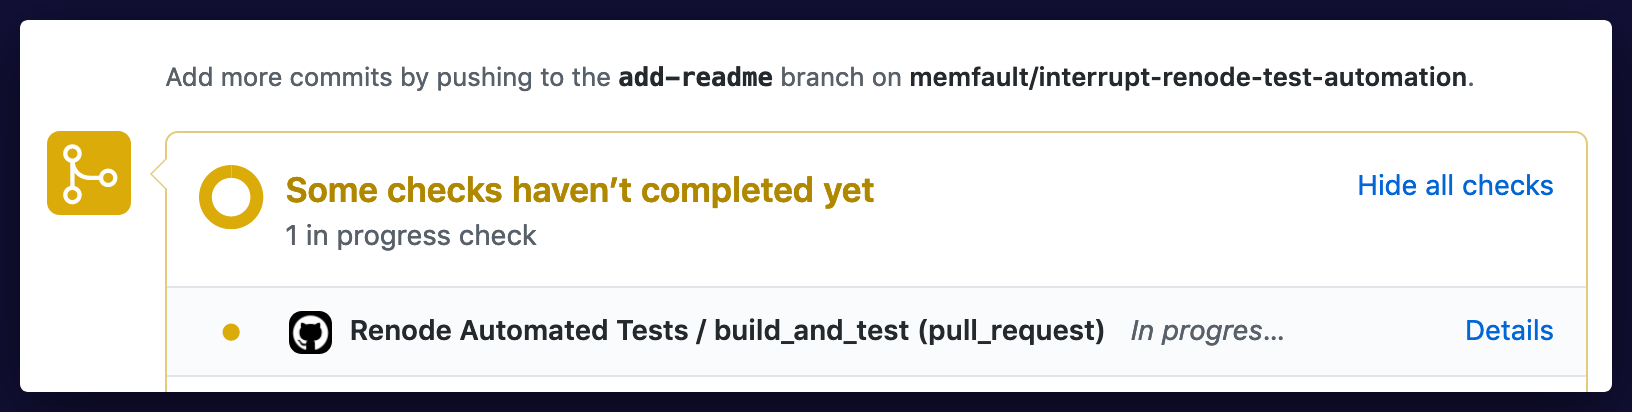
Now, when we publish a pull-request on GitHub, we’ll immediately see that the build is triggered and our job starts.
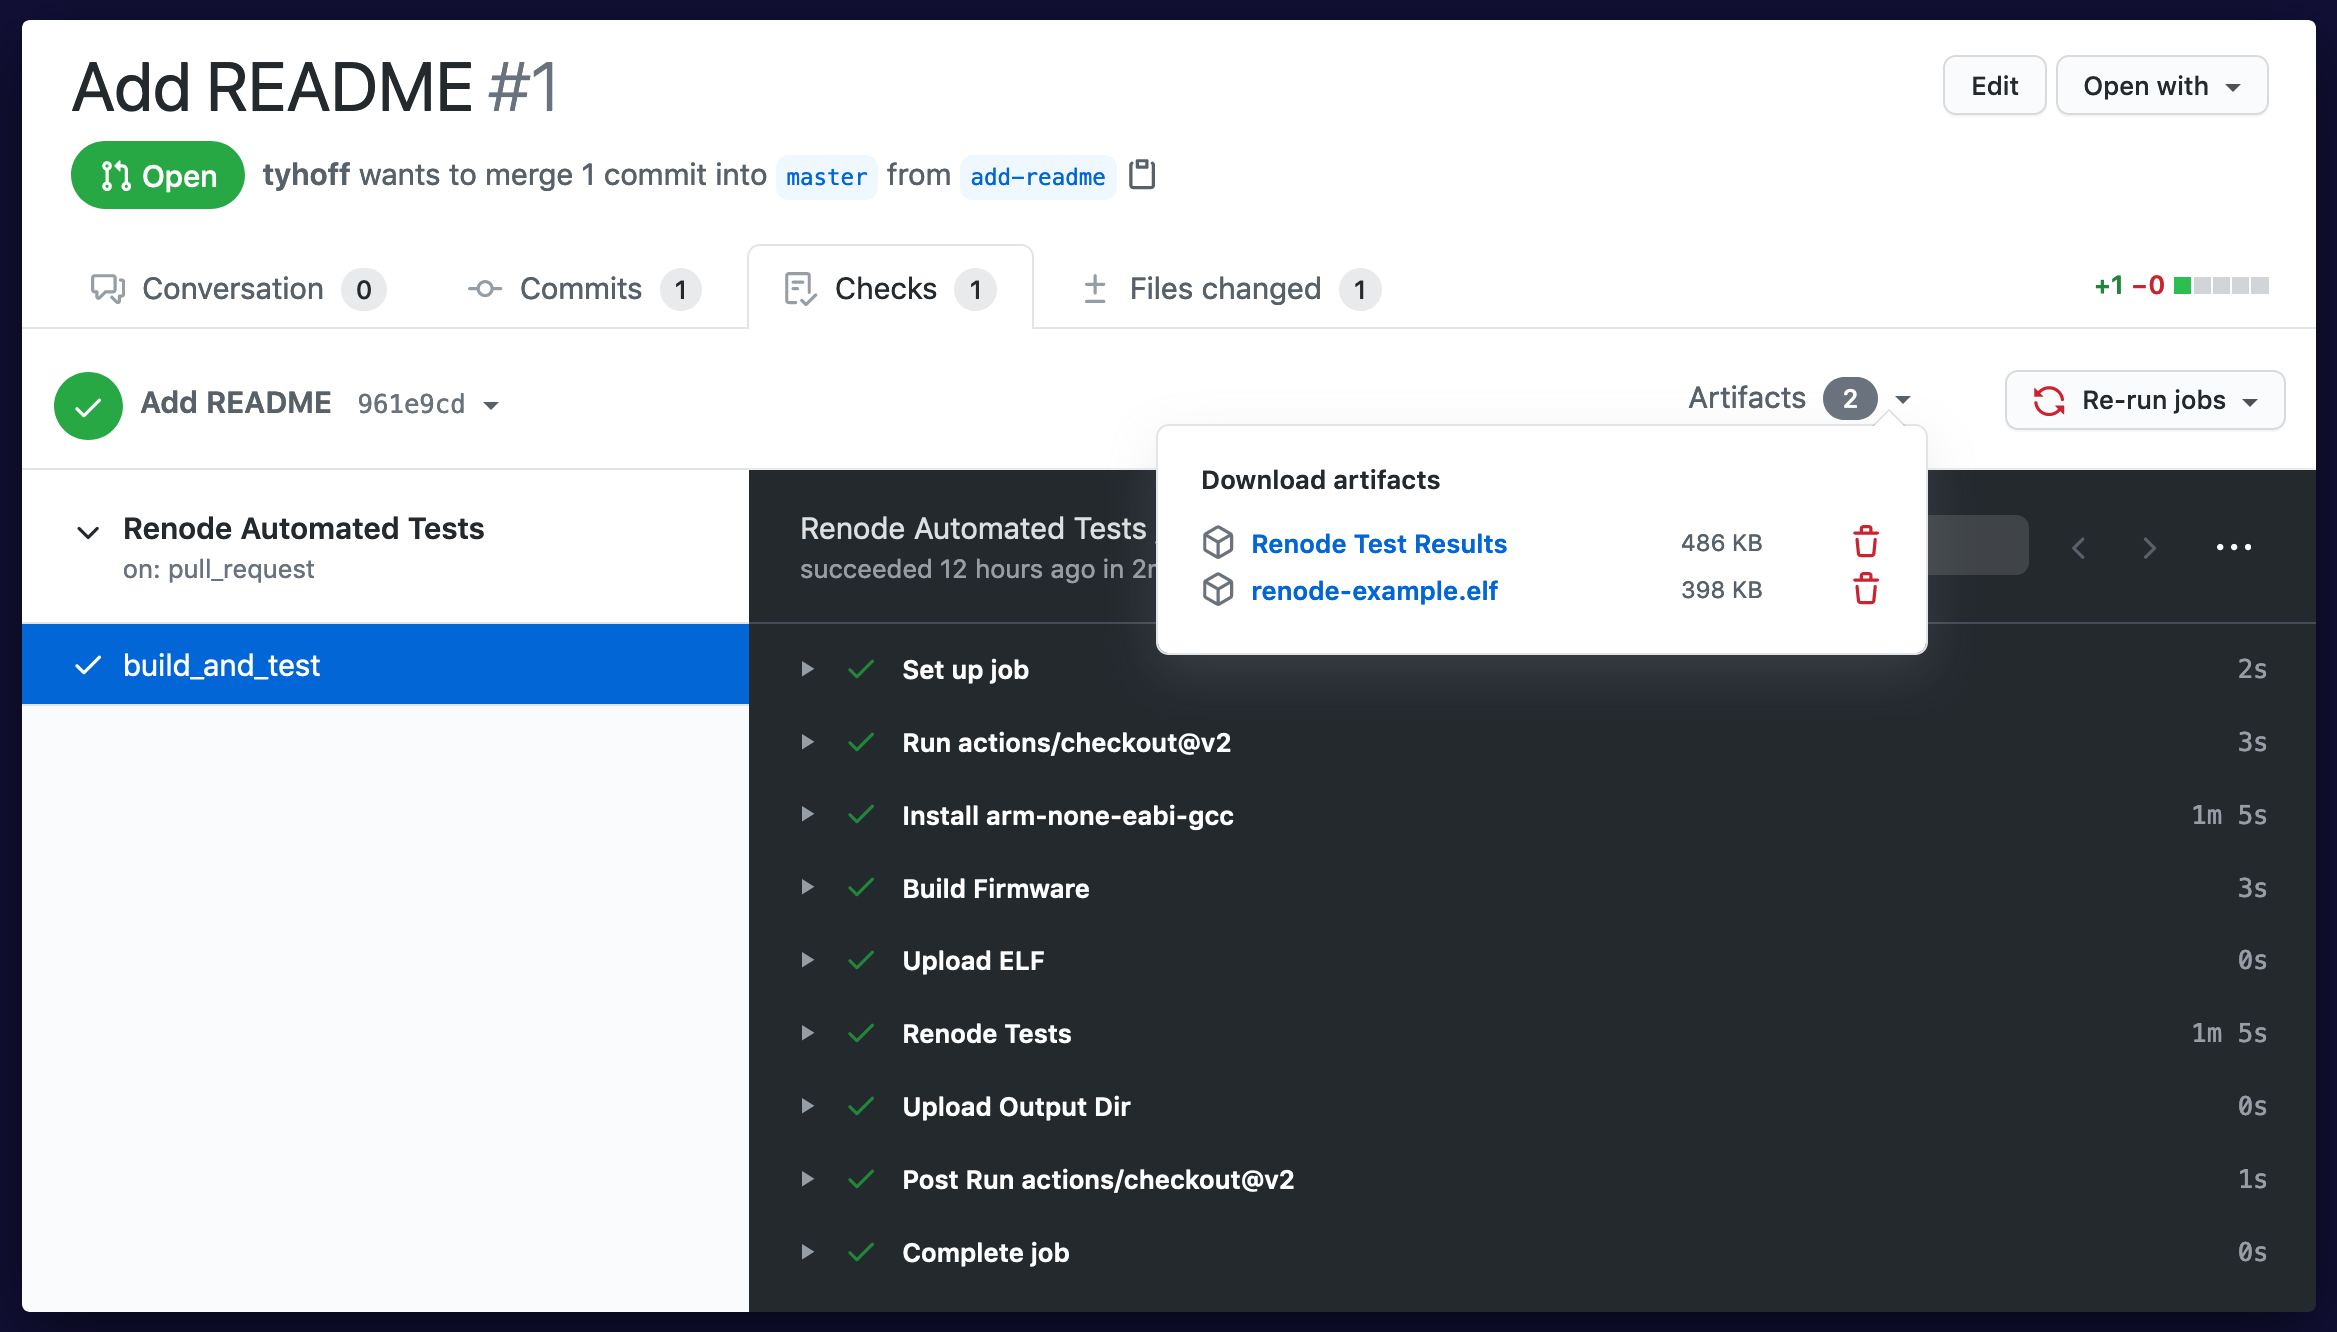
If we click on “Details”, we can watch each job complete in real time! Below we see that all jobs are successful and that we have two artifacts. One is the ELF file that was built during the job, and the other is a ZIP archive of the Robot Framework test results.
The best part about using the Robot Framework integration of Renode is that it generates pretty HTML-based reports, as we saw in the Introduction to Renode post.
I’ve included the HTML report for the above test. Click here to view it.
Debugging Failing Tests in CI
Tests are going to fail in CI, and it’s probably a good thing, as that’s what CI is for. But, it would be a pain to guess and check how to fix issues that only occur in CI. Thankfully, Renode can capture the state of the system, save it to a file, and load it after-the-fact5 for postmortem debugging.
It does this using the monitor commands Save and Load. Wouldn’t it be cool
if we could call the Save command in CI for failing tests and then locally run
Load in Renode to get the exact state of the device at the time of failure?
Yes, it would be.
Renode has part of this
built-in.
Unfortunately, this is yet another piece of functionality that doesn’t exist in
the current public release, so I’ve
copied and modified the code slightly.
Recall that GitHub Actions gobbles up the artifacts in the output folder
/test_results so as long as we place the snapshots in this directory, they
should be automatically included in our final ZIP.
In the example project, I’ve added a test that always fails. The C code generates a fault which crashes the device:
int cli_command_fault(int argc, char *argv[]) {
    // Bad function call!!
    void (*g_bad_func_call)(void) = (void (*)(void))0x20000002;
    g_bad_func_call();
    return 0;
}
The Robot Framework test fails after it doesn’t get a response from the device.
*** Test Cases ***
Trigger Fault
    [Documentation]             Should fail, but fine since non_critical
    [Tags]                      non_critical  uart  input

    Start Test

    Wait For Prompt On Uart         ${SHELL_PROMPT}
    Write Line To Uart              fault

    # By now we've crashed
    Wait For Line On Uart           Nope     timeout=2
By adding the hooks above, every failing test should capture a Renode snapshot.
I’ve done a few commits into the example project repo with this test in place, which means there is a ZIP with a Renode snapshot in it. Let’s download one of the ZIP archives and extract it.
$ tree .
test_results
├── log.html
├── logs.txt
├── report.html
├── robot_output.xml
├── snapshots
│   └── test-basic-Trigger_Fault.fail.save
└── test-basic.xml
The test-basic-Trigger_Fault.fail.save file is a snapshot from a test and
shell command that forces a crash.
Let’s load it up into Renode & GDB and see what it looks like. I’ve created
another script in the project repo to help with loading these save files into
Renode, load-save.sh.
#!/bin/sh

sh /Applications/Renode.app/Contents/MacOS/macos_run.command --disable-xwt \
  -e "Load @$1" \
  -e 'mach set 0' \
  -e 'machine StartGdbServer 3333'
This script starts Renode in headless mode, loads the save file passed in as an
argument with the Load command, and starts a GDB server.
$ ./load-save.sh test_results/snapshots/test-basic-Trigger_Fault.fail.save
Loaded monitor commands from: ./scripts/monitor.py
Monitor available in telnet mode on port 1234
machine-0: GDB server with all CPUs started on port :3333
We see that the GDB port on 3333 is up and running, so let’s attach to that port. Don’t forget to include the ELF file (which is also saved in the GitHub build artifacts).
$ arm-none-eabi-gdb-py --eval-command="target remote :3333" --se renode-example.elf
[...]
(gdb) bt
#0  blocking_handler () at ../../cm3/vector.c:104
#1  <signal handler called>
#2  0x20000002 in rcc_ahb_frequency ()
#3  0x08000252 in cli_command_fault (argc=1, argv=0x2000ff74) at src/app_shell_commands.c:24
#4  0x08000528 in prv_process () at src/shell/src/shell.c:113
#5  0x080005ec in shell_receive_char (c=13 '\r') at src/shell/src/shell.c:147
#6  0x080001e0 in main () at src/app.c:29
That looks right! 0x20000002 was the bogus address I used which caused a
UsageFault, and we can tell it came from the CLI command fault.
Using Renode in Headless Mode
To improve my workflow with Renode, I needed to do something about the Mono-emulated terminal windows that were spawned with Renode. Although not entirely documented, it’s quite easy to never have to use these terminal windows directly and you can instead attach to Renode using Telnet. This enables you to have use iTerm2, your native clipboard, tmux, etc.
To do so, we need to make a few modifications to the way we launch Renode. We’ll
pass in the argument --disable-xwt to disable the GUI entirely, and
--port <port> to make the Renode Monitor available through Telnet on that
port.
I’ve included another script, start-headless.sh in the example project which
can be used to more easily launch Renode in headless mode.
#!/bin/sh
sh /Applications/Renode.app/Contents/MacOS/macos_run.command \
    --disable-xwt renode-config.resc --port 33334
After launching this, a user should be able to use telnet to connect to that
open port.
$ telnet 127.0.0.1 33334
Trying 127.0.0.1...
Connected to localhost.
Escape character is '^]'.
Renode, version 1.9.0.28176 (169a3c85-202003101417)

(monitor) i $CWD/renode-config.resc
(STM32F4_Discovery)
That solves the problem of the Monitor window, but we also want to connect to the UART without a GUI too. The answer on how to do this was found in a GitHub Issue on the PlatformIO repo.
We needed to add the following lines to renode-config.resc, which is the
Renode script that is run every time we launch it.
# Publish a Telnet connection to the UART
emulation CreateServerSocketTerminal 33335 "externalUART"

# Connect that connection to our UART
connector Connect sysbus.uart2 externalUART
Now all we need to do is telnet again to that port, and we’ll have our shell.
$ telnet 127.0.0.1 33335
shell>
shell> help
...
Taking inspiration from my previous post, Building a CLI for Firmware
Projects, I
wrote a quick and hacky tasks.py Invoke file to improve this flow.
import time
from datetime import datetime, timedelta
from telnetlib import Telnet

from invoke import Collection, Context, task


@task()
def renode(ctx):
    """Spawn Renode and attach to its monitor"""
    ctx.run("./start-headless.sh", asynchronous=True)

    print("Letting Renode boot...")
    time.sleep(3)

    retry_until = datetime.now() + timedelta(seconds=3)
    while datetime.now() < retry_until:
        try:
            ctx.run('telnet 127.0.0.1 33334', pty=True)
        except Exception as e:
            time.sleep(0.5)

@task()
def console(ctx):
    """Connect to Renode's UART"""
    ctx.run('telnet 127.0.0.1 33335', pty=True)

@task()
def gdb(ctx):
    """Connect to Renode's GDB connection"""
    ctx.run("arm-none-eabi-gdb-py "
            "--eval-command=\"target remote :3333\" "
            "--se build/renode-example.elf",
            pty=True)

@task()
def test(ctx):
    """Run tests locally"""
    ctx.run("./run_tests.sh", pty=True)
Now, all I need to do is install Invoke into my Conda environment, and I’ll be able to more easily do everything I want!
$ pip install invoke
I can start Renode and get access to its monitor:
$ invoke renode
[...]
Renode, version 1.9.0.28176 (169a3c85-202003101417)

(monitor) i $CWD/renode-config.resc
Starting emulation...
(STM32F4_Discovery)
I can get it’s shell:
$ inv console
[...]
shell>
And I can launch GDB and connect to the instance:
$ inv gdb
GNU gdb (GNU Tools for Arm Embedded Processors 8-2019-q3-update) 8.3.0.20190703-git

Reading symbols from build/renode-example.elf...
Remote debugging using :3333
0x08003fd4 in usart_wait_recv_ready (usart=usart@entry=1073759232) at ../common/usart_common_f124.c:96
96    while ((USART_SR(usart) & USART_SR_RXNE) == 0);
Much, much better. For those who know me or have read my previous posts, you know this makes me very happy.
Final Thoughts
I learned a lot about Renode through writing this post, and I can tell you that it is awesome. The project has incredible potential and was reasonable easy to get set up with GitHub Actions. I’ll definitely be doing most of my STM32 development with Renode moving forward and am excited to build automated tests using Renode to test all aspects of the Memfault Firmware SDK6.
You can find the examples shown in this post here.
See anything you'd like to change? Submit a pull request or open an issue on our GitHub
References
 Tyler Hoffman has worked on the embedded software teams at Pebble and Fitbit. He is now a founder at Memfault.