Saving bandwidth with delta firmware updates
Firmware update capability has become a must-have for most devices. Whether to add new features after launch, fix bugs, or urgently patch a security hole, firmware updates gives modern teams the flexibility they need to move fast and react to a changing environment.
I’ve written at length about firmware updates in the past, including on Interrupt with a Firmware Update Cookbook and a post about code signing, and even recorded a webinar on the topic.
Since then, I’ve heard from some of you that they’ve run into roadblocks implementing firmware updates on bandwidth-limited devices. Indeed devices connected over low bandwidth links like 900MHz wireless or LoRaWAN often struggle to download a full firmware image in any reasonable time.
One solution is to implement delta updates, a technique that allows devices to download only the bits and pieces they need rather than full system images.
In this post, we introduce the concept of delta (i.e. partial) firmware updates, explain why you may want to implement them in your projects and go through an example implementation from top to bottom.
Table of Contents
Delta Updates Explained
Note: the next few sections provide an overview of delta updates, why it matters, and how it works. If you’d like to skip straight to implementation, click here.
The concept behind delta updates is intuitive. When we put together a new version of our firmware, we do not change every single line of code. Instead, we edit specific sections of the code to change the behavior of the code and introduce a new feature or fix a bug.
This means that our new firmware is largely made up of the old firmware, plus a few changes.
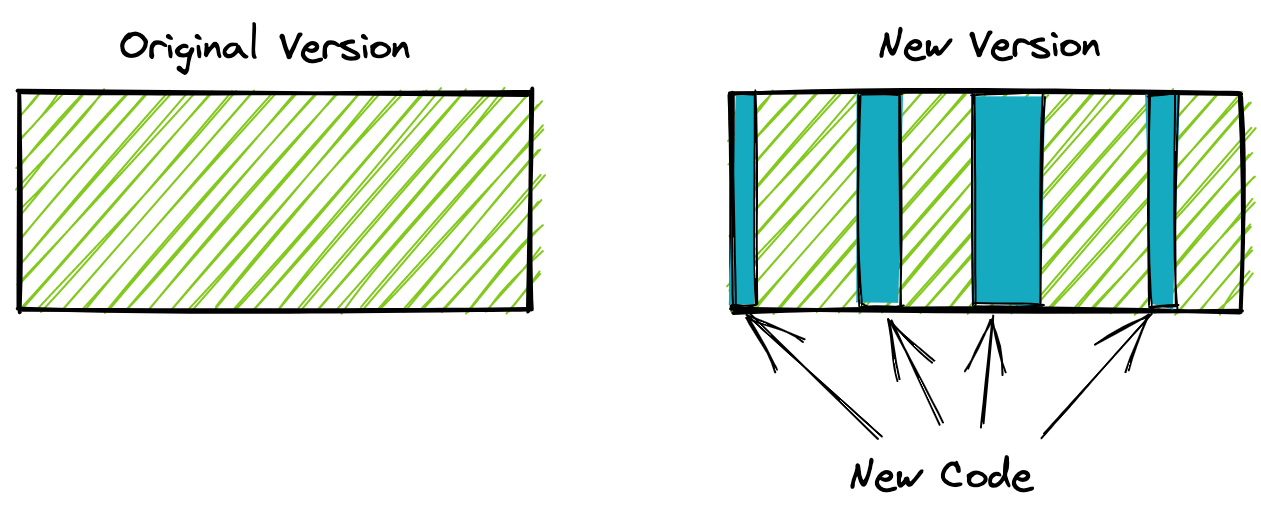
Wouldn’t it be neat if we could collect only the code changes and send those down to the device, rather than the full firmware update? This is exactly what delta updates allow us to do.
The process is broken up into two steps. First, we need to extract the bits that have changed from our new image, we’ll call it DIFF.

Then we reconstruct our image from our original firmware and our delta image, which we’ll call PATCH.

Pros and Cons of Delta Updates
Pros
The obvious advantage of delta updates is the small size of the resulting image. Delta images are often one to two orders of magnitude smaller than full system images. The size reduction has multiple beneficial effects:
- OTA updates become possible over very low bandwidth links (e.g. LoRaWAN).
- Updates are much faster over low bandwidth links. For example, a 10MB image may take over 15 minutes to download over a BLE connection to a mobile phone, even at peak throughput. A delta update would take less than 1 minute to download, leading to a much better customer experience and less risk of power loss mid-update.
- The lifetime of flash memory can be extended, as fewer writes are needed to install a delta image than a full image.
- OTA consumes less power, thanks to the reduced communication and flash writing required.
Cons
However, there is no such thing as a free lunch! Delta updates come with some downsides worth considering:
- More complexity! Your firmware update code now needs to implement the patching algorithm, which creates more opportunities for bugs.
- Delta updates require more code space to implement the patching algorithm, so if you are constrained already it may not be appropriate for your project.
- Managing delta updates creates more complexity on the backend and in the release process.
That last point bears elaborating a bit. Unlike all system images, each delta image is only compatible with a single original version. In other words, while a system image for firmware v1.2.0 can upgrade any prior version to v1.2.0, a delta update for “v1.1.0→v1.2.0” can only upgrade devices running v1.1.0 to v1.2.0. As you can imagine this creates a serious challenge at the QA stage, since the combination of things to test is much larger than with a system image.
This also means that your OTA backend needs to be sophisticated enough to present delta updates when devices are running compatible versions, and in all other cases present a full system update. And each firmware release requires you to compile and upload several delta images for your versions in the field.
Our OTA backend at Memfault supports delta updates! You can read more about it in our documentation.
Jojodiff
One of the key components of a delta update system is a binary diff and patch system. There are remarkably few libraries that provide this functionality. The excellent BSDiff1, and XDelta2 both require too much memory to work on most embedded systems without modification. This leaves Jojodiff3, which has been helpfully reimplemented by Jan Jongboom4 in his JanPatch library5 optimized for embedded systems.
While Jojodiff is neither the fastest nor the most efficient, it requires constant space, linear time complexity, and can patch a file in place. These features make it well suited to limited environments such as MCU-based devices.
Note: we’ve heard from some teams that they have successfully modified XDelta and BSDiff to do in-place, fixed memory delta patching. This was more effort than made sense in the context of this blog post, but it may be the right approach for your project. As always, your mileage may vary!
Delta Updates Implementation
Setup
Like we did in our previous posts, we use Renode to run the examples in this post. We are using a virtualized STM32 on which we are running a complete firmware image. The previous post contains detailed instructions, but in short:
# Clone the repository & navigate to the example
$ git clone https://github.com/memfault/interrupt.git
$ cd examples/fwup-delta

# Build project and start Renode
$ make && ./start.sh
You can then find the Renode monitor via telnet and start the simulation:
$ telnet localhost 4444
Trying 127.0.0.1...
Connected to localhost.
Escape character is '^]'.
Renode, version 1.9.0.28660 (cd1a61a4-202006301553)

(monitor) i $CWD/renode-config.resc
(STM32F429) start
Starting emulation...
(STM32F429) q
Renode is quitting
You can also tail the device’s USART output via telnet:
$ telnet localhost 4445
Trying 127.0.0.1...
Connected to localhost.
Escape character is '^]'.
Bootloader started
Valid public key
Invalid signature
Booting slot 1
Shared memory uinitialized, setting magic
Loader STARTED - version 1.0.0 (4015f0a)
Booting slot 2
App STARTED - version 1.0.1 (4015f0a) - CRC 0x1b11019d
Architecture
As a reminder, this is what our device firmware update architecture looks like:
With the following functionality for each block:
- Bootloader: a simple program whose sole job is to load the Loader, and fall back to another image if the Loader is invalid.
- Loader: a program that can verify our Application image, load it, and update it.
- Application: our main code, which does not do any updates itself
- Updater: a program that temporarily replaces the Application and can update the Loader.
The Loader and the Updater both may want to implement delta updates, while the Application or the Bootloader would be mostly untouched.
Building our Delta Update Image
First things first, let’s create a new version of our firmware. As an example, I added a print line that says “This application was patched!” at boot when our Application runs.
To make things easy, I create a .patch file that I can apply and un-apply
from my codebase. I can then build my new firmware image with the following
make commands:
$(BUILD_DIR)/$(PROJECT)-app-patched.elf: $(SRCS_APP) $(PATCH_FILE) $(OPENCM3_LIB)
	# Apply patch file to the codebase
	$(GIT) apply $(PATCH_FILE)
	# Create the build folders
	$(MKDIR) -p $(BUILD_DIR)
	# Compile the ELF file for the new firmware
	$(CC) $(CFLAGS) $(LDFLAGS_APP) $(SRCS_APP) $(OPENCM3_LIB) -o $@
	# Un-apply the patch file
	$(GIT) apply -R $(PATCH_FILE)
We can then convert the image to a .bin file, sign it, and stick a header to
the start of it as we did in previous posts.
Now that I have my new image app-patched.bin and my original firmware
app.bin, I need to create my delta image. To do so, we can either use the
original Jojodiff or Jan’s JS version, jdiff6, which can be installed
via NPM (npm install -g jdiff). I chose the latter.
Jdiff’s syntax is simple:
$ jdiff <base-image> <new-image> <output-patch-bin>
This translates to the following make commands:
$(BUILD_DIR)/patch.bin: $(BUILD_DIR)/$(PROJECT)-app.bin $(BUILD_DIR)/$(PROJECT)-app-patched.bin
	$(JDIFF) $^ $@ &>/dev/null # prints useless warning from emscripten, so ignore it
The resulting patch.bin is 1252 bytes, down from 7908 bytes for the full app
image. This is only a ~6x reduction in size but, in practice, you will see much
better results on larger and more complex applications.
Since we’re not concerned with downloading the image from the cloud for the sake
of this blog post, we just hardcode the patch.bin inside of our Loader image
using objcopy as we explained in previous posts.
Note: C23 which was just finalized will include a new
#embedpreprocessor directive which makes embedded binary and other files inside of a C program much easier. We’ll use that instead of objcopy in the future!
Implementing JanPatch
Janpatch is distributed as a single header file which makes it easy to integrate
into your firmware build. Simply clone the repository, stick it on your include
path, and #include <janpatch.h> in your C code.
Everything the library needs to work is passed via the janpatch_ctx struct.
Let’s take a look at it:
typedef struct {
    // fread/fwrite buffers
    janpatch_buffer source_buffer;
    janpatch_buffer patch_buffer;
    janpatch_buffer target_buffer;

    // function signatures
    size_t (*fread)(void*, size_t, size_t, JANPATCH_STREAM*);
    size_t (*fwrite)(const void*, size_t, size_t, JANPATCH_STREAM*);
    int    (*fseek)(JANPATCH_STREAM*, long int, int);
    long   (*ftell)(JANPATCH_STREAM*);

    // progress callback
    void   (*progress)(uint8_t);

    // the combination of the size of both the source + patch files (that's the max. the target file can be)
    long   max_file_size;
} janpatch_ctx;
First come the source, patch, and target buffers. These are simply RAM buffers used by Janpatch as working memory. The author recommends matching the size of your flash sectors for best performance, likely because the whole buffer is written at once, so you’ll save on erase times.
On our STM32, flash sectors are 4kB so we’ll simply allocate three static 4kB buffers:
#include <janpatch.h>

#define SECTOR_SIZE 4096

static unsigned char source_buf[SECTOR_SIZE];
static unsigned char target_buf[SECTOR_SIZE];
static unsigned char patch_buf[SECTOR_SIZE];

int do_janpatch() {
    janpatch_ctx ctx = {
        // fread/fwrite buffers for every file, minimum size is 1 byte
        // when you run on an embedded system with block size flash, set it to the size of a block for best performance
        { source_buf, SECTOR_SIZE },
        { target_buf, SECTOR_SIZE },
        { patch_buf, SECTOR_SIZE },
	...
    };
}
The next four fields are function pointers that expect File I/O functions. On
POSIX systems you can simply pass fread, fwrite, and fseek, and define
JANPATCH_STREAM as FILE. However, we are on a bare metal system and will
need to implement our own. I’ll call this module Simple File I/O or simple_fileio.
We need our simple_fileio module to be able to read data from our
memory-mapped bin file, and both read and write data from/to our firmware slot
in flash. We’ll also need to keep track of seek offsets as we go to comply with
the POSIX-like API.
First, we’ll create a new type to encapsulate all of that state and serve as our
JANPATCH_STREAM type. We’ll call it sfio_stream_t:
typedef enum {
    SFIO_STREAM_SLOT,
    SFIO_STREAM_RAM,
} sfio_stream_type_t;

typedef struct {
    sfio_stream_type_t type;
    size_t offset;
    size_t size;
    union {
	# RAM pointer for SFIO_STREAM_RAM
        uint8_t *ptr;
	# Image slot for SFIO_STREAM_SLOT
	image_slot_t slot;
    };
} sfio_stream_t;
We can then implement sfio_fread which reads from RAM or image slot at the
stored offset and writes it to an output pointer. Note that while the POSIX API
accepts a size and a count (for a total number of bytes read of size *
count, Janpatch only ever sets a size of 1 so we made the
simplifying assumption that it would always be 1.
size_t sfio_fread(void *ptr, size_t size, size_t count, sfio_stream_t *stream) {
    assert(size == 1);
    if (stream->offset + count > stream->size) {
        count = stream->size - stream->offset;
    }
    if (stream->type == SFIO_STREAM_SLOT) {
        dfu_read(stream->slot, ptr, stream->offset, size * count);
    } else {
        memcpy(ptr, stream->ptr + stream->offset, size * count);
    }

    return count * size;
}
Next, our sfio_fwrite function needs to write the provided buffer of count bytes
to our RAM or image slot, as follows:
size_t sfio_fwrite(const void *ptr, size_t size, size_t count, sfio_stream_t *stream) {
    assert(size == 1);
    if (stream->offset + count > stream->size) {
        count = stream->size - stream->offset;
    }
    if (stream->type == SFIO_STREAM_SLOT) {
        dfu_write(stream->slot, ptr, stream->offset, size * count);
    } else {
        memcpy(stream->ptr + stream->offset, ptr, size * count);
    }

    return count * size;
}
Last but not least, sfio_fseek simply needs to update the stored offset
value. Note that Janpatch only ever uses SEEK_SET so we can use that to
simplify our code again:
int sfio_fseek(sfio_stream_t *stream, long int offset, int origin) {
    assert(origin == SEEK_SET);
    if (offset > stream->size) {
        return -1;
    } else {
        stream->offset = offset;
    }
    return 0;
}
Astute readers may have noticed that we introduced new functions: dfu_read and
dfu_write, which we use to write to and read from our image slots. Those
functions convert slot addresses to physical addresses and then use memcpy or flash
APIs to read/write the data. Here’s a simple implementation that does no bounds
checking;
int dfu_read(image_slot_t slot, void *ptr, long int offset, size_t count) {
    void *addr = (slot == IMAGE_SLOT_1 ? &__slot1rom_start__ : &__slot2rom_start__);
    addr += offset;
    memcpy(ptr, addr, count);
    return count;
}

int dfu_write(image_slot_t slot, const void *ptr, long int offset, size_t count) {
    uint32_t addr = (uint32_t)(slot == IMAGE_SLOT_1 ? &__slot1rom_start__ : &__slot2rom_start__);
    addr += offset;
    flash_program(addr, ptr, count);
    return count;
}
We can now fill in our janpatch_ctx:
#define SECTOR_SIZE 4096

janpatch_ctx ctx = {
    // fread/fwrite buffers for every file, minimum size is 1 byte
    // when you run on an embedded system with block size flash, set it to the size of a block for best performance
    { source_buf, SECTOR_SIZE },
    { target_buf, SECTOR_SIZE },
    { patch_buf, SECTOR_SIZE },

    // functions which can perform basic IO
    &sfio_fread,
    &sfio_fwrite,
    &sfio_fseek,

    NULL, // ftell not implemented
    NULL, // progress callback not implemented
};
Finally, we need to invoke the janpatch method itself. It accepts three
JANPATCH_STREAM:
-
source, here that is our App image in slot 2. -
patch, the delta image we hardcoded into our Loader (i.e. memory mapped) -
target, also our App image in slot 2, as we are patching in-place.
Here is what the code looks like:
    JANPATCH_STREAM source = {
        .type = SFIO_STREAM_SLOT,
	.offset = 0,
	.size = (size_t)&__slot2rom_size__,
	.slot = IMAGE_SLOT_2,
    };
    JANPATCH_STREAM patch = {
        .type = SFIO_STREAM_RAM,
	.offset = 0,
	.size = (size_t)&_binary_build_patch_bin_size,
	.ptr = data_ptr,
    };
    JANPATCH_STREAM target = {
        .type = SFIO_STREAM_SLOT,
	.offset = 0,
	.size = (size_t)&__slot2rom_size__,
	.slot = IMAGE_SLOT_2,
    };

    shell_put_line("Patching data");
    janpatch(ctx, &source, &patch, &target);
That’s it! The full example is available on Github in the Interrupt repo.
Testing it all in Renode
Once we’ve built all of our image, we simply need to start Renode by running the
provided start.sh or mono64 Renode.exe renode-config.resc --port 4444
--disable-xwt.
We then perform the update on the USART console:
➜  ~ telnet localhost 4445
Trying ::1...
telnet: connect to address ::1: Connection refused
Trying 127.0.0.1...
Connected to localhost.
Escape character is '^]'.
Bootloader started
Booting slot 1
Shared memory initialized, setting magic
Loader STARTED - version 1.0.0 (01b2209)
Booting slot 2
App STARTED - version 1.0.1 (01b2209) - CRC 0x77a58907

shell> dfu-mode
Rebooting into DFU mode
Bootloader started
Booting slot 1
Loader STARTED - version 1.0.0 (01b2209)
Entering DFU Mode

shell> do-dfu
Starting update
Patching data
Validating image
Checking signature
Committing image
Rebooting
Bootloader started
Booting slot 1
Loader STARTED - version 1.0.0 (01b2209)
Booting slot 2
App STARTED - version 1.0.1 (01b2209) - CRC 0xea1a3793

shell> This application was patched! <--- It worked!
We can see “This application was patched!” print after the update (but not before). Everything is working!
Conclusion
With the help of some great open source software, implementing delta updates in our Loader turned out to be relatively easy. A huge thanks especially to Jan Jongboom for his reverse engineering of the jojodiff format and implementation of an embedded-friendly patch library.
A separate post could be written about how to wrangle those updates on the cloud side. Getting the right binary to the right device becomes more complicated as we roll out features like Delta Updates. Perhaps we will tackle this topic next time.
As always, we’d love to hear from you. Do you use a different approach to delta updates? Let us know! And if you see anything you’d like to change, don’t hesitate to submit a pull request or open an issue on Github
Interested in learning more device firmware update best practices? Watch this webinar recording
See anything you'd like to change? Submit a pull request or open an issue on our GitHub
References
-
Jan Jongboom is the co-founder and CTO at Edge Impulse ↩
 François Baldassari has worked on the embedded software teams at Sun, Pebble, and Oculus. He is currently the CEO of Memfault.