Building Nordic nRF-Connect SDK Projects with GitHub Actions
Recently we ran through a re-vamp of our CI builds targeting the Nordic nRF-Connect SDK, and I wanted to share some of the things we learned along the way! This article walks through setting up a GitHub Actions workflow for building nRF-Connect SDK projects.
Table of Contents
Project Setup and Building Locally
Note: This article assumes some familiarity with the nRF-Connect SDK and Zephyr build setup. If you’re new to the nRF-Connect SDK, check out the Nordic documentation for details on how to set up a local build environment.
To get started, first we need to set up an nRF-Connect SDK project. We’ll use
the
samples/debug/memfault
project, because it’s one I’m familiar with (I work for Memfault, after all,
when I’m not writing Interrupt articles!). The same principles apply to any
nRF-Connect SDK-based project, though.
The first thing we’ll do is clone the nRF-Connect SDK and initialize the Zephyr workspace, and confirm we can build this project with our local build environment (I’m currently using the Zephyr SDK v0.16.4, installed following these instructions: https://docs.zephyrproject.org/latest/getting_started/index.html#set-up-a-development-system).
Note: I’m using a Ubuntu Linux host for these examples.
# create a directory for our project
$ mkdir memfault-nrfconnect-ci
$ cd memfault-nrfconnect-ci
# clone the nRF-Connect SDK. note that we're using the v2.5.1 tag here
$ git clone https://github.com/nrfconnect/sdk-nrf.git nrf -b v2.5.1
# initialize the Zephyr workspace
$ west init -l nrf
# update the Zephyr workspace, downloading all projects selected by the
# manifest. this takes a while!
$ west update
Now that we’ve fetched the nRF-Connect SDK and initialized the Zephyr workspace,
let’s build the memfault sample project. I’m going to target the
nrf7002dk_nrf5340_cpuapp board, because I’ve got it handy on my desk.
# running from the root of the Zephyr workspace
$ west build \
  --board nrf7002dk_nrf5340_cpuapp \
  --pristine=always \
  nrf/samples/debug/memfault \
  -- \
  -DCONFIG_MEMFAULT_NCS_PROJECT_KEY=\"DUMMY\"
A couple of notes:
- The target project is
nrf/samples/debug/memfault. This is the path to the project relative to the root of the Zephyr workspace. - We’re using the
--pristine=alwaysoption to ensure that we startt with a clean build. - We’re passing the
CONFIG_MEMFAULT_NCS_PROJECT_KEYoption to the build command, which is a required option for this project that’s unset by default. Just provide a dummy value here for building the project.
Once we’ve confirmed the project builds locally, we’re almost ready to start setting up our GitHub Actions workflow.
Optional: Switch to Application Manifest
It’s not required, but if this were a real project we’d want to split our sample
project into its own repository. We’ll need to add a west.yml Zephyr manifest,
making our project the manifest repository. See the Zephyr
documentation
which describes some of the “workspace topologies” Zephyr supports; we’re going
to be using a “T2” topology.
# create a new Zephyr workspace, and a folder for our project
$ mkdir -p zephyr-workspace/memfault-nrfconnect-ci-app
$ cd zephyr-workspace/memfault-nrfconnect-ci-app
# initialize a git repo in the new folder
$ git init
# copy the contents of the sample project into the new folder
$ cp -r /path/to/ncs/workspace/nrf/samples/debug/memfault/* .
# let's save our work before making any modifications, so we can diff later if
# we need to
$ git add .
$ git commit -m "Initial commit, copied from: https://github.com/nrfconnect/sdk-nrf/tree/v2.5.1/samples/debug/memfault"
# now create a blank west.yml manifest file
$ touch west.yml
I edited the west.yml file to contain the following:
manifest:
  version: "0.10"
  projects:

    # Specify the nRF-Connect SDK as a project dependency.
    - name: sdk-nrf
      path: nrf
      url: https://github.com/nrfconnect/sdk-nrf.git
      revision: v2.5.1
      import: true

    # Specify a newer version of the Memfault Firmware SDK, overriding the one
    # specified in the nRF-Connect SDK manifest.
    - name: memfault-firmware-sdk
      url: https://github.com/memfault/memfault-firmware-sdk
      path: modules/lib/memfault-firmware-sdk
      revision: 1.6.0
Note: I’m using the
url:specifier, instead of theremotesshorthand (which is what the nRF-Connect SDK does), since I only have two projects imported.
Note #2: we could make use of the
name-allowlistkey when importing the nRF-Connect SDK, to only import the projects we need. This can be very useful to reduce the size of the workspace, but it’s not required. It looks something like this:- name: sdk-nrf path: nrf url: https://github.com/nrfconnect/sdk-nrf.git revision: v2.5.1 import: name-allowlist: - hostap - zephyr - mcuboot - mbedtls - nrfxlib - cmsis - hal_nordicIt can be a little tricky to figure out which projects are required. The
west
manifest --resolve
command can be helpful to print out all the projects selected by the manifest. I recommend saving the full list to a file, then start pruning and rebuilding the workspace until the minimal set is found.
Let’s save our work and push it to a new GitHub repository:
$ git add .
$ git commit -m "Add west.yml manifest"
# use the gh cli to create a new GitHub repository. can also be done via the
# web ui if you're not as lazy as me 😅
$ gh repo create --public noahp/memfault-nrfconnect-ci-app --source .
$ git push
At this point it’s also worth adding our own README.md file, since we still
have the original Nordic README.rst file. I just added a file with these
contents:
# Memfault nRF-Connect SDK CI Example

Sample project based on the [nRF-Connect SDK Memfault
Sample](https://github.com/nrfconnect/sdk-nrf/tree/v2.5.1/samples/debug/memfault)
Save and push that too:
$ git add README.md
$ git commit -m "Add README.md"
$ git push
The last piece we can do now that we have our application as the manifest
repository is to test that we can build it using the west command. We’ll need
to update the west workspace to use our new manifest repository, and then we
can build the project:
# first go up a level, to our "zephyr-workspace/" directory
$ cd ..
# now set our new project up as a "local" manifest repository
$ west init -l memfault-nrfconnect-ci-app
# now run west update and wait 😮💨
$ west update
# finally, build the project using the same command as before, but pointing to
# the new project path
$ west build \
--board nrf7002dk_nrf5340_cpuapp \
--pristine=always memfault-nrfconnect-ci-app \
-- \
-DCONFIG_MEMFAULT_NCS_PROJECT_KEY=\"DUMMY\"
Now we have a directory setup that looks like this:
# most of the folders below are downloaded when we run `west update`, and are
# from the nRF-Connect SDK's manifest
$ tree -L 2
.
├── bootloader
├── build  # build folder; this is where build artifacts are placed (by default)
├── memfault-nrfconnect-ci-app  # our mighty little project!
│   ├── README.md  # the README.md we created
│   └── west.yml  # the Zephyr manifest we created
├── modules
├── nrf
├── nrfxlib
├── test
├── tools
└── zephyr
Now we’re ready to start setting up our GitHub Actions workflow!
Setting up GitHub Actions
Note: this quickstart guide is helpful for some guidance on setting up GitHub Actions. We’ll assume a little familiarity with the basics of GitHub Actions going forward: https://docs.github.com/en/actions/quickstart
The first thing we’ll need to do is create a new GitHub Actions workflow file:
# from within our memfault-nrfconnect-ci-app project directory
$ mkdir -p .github/workflows
$ touch .github/workflows/ci.yml
All we’ll put in the file for now is a basic workflow that runs on every push
and pull request targeting the main branch, and just clones our repository:
on:
  pull_request:
    branches:
      - main
  push:
    branches:
      - main

jobs:
  build:
    runs-on: ubuntu-latest
    steps:
      - uses: actions/checkout@v4
The last thing we’ll do here is make it possible to manually trigger our
workflow, by adding the workflow_dispatch event trigger:
on:
  pull_request:
    branches:
      - main
  push:
    branches:
      - main
  workflow_dispatch:
This can be useful for testing changes without requiring a commit, for example
if we’re iterating on a custom Docker image used by the workflow. You can
manually trigger the run from the GitHub Actions UI (instructions
here), or the gh cli also supports triggering the workflow:
$ gh workflow run ci.yml
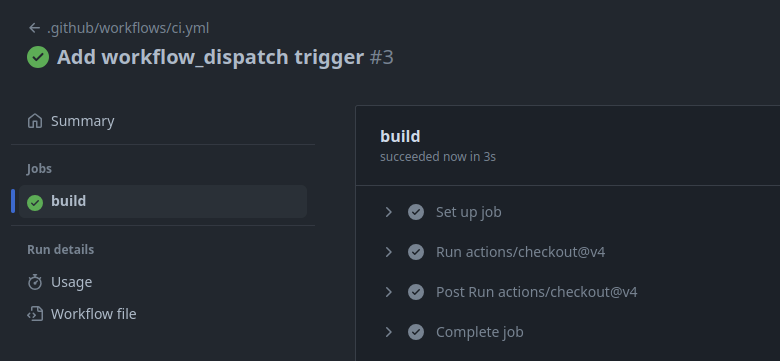
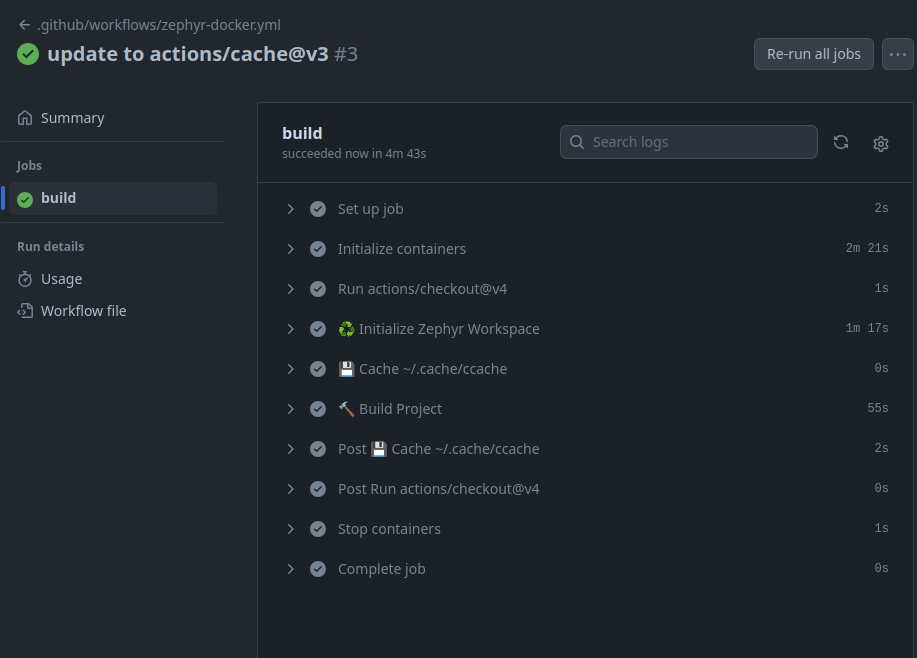
After pushing ci.yml, we can go to the “Actions” tab in our GitHub repository, and we should see our
workflow successfully run:
Runtime Environment Setup
Now that we’ve got a basic skeleton in place, it’s time to set up the workflow to also be able to build our project. The first approach we’ll take is to install all the dependencies we need on-the-fly during the workflow run. The tools we need are:
- host build dependencies (e.g.
cmake,ninja, etc.) - Zephyr SDK toolchain (this is the C compiler, linker, libc, etc.)
- the
westPython tool
I followed the details in the Zephyr Getting Started Guide for installing these dependencies.
Note: Nordic provides a “toolchain manager” GUI for installing nRF-Connect SDK dependencies. This isn’t suitable for CI, where we need to install dependencies non-interactively. Nordic also conveniently provides a command-line version of the toolchain manager, called
nrfutil; see the nrfutil documentation for details.However, we’re going to install the normal Zephyr build dependencies ourselves, instead of using those convenience tools. This gives us a better understanding of the components in our build environment, and also makes it easier to manage each dependency separately (for example, if we need to update our
cmakeversion).nrfutilat this time also is no longer open-source, and it’s nice to be able to peek under the hood of our build environment, if we ever need to.Note that Martin’s article “Practical Zephyr - Zephyr Basics (Part 1)” has a great rundown of these options, check it out!
Below find the updated workflow file, with the Zephyr build dependencies installed on-the-fly (the emojis are optional but recommended 😅):
on:
  pull_request:
    branches:
      - main
  push:
    branches:
      - main
  workflow_dispatch:

jobs:
  build:
    runs-on: ubuntu-latest
    steps:
      - uses: actions/checkout@v4
        with:
          # Clone the repo to a subdirectory, so we can initialize the Zephyr
          # workspace in the parent directory.
          path: zephyr-workspace/nrfconnect-ci-app

      - name: 🧰 Install Dependencies + West
        # Install the Zephyr host build dependencies, and the `west` Python tool.
        # This list is from Zephyr's getting started guide:
        # https://docs.zephyrproject.org/latest/develop/getting_started/index.html
        run: |
          sudo apt update
          sudo apt install --no-install-recommends git cmake ninja-build gperf \
            ccache dfu-util device-tree-compiler wget \
            python3-dev python3-pip python3-setuptools python3-tk python3-wheel xz-utils file \
            make gcc gcc-multilib g++-multilib libsdl2-dev libmagic1

          pip3 install west

      - name: 🪁 Install Zephyr SDK
        # Fetch the Zephyr SDK from the GitHub Release artifact, unpack it and
        # run the setup script, selecting the '-c' option to install cmake
        # packages and the '-t arm-zephyr-eabi' option to install the toolchain
        # only for the arm-zephyr-eabi (Cortex-M) architecture, since we don't
        # need the other toolchains (xtensa, riscv, etc.)
        run: |
          wget -q https://github.com/zephyrproject-rtos/sdk-ng/releases/download/v0.16.4/zephyr-sdk-0.16.4_linux-x86_64_minimal.tar.xz
          tar xf zephyr-sdk-0.16.4_linux-x86_64_minimal.tar.xz -C ~/
          ~/zephyr-sdk-0.16.4/setup.sh -c -t arm-zephyr-eabi

      - name: ♻️ Initialize Zephyr Workspace
        # Set up the Zephyr workspace and install the Python dependencies
        run: |
          cd zephyr-workspace
          west init -l nrfconnect-ci-app
          west update --narrow -o=--depth=1
          pip3 install -r zephyr/scripts/requirements.txt

      - name: 🔨 Build Project
        run: |
          cd zephyr-workspace
          west build \
            --board nrf7002dk_nrf5340_cpuapp \
            --pristine=always nrfconnect-ci-app \
            -- \
            -DCONFIG_MEMFAULT_NCS_PROJECT_KEY=\"1234\"
Pushing this to our main branch will re-run the workflow, and we can check
that it succeeded:
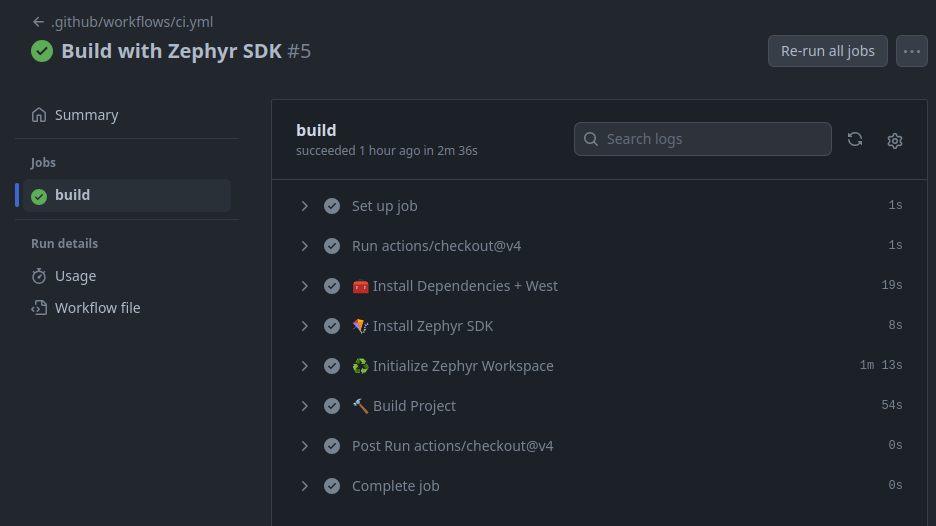
An interesting note here: even though we’re setting up the build environment
during the workflow run, it completes pretty quickly, reported as 2m36s by
GitHub Actions. The breakdown is as follows:
-
🧰 Install Dependencies + West: 19s (12%) -
🪁 Install Zephyr SDK: 8s (5%) 😮 -
♻️ Initialize Zephyr Workspace: 1m13s (47%) -
🔨 Build Project: 54s (35%)
The biggest chunk of time is spent initializing the Zephyr workspace, which makes sense- it’s pulling down multiple Git repositories (45 total, in fact!).
Let’s add one more step to our job- saving the output artifacts. In practice, we might want to upload these to a cloud storage service (like AWS S3), or even execute OTA deployments directly from the GitHub action, but that’s a topic for another day. For now, we’ll just save the build artifacts as a GitHub Action artifact:
      - name: 📦 Save Build Artifacts
        uses: actions/upload-artifact@v4
        with:
          name: build-artifacts
          path: zephyr-workspace/build
In practice we might only be interested in certain files in the build folder,
like build/zephyr/zephyr.elf and build/zephyr/app_update.bin for devices
with OTA capability.
Running the above change, we can see some artifacts are saved during the build, and we can download and inspect them:
Caching Zephyr Workspace Dependencies + Build Artifacts
Now that we’ve got a working workflow, let’s see if we can speed it up a bit. There are 2 steps that are consuming the majority of the time, and both can benefit from caching:
- Initializing the Zephyr workspace
- Building the project
Caching Zephyr Workspace Dependencies
There are (at least) two different ways to cache Zephyr workspace dependencies:
- Cache the entire Zephyr workspace
- Make use of the
west update--path-cache/--name-cacheoptions, to havewest updatecheck a local cache directory for Git repositories before fetching them
The first option is the simplest, but it can be a little more fragile (since we’ll restore the entire Zephyr workspace, we’ll need to ensure we properly install the updated project repo). The second option works well, but it seems to require a fully populated (non-shallow) Zephyr workspace cache, which can be several gigabytes in size.
Caching Build Artifacts
We can use ccache to cache the compiler output (see Tyler’s article about
Improving Compilation Times for details).
Zephyr’s build system will automatically detect and use ccache, so all we have
to do here is save and restore the ccache cache directory, and we’ll get
dramatically faster build times.
Note that the cache should be periodically freshened (this can be done on a nightly or weekly build, for example) to ensure that the compilation cache doesn’t become stale and lose its benefit.
Putting it all together
It’s a bit detailed, but here’s the approach I used to implement the caching as described above. I also made 2 other performance tweaks:
- cache the Python dependencies, by installing them into a Python virtualenv, and caching the virtualenv
- reduce the number of host packages installed (
apt install), since some are already present in the GitHub-hosted runner environment (the list of installed software in these virtual machines can be found by following the information here)
Here’s the updated workflow file:
on:
  pull_request:
    branches:
      - main
  push:
    branches:
      - main
  workflow_dispatch:

jobs:
  build:
    runs-on: ubuntu-latest
    steps:
      - name: 💾 Cache Zephyr Workspace
        uses: actions/cache@v3
        with:
          path: zephyr-workspace
          key: zephyr-workspace-v1-${{ runner.os }}-${{ hashFiles('zephyr-workspace/nrfconnect-ci-app/west.yml') }}
          restore-keys: |
            zephyr-workspace-v1-${{ runner.os }}-

      - name: 🧹 Clean Landing Site
        run: |
          rm -rf zephyr-workspace/nrfconnect-ci-app

      - uses: actions/checkout@v4
        with:
          # Clone the repo to a subdirectory, so we can initialize the Zephyr
          # workspace in the parent directory.
          path: zephyr-workspace/nrfconnect-ci-app

      - name: 💾 Cache ~/.venv
        uses: actions/cache@v3
        with:
          path: ~/.venv
          key: venv-${{ runner.os }}-${{ hashFiles('zephyr-workspace/zephyr/scripts/requirements.txt') }}
          restore-keys: |
            venv-${{ runner.os }}-

      - name: 🧰 Install Dependencies + West
        # Install the Zephyr host build dependencies, and the `west` Python tool. This list is from
        # https://docs.zephyrproject.org/3.5.0/develop/getting_started/index.html#install-dependencies
        run: |
          sudo apt update
          sudo apt install --no-install-recommends \
            ccache \
            ninja-build \

          python3 -m venv ~/.venv
          source ~/.venv/bin/activate
          # insert the PATH changes the venv activate made to be present for
          # future steps
          echo "PATH=$PATH" >> $GITHUB_ENV
          pip3 install west ninja

      - name: 🪁 Install Zephyr SDK
        # Fetch the Zephyr SDK from the GitHub Release artifact, unpack it and
        # run the setup script, selecting the '-c' option to install cmake
        # packages and the '-t arm-zephyr-eabi' option to install the toolchain
        # only for the arm-zephyr-eabi (Cortex-M) architecture, since we don't
        # need the other toolchains (xtensa, riscv, etc.)
        run: |
          wget -q https://github.com/zephyrproject-rtos/sdk-ng/releases/download/v0.16.4/zephyr-sdk-0.16.4_linux-x86_64_minimal.tar.xz
          tar xf zephyr-sdk-0.16.4_linux-x86_64_minimal.tar.xz -C ~/
          ~/zephyr-sdk-0.16.4/setup.sh -c -t arm-zephyr-eabi

      - name: ♻️ Initialize Zephyr Workspace
        # Set up the Zephyr workspace and install the Python dependencies
        run: |
          cd zephyr-workspace
          rm -rf .west
          west init -l nrfconnect-ci-app
          west update --narrow -o=--depth=1

      - name: 🐍 Install Python Dependencies
        run: |
          cd zephyr-workspace
          pip3 install -r zephyr/scripts/requirements.txt

      - name: 💾 Cache ~/.cache/ccache
        uses: actions/cache@v3
        with:
          path: ~/.cache/ccache
          key: ccache-v1-${{ runner.os }}-${{ hashFiles('zephyr-workspace/nrfconnect-ci-app/west.yml') }}
          restore-keys: |
            ccache-v1-${{ runner.os }}-

      - name: 🔨 Build Project
        run: |
          cd zephyr-workspace
          # zero ccache statistics
          ccache -z
          west build \
              --board nrf7002dk_nrf5340_cpuapp \
              --pristine=always nrfconnect-ci-app \
              -- \
              -DCONFIG_MEMFAULT_NCS_PROJECT_KEY=\"1234\"
          # print detailed ccache statistics
          ccache -sv
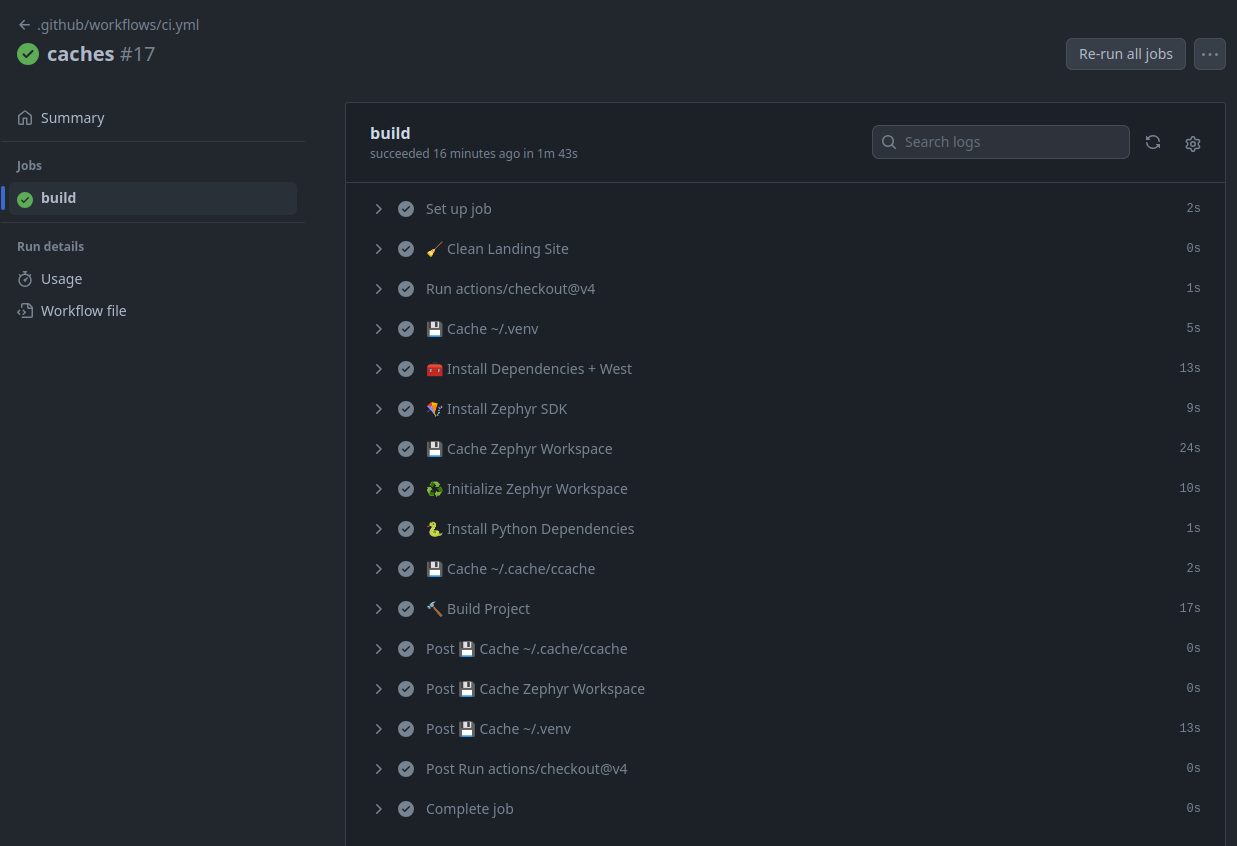
After all that, our total build time as reported by GitHub Actions goes down to
1m43s, or 34% faster. Honestly not that much faster, but it’s a start!
Docker Image Builds 🐳
So far we’ve been using the GitHub-hosted runners, which are virtual machines, to run our workflow. It’s convenient, but we’re at the mercy of the configuration of those machines- the software installed might change at any time, and we are not in full control.
We could work around that problem by installing custom copies of each piece of software we rely on, but instead, let’s use a Docker image to “freeze” our dependencies.
Note that we can specify a particular runner from the list here, for example
ubuntu-22.04, which would likely give us more stable host software (and we could be explicit about which versions we select when we runapt install, but that relies on the Ubuntu package repositories keeping those versions available). But it’s not guaranteed to exist forever- GitHub could at any time remove support for that runner.
Zephyr Docker Image
Zephyr provides a Docker image that contains all the dependencies we need to build our project, documented here:
https://github.com/zephyrproject-rtos/docker-image/pkgs/container/ci
We can make use of this image by specifying it as the runner in our GitHub Actions workflow:
on:
  pull_request:
    branches:
      - main
  push:
    branches:
      - main
  workflow_dispatch:

jobs:
  build:
    runs-on: ubuntu-latest
    container:
      # Zephyr toolchain from here:
      # https://github.com/zephyrproject-rtos/docker-image/pkgs/container/ci
      image: ghcr.io/zephyrproject-rtos/ci:v0.26.6
    env:
      # Tell cmake where to find the zephyr sdk
      CMAKE_PREFIX_PATH: /opt/toolchains
    steps:
      - uses: actions/checkout@v4
        with:
          # Clone the repo to a subdirectory, so we can initialize the Zephyr
          # workspace in the parent directory.
          path: zephyr-workspace/nrfconnect-ci-app

      - name: ♻️ Initialize Zephyr Workspace
        # Set up the Zephyr workspace and install the Python dependencies
        run: |
          cd zephyr-workspace
          rm -rf .west
          west init -l nrfconnect-ci-app
          west update --narrow -o=--depth=1

      - name: 💾 Cache ~/.cache/ccache
        uses: actions/cache@v3
        with:
          path: ~/.cache/ccache
          key: ccache-v1-${{ runner.os }}-${{ hashFiles('zephyr-workspace/nrfconnect-ci-app/west.yml') }}
          restore-keys: |
            ccache-v1-${{ runner.os }}-

      - name: 🔨 Build Project
        run: |
          cd zephyr-workspace
          ccache -z
          west build \
              --board nrf7002dk_nrf5340_cpuapp \
              --pristine=always nrfconnect-ci-app \
              -- \
              -DCONFIG_MEMFAULT_NCS_PROJECT_KEY=\"1234\"
          ccache -sv
Let’s run that and see how it goes:
It ran in 4m53s, much slower than the on-the-fly setup we had before, but we
didn’t have to install anything- all the tools were pre-installed in the Docker
image, so they won’t change (unless we update to a different image). This is a
really good property for CI!
This is the same image the Zephyr project uses for their CI, which is a nice benefit- we can be sure that our project will build in the same environment that the Zephyr project uses.
From the Practical Zephyr - Zephyr Basics (Part 1) article, there’s another example of using the Zephyr CI Docker image, which can be found here:
https://github.com/lmapii/practical-zephyr-manifest-repository/blob/main/.github/workflows/ci.yml
The downside to this image is it’s quite large (>13GB after uncompressing!) and takes ~2m21s to load in our job (note that the Zephyr project relies on self-hosted runners, which have the image pre-cached, so it’s not as much of a problem for them!).
One reason why the image is so large is because it contains toolchains for all
the many architectures Zephyr supports- at the time of writing, the image
contains toolchains for 22 different architectures 😮 (including
sparc-zephyr-elf 🤔)!
The image is open-source, built from the linked repo here:
https://github.com/zephyrproject-rtos/docker-image
So we can look at every piece of software added to that image.
Since our project only needs a single toolchain, let’s go ahead and create our own, custom Docker image!
Custom Docker Image
Before we dive in, I’d like to mention a recent project that maintains several very nice Docker images for embedded development:
https://github.com/embeddedcontainers/ncs
There’s images there for building Zephyr projects and nRF-Connect SDK projects. We can use those images as reference as we go to create our own custom image.
Fortunately, we already have all the pieces we need to construct our docker image, from the section above where we installed all the dependencies on-the-fly. We add all those pieces to a docker image and upload it to the GitHub Container Registry, then use the image in our build.
Here’s the Dockerfile defining the image:
FROM ubuntu:22.04

# set noninteractive installation
ENV DEBIAN_FRONTEND=noninteractive

# install host packages for Zephyr builds. package list is from here:
# https://docs.zephyrproject.org/3.5.0/develop/getting_started/index.html#install-dependencies
RUN apt-get update && apt-get install -y --no-install-recommends \
  ccache \
  cmake \
  file \
  g++-multilib \
  gcc \
  gcc-multilib \
  git \
  gperf \
  make \
  ninja-build \
  python3-venv \
  wget \
  xz-utils

# install the Zephyr toolchain only for arm-zephyr-eabi
ARG ZEPHYR_SDK_VERSION=0.16.4
RUN wget -q https://github.com/zephyrproject-rtos/sdk-ng/releases/download/v${ZEPHYR_SDK_VERSION}/zephyr-sdk-${ZEPHYR_SDK_VERSION}_linux-x86_64_minimal.tar.xz \
  && mkdir -p /opt/toolchains \
  && tar xf zephyr-sdk-${ZEPHYR_SDK_VERSION}_linux-x86_64_minimal.tar.xz -C /opt/toolchains \
  && /opt/toolchains/zephyr-sdk-${ZEPHYR_SDK_VERSION}/setup.sh -c -t arm-zephyr-eabi \
  && rm zephyr-sdk-${ZEPHYR_SDK_VERSION}_linux-x86_64_minimal.tar.xz

# tell cmake where to find the Zephyr SDK cmake packages
ENV CMAKE_PREFIX_PATH /opt/toolchains

# create a Python virtual environment and install Python packages
RUN python3 -m venv /venv \
  && . /venv/bin/activate \
  && pip install --no-cache-dir \
    west==1.2.0

# fetch our target NCS version to make west update faster when we build
COPY west.yml /zephyr-workspace-cache/.manifest/west.yml

# retrieve a lighter version of the Zephyr workspace, which is enough to
# populate a cache for use when building. we'll need to re-generate this image
# if the manifest changes, to keep the benefit.
RUN . /venv/bin/activate \
  && cd /zephyr-workspace-cache \
  && west init -l .manifest \
  && west update --narrow --fetch-opt=--filter=tree:0

# install Python dependencies for the Zephyr workspace
RUN . /venv/bin/activate \
  && cd /zephyr-workspace-cache \
  && pip install --no-cache-dir -r zephyr/scripts/requirements.txt
We’ll build the image using this command:
# note the image tag is set to use the GitHub container registry (ghcr.io), and
# we're setting the current ISO-8601 date as the tag
$ DOCKER_BUILDKIT=1 docker build -f .github/Dockerfile . -t ghcr.io/noahp/memfault-nrfconnect-ci-app:$(date --iso)
Note: if your host machine is not amd64 (eg arm64), you’ll need to pass the following option to the docker build command:
--platform linux/amd64
Pushing the image to the GitHub container registry requires logging in (instructions here), then doing the normal docker push command:
$ docker push ghcr.io/noahp/memfault-nrfconnect-ci-app:2024-01-17
Once the image is uploaded to the GitHub container registry, we can use it in our job:
  custom-docker-image:
    runs-on: ubuntu-latest
    container:
      image: ghcr.io/noahp/memfault-nrfconnect-ci-app:2024-01-17
    steps:
      - uses: actions/checkout@v4
        with:
          # Clone the repo to a subdirectory, so we can initialize the Zephyr
          # workspace in the parent directory.
          path: zephyr-workspace/nrfconnect-ci-app

      - name: ♻️ Initialize Zephyr Workspace
        run: |
          cd zephyr-workspace
          west init -l nrfconnect-ci-app
          west update --narrow -o=--depth=1 --path-cache /zephyr-workspace-cache

      - name: 💾 Cache ~/.cache/ccache
        uses: actions/cache@v3
        with:
          path: ~/.cache/ccache
          key: ccache-v2-${{ runner.os }}-${{ hashFiles('zephyr-workspace/nrfconnect-ci-app/west.yml') }}
          restore-keys: |
            ccache-v2-${{ runner.os }}-

      - name: 🔨 Build Project
        run: |
          cd zephyr-workspace
          ccache -z
          west build \
              --board nrf7002dk_nrf5340_cpuapp \
              --pristine=always nrfconnect-ci-app \
              -- \
              -DCONFIG_MEMFAULT_NCS_PROJECT_KEY=\"1234\"
          ccache -sv
This runs in 1m31s when cached, which is pretty good! The custom docker image
is about 3.4GB uncompressed, much smaller than the Zephyr general purpose image.
Overall advantages to our custom image:
- we can control exactly what software is installed
- smaller image size (more precisely fit to our needs)
- we can include a Zephyr workspace cache in the image, to speed up the
west updatestep
The downside is that we’re now on the hook for maintaining our Docker image. The convenience of the GitHub container registry does make this a little less painful, though.
Fine Tuning Docker Images
I’ll mention a few tools I use to tighten up Docker images:
- dive - a sophisticated tool for analyzing each layer in a Docker image, and identifying opportunities to reduce unused items
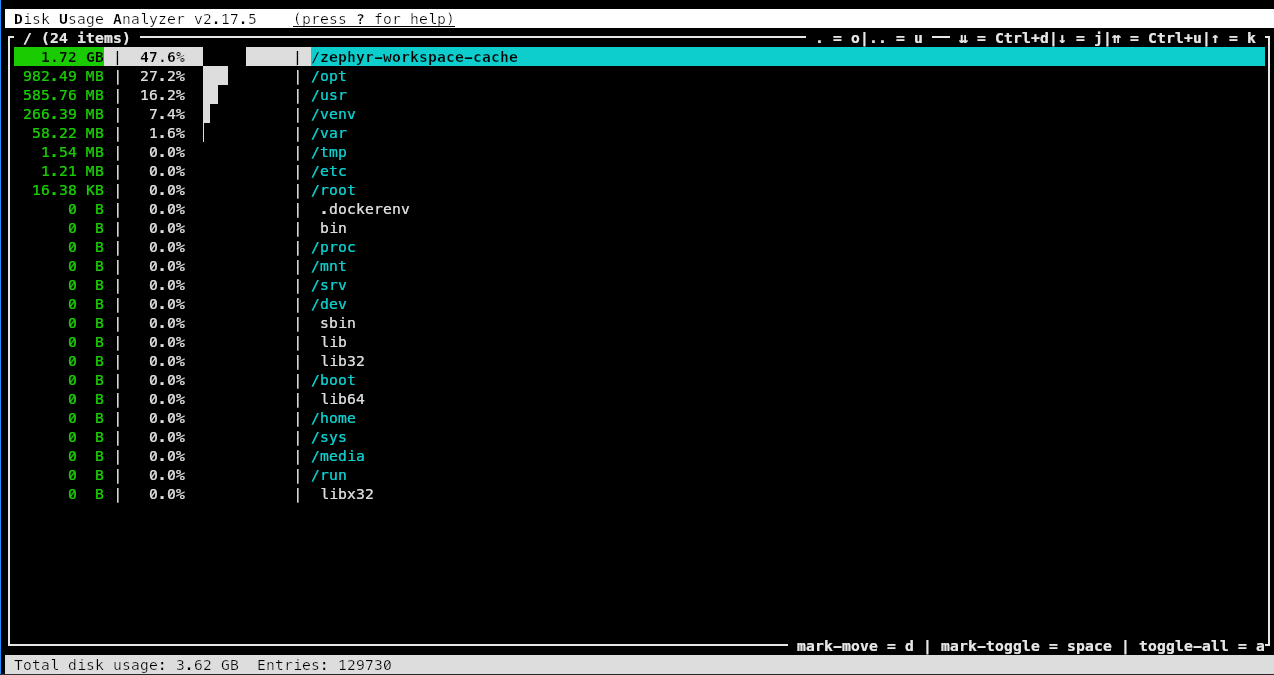
- dua - this is actually not Docker-specific, but it’s a great tool for quickly drilling through the Docker image file system, checking for large files that can be removed
Here’s a way to use dua to inspect the file system of our image:
$ docker run --rm -i -t \
  ghcr.io/noahp/memfault-nrfconnect-ci-app:2024-01-17 \
    bash -c 'cd /tmp && wget -q -c https://github.com/Byron/dua-cli/releases/download/v2.17.5/dua-v2.17.5-x86_64-unknown-linux-musl.tar.gz -O - | tar -xz && ./dua*/dua i /'
Which yields an interactive view of the file system:
Outro
That’s it for this article! We’ve covered a lot of specifics around setting up and tuning GitHub actions for building nRF-Connect SDK projects. I know I learned a good bit about optimizing nRF-Connect SDK builds for CI, and I have a much better understanding of how the Zephyr SDK components work together when building a project.
You can find the project we built in this article here:
https://github.com/noahp/memfault-nrfconnect-ci-app
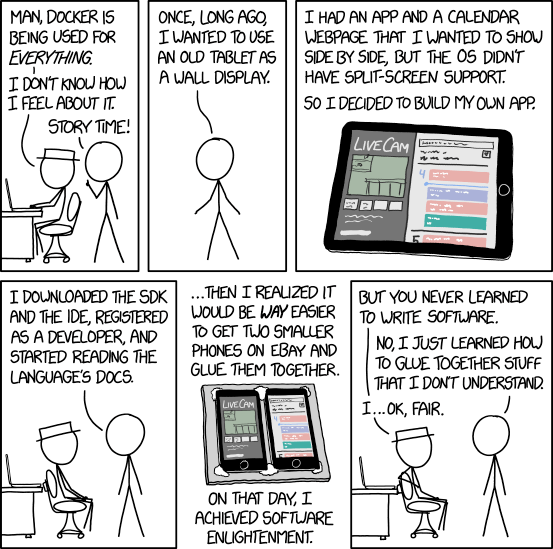
I’ll leave this XKCD comic here, which I think nicely summarizes what we worked through in this article 😄:
See anything you'd like to change? Submit a pull request or open an issue on our GitHub
References
 Noah Pendleton is an embedded software engineer at Memfault. Noah previously worked on embedded software teams at Fitbit and Markforged.