Asynchronous Rust on Cortex-M Microcontrollers
In the realm of embedded software, the demand for efficient and responsive applications is ever-increasing. Asynchronous programming, with its ability to handle concurrent tasks effectively, holds immense potential in this domain. Let’s delve into the world of asynchronous Rust specifically tailored for microcontrollers.
In this article, we explore the inner workings of Futures, cooperative scheduling, and Async Rust executors, highlighting their significance in optimizing resource utilization. Moreover, we introduce the Rust Embassy project, an innovative framework designed to unlock the power of asynchronous programming on microcontrollers.
Note: This article assumes knowledge of Rust, as well as knowledge of using Rust on microcontrollers. If you’re unfamiliar with Rust, I suggest reading The Rust Book. For a good understanding of embedded Rust, The Embedded Rust Book is a great resource, as well as our Zero to Main: Rust article covering how Rust runs on Cortex-M based microcontrollers.
Table of Contents
What is Asynchronous Programming?
Asynchronous programming is a type of concurrent programming where the execution of a task can be paused if it does not have work to do. This is especially useful for tasks that are waiting for some external event to occur, such as a network packet arriving, or a button being pressed. In a synchronous system, the task would have to wait for the event to occur before it could continue execution. In an asynchronous system, the task can be paused, and another task can be executed until the event occurs. This allows for more efficient use of resources, as the thread this task is running on can be used for other tasks while it is waiting. Additionally, all resources for the thread, such as the stack, can be used by other tasks while it is waiting.
How Does Async Rust Work?
Similar to other languages Rust provides async/await syntax to make writing
concurrent code easier. The async/await syntax is built on top of the
Future trait, which
is the core of Rust’s asynchronous programming story. Before we dive into how
async Rust works, let’s take a look at how async functions are defined in Rust:
async fn foo() -> u32 {
    bar().await
}

async fn bar() -> u32 {
    42
}
This code is pretty simple, but there are a few things to note. First, the
async keyword is used to mark a function as async. It’s important to note that
the async keyword is just syntactic sugar for returning a future. The function
signature for foo could be rewritten as:
fn foo() -> impl Future<Output = u32>
The await keyword is important, as it signals for the underlying future to
make progress. Futures in Rust are considered “lazy”, meaning they will
not make any progress until they are polled. We’ll cover polling in more detail
later, but for now, just think of it as a way to advance the state of the future.
The await keyword is what calls poll on the future, and returns the
result of the future.
Now that we have a good idea of how async functions generate futures, let’s look in depth into how futures work.
Rust Futures
Futures in Rust represent a calculation that eventually yields some result. All
futures implement the
Future trait:
pub trait Future {
    type Output;

    fn poll(self: Pin<&mut Self>, cx: &mut Context<'_>) -> Poll<Self::Output>;
}
Pretty simple right? Let’s unpack what we’re looking at. The Output type is
exactly what you’d expect, the output of our calculation. The poll function
hides a bit of complexity. Starting from the return value we see our defined
Output type, but what is the type wrapping it? Diving deeper we see the
following definition for
Poll:
pub enum Poll<T> {
    Ready(T),
    Pending,
}
This enum represents the two possible states of a future. The Ready state
indicates that our calculation represented by the future is complete, and
encloses our defined return type. The Pending state indicates that our future
is not yet complete, and has more work that needs to be done. Generally, this
means we’re waiting for some I/O to complete, say a packet from a network stack,
or a message over a SPI bus.
To advance the state of our future we could call poll repeatedly until we
get a Ready status, but that seems rather inefficient. If our Future is
dependent on an external I/O event, looping over calls to poll keeps our
processor awake and wastes precious power. This observation brings us to the
only argument passed into the poll function, the future
Context.
The Context only has one role, to provide access to the Future’s
Waker.
The Waker gives us an elegant solution to calling our poll implementation in
a loop. When a future is not ready to complete, the asynchronous action can save
off the Waker and use it to inform the executor that there is more work to be
done in the future. An example of this would be an interrupt on a GPIO wired to
a button. We’ll go over this exact example later in the article!
Now that we understand how futures work, we can plot out the lifetime of one like so:
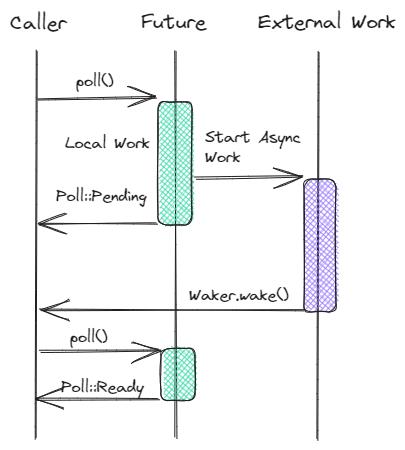
The last part of the poll function we haven’t covered is a fairly spicy bit.
The self reference here is a little strange. Let’s take a deeper look:
self: Pin<&mut Self>
This is one of the stranger variants of self we can see on a trait.
The &mut self is pretty standard, but what is this Pin thing? The
Pin struct acts as a
marker that tells the compiler that the memory of the wrapped type will not be
moved. This is important when we’re dealing with futures, as we need to ensure
that all of the state tracking the future’s progress is not moved. If the
underlying calculation is not complete, and we move the memory, we could lose
track of the future’s progress. Any future poll would potentially be in an
invalid state, as it would attempt to access memory that is no longer valid.1
Async Executors
Now that we have a good understanding of Rust futures work we need to look at the core of any async system, the executor. Unlike its contemporaries in other languages like Go or Javascript, Rust does not have a built-in executor. This means that we need to provide our executor implementation. While this may add a bit of complexity, it also gives us a lot of flexibility. We can choose the executor that best fits our needs, and we can even write our own if we need to. This is what allows us to run async Rust on embedded systems, as well as giant servers in the cloud.
Any executor implementation needs to fulfill a few requirements:
- Keep track of all running tasks
- Provide the ability to spawn new tasks
- Provide a mechanism for
Wakers to notify the executor there is work to be done for a given task. - Poll all tasks when they have work to complete
Since Rust futures are state machines that expect to run to completion, we can’t rely on preemptive scheduling like we would when running an RTOS. Instead, we must use cooperative scheduling.
Cooperative vs. Preemptive Scheduling
Preemptive Scheduling
We’re all familiar with Preemptive scheduling. This is the type of scheduling used in most RTOS, as well as the most prominent operating systems like Linux, Windows, and MacOS. At a high level preemptive schedulers can stop the execution of a task at any time it sees fit. Generally, there is a concept of priority, and the OS kernel will favor higher-priority threads when determining which threads to run while attempting to allow all tasks to run.
If you’re looking for a deeper dive into RTOS context switching, check out our post on Cortex-M Task Switching. Additionally, check out this great article doing a Comparison of FreeRTOS and Embassy.
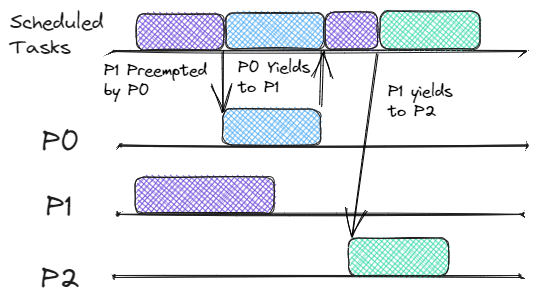
Cooperative Scheduling
Cooperative scheduling is quite different. There is no priority, and tasks are run until they return (yield) control back to the caller. It is the responsibility of the task to be a good neighbor, and not run for too long. Compare the preemptive scheduling diagram above with the cooperative scheduling diagram below. Notice how the tasks can run to completion before switching to the next task.

On its own, this cooperative scheduling doesn’t seem to provide much value. Why would we want to move the cognitive load of ensuring all tasks run from the OS scheduler to the writer of the tasks? Doesn’t this also start to resemble a super loop? I thought we moved to an RTOS to get away from having to worry about these things?! If we combine cooperative scheduling with our understanding of Rust futures, we start to see the value. Whenever a future yields, the next future can be polled. This means that we can run multiple futures on a single thread! That means concurrent execution without the overhead of context switches or a separate stack for each task!
Embassy
Embassy is probably the most popular async executor for embedded systems. It provides a full suite of synchronization primitives and a very small footprint. Additionally, it provides fully implemented HALs for many popular microcontrollers.
So far we’ve done a lot of gabbing about how async executors work, but we haven’t written any code! Let’s change that by looking at a simple blinky example using Embassy.
Note: The examples below are written for the STM32U5 Discovery Kit If you want to look at the full code, check out the Interrupt Github Repo.
Blinky Example
#[embassy_executor::main]
async fn main(spawner: Spawner) {
    let p = embassy_stm32::init(Default::default());
    let led = Output::new(p.PH7, Level::Low, Speed::Medium);

    spawner.spawn(blinky(led)).unwrap();
}

#[embassy_executor::task]
async fn blinky(mut led: Output<'static, PH7>) -> ! {
    const LED_PERIOD_MS: u64 = 200;

    let mut ticker = Ticker::every(Duration::from_millis(LED_PERIOD_MS));
    loop {
        led.toggle();
        ticker.next().await;
    }
}
This example likely looks very familiar to anyone who has written a blinky
example before. We’re spawning a task that toggles an LED every 200ms. What
likely isn’t familiar is all this crazy embassy_executor, and spawner stuff.
Let’s break down this example piece by piece.
#[embassy_executor::main]
async fn main(spawner: Spawner) {
The #[embassy_executor::main] attribute macro has a few responsibilities2.
First, it provides an
entry point
for our program. This is the function that will be called by the Cortex-M
reset handler on boot. If you want to learn more about this check out our
Zero to Main: Bare Metal C
article.
Secondly, it creates a new
Executor
for us. In our configuration, this executor is expected to have a 'static
lifetime, meaning that it’s expected to live for the entire lifetime of the
program. This makes sense, as we need our executor to live at least as long as
all of our tasks.
Lastly, it spawns a task that will run our main function and passes a copy
of the internal
Spawner
handle for our executor. This handle allows us to spawn new tasks and send them
over to our executor. The Spawner implements
Copy, so it can be
cheaply passed around to different tasks to allow them to spawn new tasks.
let p = embassy_stm32::init(Default::default());
let led = Output::new(p.PH7, Level::Low, Speed::Medium);
This section sets up the LED that we’ll be blinking. Since we’re using an
stm32 dev kit, we’re using the
embassy_stm32
crate. The call to embassy_stm32::init is responsible for setting up all of
our peripherals. The Output struct provides us with a safe interface for
interacting with the GPIO that our LED is connected to PH73.
spawner.spawn(blinky(led)).unwrap();
The final bit of our main function is to spawn our blinky task. This adds
the task to the executor’s task queue and allows it to be polled when it has
work to do.
#[embassy_executor::task]
async fn blinky(mut led: Output<'static, PH7>) -> ! {
Now we’re on to the fun part! The #[embassy_executor::task] attribute macro
is responsible for turning our blinky function into a task. The underpinnings
of this macro are a bit beyond the scope of this article, but if you’re
interested you can check out the
embassy-macro crate.
For now, we can just think of this macro as a special wrapper that turns the
future generated by our blinky function into a task that can be polled by the
embassy executor.
const LED_PERIOD_MS: u64 = 200;

let mut ticker = Ticker::every(Duration::from_millis(LED_PERIOD_MS));
loop {
    ticker.next().await;
    led.toggle();
}
We’re almost done! The rest of our blinky function is just a simple loop that
toggles our LED every 200ms. The Ticker struct is provided by the
embassy::time crate,
and provides a simple interface for waiting for a given duration. The
next
method returns a future that will resolve once the given duration has elapsed.
I’m sure you’ve guessed what the last bit does, but just in case, it toggles
the GPIO pin that our LED is connected to.
This is a pretty simple example, but it demonstrates the basics of how to write an async program using Embassy. Let’s modify the example to be a bit more complex, and see how we can extract some more interesting value.
Button Example
Our button example will be largely the same as our blinky example, but we’ll add a button to the mix. When the button is pressed we’ll toggle the blinking of the LED. Let’s take a look at the code.
static LED_BLINK_ACTIVE: AtomicBool = AtomicBool::new(true);

#[embassy_executor::main]
async fn main(spawner: Spawner) {
    let p = embassy_stm32::init(Default::default());

    let led = Output::new(p.PH7, Level::High, Speed::Medium);
    let button = Input::new(p.PC13, Pull::Down);
    let button = ExtiInput::new(button, p.EXTI13);

    spawner.spawn(buttony(button)).unwrap();
    spawner.spawn(blinky(led)).unwrap();
}

#[embassy_executor::task]
async fn blinky(mut led: Output<'static, PH7>) -> ! {
    const LED_PERIOD_MS: u64 = 200;

    let mut ticker = Ticker::every(Duration::from_millis(LED_PERIOD_MS));
    loop {
        ticker.next().await;
        if LED_BLINK_ACTIVE.load(Ordering::Relaxed) {
            led.toggle();
        }
    }
}

#[embassy_executor::task]
async fn buttony(mut button: ExtiInput<'static, PC13>) {
    loop {
        button.wait_for_rising_edge().await;

        LED_BLINK_ACTIVE.fetch_xor(true, Ordering::SeqCst);
    }
}
The first thing you’ll notice is that we’ve added a new static variable,
LED_BLINK_ACTIVE. It is an
AtomicBool
that allows us to safely share it between tasks. We’ll use this variable to
track whether or not the LED should be blinking.
let button = Input::new(p.PC13, Pull::Down);
let button = ExtiInput::new(button, p.EXTI13);
In this next section of the new code, we’re setting up our button. The first
line sets up our PC13 GPIO as an input. The second line assigns the GPIO to an
interrupt in the EXTI4 peripheral of the STM32U5. This sets up the GPIO as
an interrupt source and allows us to wait for the button to be pressed without
having to poll the GPIO.
if LED_BLINK_ACTIVE.load(Ordering::Relaxed) {
    led.toggle();
}
Next, we have a small change in our blinky task. We’ve added a check to see if
the LED should be blinking. If it should, we toggle the LED. If not, we do
nothing. This is a simple way to pause the blinking of the LED when we press the
button.
#[embassy_executor::task]
async fn buttony(mut button: ExtiInput<'static, PC13>) {
    loop {
        button.wait_for_rising_edge().await;

        LED_BLINK_ACTIVE.fetch_xor(true, Ordering::SeqCst);
    }
}
Our last bit of code is the meat of our new addition. The aptly named buttony
task. This task is responsible for waiting for the button to be pressed, and
then toggling the LED_BLINK_ACTIVE
AtomicBool
. Let’s dive deep into the wait_for_rising_edge method to get a good
understanding of how it works, and tie together our understanding of Async Rust
on embedded.
Asynchronous Interrupts in Embassy
Note: We’re going to be diving into the source code of Embassy here. At the time of writing Embassy is still in development, and the code outlined here may change. Even if this implementation changes, the core concepts of how an asynchronous interrupt would be implemented will remain the same.
Let’s dive into the source code of the
wait_for_rising_edge
method.
pub async fn wait_for_rising_edge<'a>(&'a mut self) {
    ExtiInputFuture::new(self.pin.pin.pin.pin(), self.pin.pin.pin.port(), true, false).await
}
That’s a lot of pins! All of these calls to pin are a result of a few layers of
abstraction here that we won’t touch on. The important thing to note is that
this is the pin we initially assigned to the EXTI interrupt. In our case this
PC13 and its associated port. The other arguments are the edge we’re waiting
on. One other note is that the pins here are GPIO pins and not the Rust
future Pin type we discussed earlier.
It looks like the core of this function is in another castle! Let’s take a look
at the
ExtiInputFuture
struct, and see if we can learn anything interesting.
struct ExtiInputFuture<'a> {
    pin: u8,
    phantom: PhantomData<&'a mut AnyPin>,
}

impl<'a> ExtiInputFuture<'a> {
    fn new(pin: u8, port: u8, rising: bool, falling: bool) -> Self {
        critical_section::with(|_| {
            let pin = pin as usize;
            exticr_regs().exticr(pin / 4).modify(|w| w.set_exti(pin % 4, port));
            EXTI.rtsr(0).modify(|w| w.set_line(pin, rising));
            EXTI.ftsr(0).modify(|w| w.set_line(pin, falling));

            // clear pending bit
            #[cfg(not(any(exti_c0, exti_g0, exti_l5, exti_u5, exti_h5, exti_h50)))]
            EXTI.pr(0).write(|w| w.set_line(pin, true));
            #[cfg(any(exti_c0, exti_g0, exti_l5, exti_u5, exti_h5, exti_h50))]
            {
                EXTI.rpr(0).write(|w| w.set_line(pin, true));
                EXTI.fpr(0).write(|w| w.set_line(pin, true));
            }

            cpu_regs().imr(0).modify(|w| w.set_line(pin, true));
        });

        Self {
            pin,
            phantom: PhantomData,
        }
    }
}
The members of this struct are mostly what we’d expect. The pin member is
the GPIO attached to our button. The
PhantomData
member is a bit of a distraction here. We won’t cover it in detail, but it’s a
way to preserve the lifetime needed for the future even though we don’t
use the lifetime anywhere.
The new method is where we set up our interrupt. We won’t cover all of the
individual bit manipulations here. If you want to get a complete understanding
of what’s going on, check out section 23 of the STM32U5 reference manual4.
At a high level here’s what’s going on:
- First, we enter a critical section. This ensures that we aren’t interrupted while we’re setting up our interrupt.
- Next, we set the
EXTIinterrupt to use the pin we’re waiting on. - Then we set the edge we’re waiting on. In our case, we’re waiting for a rising edge.
- Then we clear the pending bits of any interrupts on this line
- Finally, we enable the interrupt to wake up the CPU when it’s triggered.
This is all pretty standard peripheral configuration. What we’re
interested in is how this future is driven to completion. Let’s take a look at
the Future
implementation for
ExtiInputFuture.
impl<'a> Future for ExtiInputFuture<'a> {
    type Output = ();

    fn poll(self: Pin<&mut Self>, cx: &mut Context<'_>) -> Poll<Self::Output> {
        EXTI_WAKERS[self.pin as usize].register(cx.waker());

        let imr = cpu_regs().imr(0).read();
        if !imr.line(self.pin as _) {
            Poll::Ready(())
        } else {
            Poll::Pending
        }
    }
}
It’s taken a while, but we’re finally looking at a Rust future implementation for a peripheral! Given how much we’ve covered so far, this implementation should be pretty straightforward. Let’s break it down.
EXTI_WAKERS[self.pin as usize].register(cx.waker());
This line is the key to how this future is driven to completion. Here we copy the waker associated with the future to a static array of wakers that each map to a specific interrupt line. We’ll come back to this in a moment when we look at the actual interrupt handler.
let imr = cpu_regs().imr(0).read();
if !imr.line(self.pin as _) {
    Poll::Ready(())
} else {
    Poll::Pending
}
Here we check if the interrupt has fired, and return Poll::Ready if it has. If
it hasn’t fired yet, we return Poll::Pending. This is the pattern we
established earlier for futures. If there is still work to be done, in the case
of this future waiting for an interrupt, we return Poll::Pending.
pub unsafe fn on_irq() {
    #[cfg(not(any(exti_c0, exti_g0, exti_l5, exti_u5, exti_h5, exti_h50)))]
    let bits = EXTI.pr(0).read().0;
    #[cfg(any(exti_c0, exti_g0, exti_l5, exti_u5, exti_h5, exti_h50))]
    let bits = EXTI.rpr(0).read().0 | EXTI.fpr(0).read().0;

    // Mask all the channels that fired.
    cpu_regs().imr(0).modify(|w| w.0 &= !bits);

    // Wake the tasks
    for pin in BitIter(bits) {
        EXTI_WAKERS[pin as usize].wake();
    }

    // Clear pending
    #[cfg(not(any(exti_c0, exti_g0, exti_l5, exti_u5, exti_h5, exti_h50)))]
    EXTI.pr(0).write_value(Lines(bits));
    #[cfg(any(exti_c0, exti_g0, exti_l5, exti_u5, exti_h5, exti_h50))]
    {
        EXTI.rpr(0).write_value(Lines(bits));
        EXTI.fpr(0).write_value(Lines(bits));
    }
}
The last piece of the puzzle is the interrupt handler. Again we won’t cover all
of the register configurations 4 here. The important part is right in the
middle where we call wake on the waker associated with the interrupt line that
fired.
for pin in BitIter(bits) {
    EXTI_WAKERS[pin as usize].wake();
}
This is the key to how our future is driven to completion. When any interrupt
registered fires, we’ll call the associated waker. Under the hood, this will
throw our buttony task back onto the executor’s task queue, and it will be
polled when it gets its next turn.
Benefits of Async Rust on Embedded Systems
One of the biggest benefits of async Rust is a much smaller RAM footprint. A traditional RTOS will require a stack for each task. Rust futures only need to keep track of variables that are used across await points. This means that the memory needed for an async task can be much smaller than a traditional RTOS task, as small as 10s of bytes for less complex tasks! This means we can spin up more tasks that have smaller discrete jobs, instead of overloading single tasks with multiple responsibilities.
Another benefit is the lack of context switching between tasks. Since we’re operating in a cooperative scheduling environment, we don’t need to save and restore the state of a task when it is pending. This means we can spend more time doing useful work, and less time context-switching!
Downsides of Async Rust on Embedded Systems
There’s no such thing as a free lunch, and async Rust is no exception. There are some downsides to using async Rust on embedded systems.
While async Rust feels ergonomic, there is still a lot of complexity under the hood. This can make it difficult to debug issues when they arise. An overloaded task that is starving others in the runtime can be difficult to diagnose. This isn’t helped by the fact that debug symbols can get a little weird when using async Rust. This is because stack unwinding isn’t quite what you’d expect when looking because of the way futures are polled and scheduled.
Another downside is the lack of priorities introduced by the cooperative scheduler. To its credit, Embassy has a pretty cool solution to this problem. Using the priorities assigned to interrupts, an executor is run in each of these interrupts5. This allows for a form of priority-based scheduling, but it’s a decent amount of added complexity compared to a traditional preemptive RTOS.
Additionally, the ability to spawn more tasks than you would with a traditional RTOS can be a double-edged sword. While it’s great to be able to spin up more tasks, it can be easy to go overboard and create too many tasks. This can lead to an overloaded task queue, with tasks spending more time waiting to be polled.
Final Thoughts
Async Rust is a powerful tool for embedded systems. It allows us to write concurrent code that is easy to reason about and has a small memory footprint. It’s not without its downsides, but the benefits far outweigh the costs in my opinion. I hope this article has helped you understand how async Rust works under the hood, and how it can be used to write concurrent code on embedded systems.
We’ve only scratched the surface of what’s possible with async Rust. I hope this article serves as a jumping-off point for you to explore the world of async Rust on embedded systems. I hope you have fun writing concurrent code in this paradigm!
See anything you'd like to change? Submit a pull request or open an issue on our GitHub
Further reading
- lilos: A lightweight async executor for cortex-m devices.
- Making the Tokio scheduler 10x Faster: An interesting blog post about a rewrite of the Tokio scheduler.
- The Rust Async Book: The official documentation for async Rust.
References
 Blake Hildebrand is an embedded software engineer at Memfault. Blake previously worked on embedded software teams at Garmin and Amazon Robotics.