Beyond Error Codes - Debugging Ill-Defined Problems
It’s Friday around 4 PM. You’ve been on a productivity tear and are getting to wrap up for the week when, all of a sudden, things go off the rails. Logging has stopped entirely with no clues to the problem, your LED has stopped blinking, and even the debug CLI you painstakingly coded has stopped responding to any of your commands. “But I wasn’t even making a complicated change!” you yell into the void. You’ve thoroughly bricked your firmware, and none of the usual safety nets you’ve set for yourself are telling you why!
These types of problems can be extremely frustrating and intimidating when they occur. They often undermine confidence in the codebase, making it seem as if problems could jump out at any time when you make any change whatsoever. I’ve encountered these sorts of problems many times in my career. Each one has served as a painful lesson in debugging issues like this.
The good news is there has always been an explanation for any issue I’ve encountered. And they’ve yet to be caused by a rogue neutron, despite how often I wish the culprit was someone other than myself.
The following guide serves as a prescriptive, step-by-step way of debugging errors that on their face appear to be intangible.
🎬 Listen to Hayden on Interrupt Live talk about the content and motivations behind writing this article.
Table of Contents
-
Steps
- Step 1: See What Changed
- Step 2 - Utilize All Compiler Error Reporting Capabilities
- Step 3 - Utilize All MCU Error Reporting Capabilities
- Step 4 - Isolate the Problem Surface Area with Logging and/or Debugging
- Step 5 - Keep an Eye on Your Stack
- Step 6 - Keep an Eye on Your Heap
- Step 7 - Vet Critical Peripherals
- Step 8 - MCU Errata and Application Notes
- Step 9 - Ask for Help
- Case Studies
- Conclusion
Steps
I wrote these steps to get the most information about the error with as little effort as possible. Each step increases in level of effort as you go along. The goal is that at some point throughout the steps, you can gain enough information about the error to isolate and fix it. At the end of the steps, I present a couple of case studies from my personal experience to showcase how I have used these steps to debug issues.
While there are some “hardware” aspects to some of the bugs described, I should note that I designed this guide for debugging “software-induced” errors. Therefore, the following errors (while just as critical to fix) are out of the scope of this article:
- Poorly/incorrectly designed circuit boards
- ESD damage or general IC damage/failure
- Brownouts/inadequate power supply
Step 1: See What Changed
This step seems insultingly simple, and yet it is one I often forget myself. Unless you’ve never successfully gotten your firmware to boot, presumably, there was a time when your firmware functioned in some capacity. Being able to diff your codebase between “working” and “broken” states is crucial for giving you a nudge toward what might be broken. You may not understand precisely what is happening yet, but that’s ok. Even knowing the general area the problem might be in is valuable information.
Find the smallest possible change you can make that induces the bad state. Depending on when you last made a commit, this step might involve adding incremental changes between the last working commit and the current broken state. There’s even a great article already on Interrupt about using git bisect to accomplish what I’m describing.
Now that you have a general idea of where the problem may lie, it’s time to utilize some error reporting capabilities built into your compiler and MCU.
Step 2 - Utilize All Compiler Error Reporting Capabilities
If you’re using vendor tooling that auto-generates your build system for you,
you might be missing out on some no-effort error prevention! There are a variety
of compiler flags and static analysis tools in your compiler that can make your
life easier. One of these (-Wreturn-type) would have saved me immediately in
one of my examples. Philip Johnston over
at Embedded Artistry has written a
great blog post
on some of the flags he uses and why they’re important.
Step 3 - Utilize All MCU Error Reporting Capabilities
Nearly every MCU I’ve worked with has some fault-reporting capability. A fantastic Interrupt article I find myself coming back to time and time again details hard fault handlers, specifically on Cortex-M platforms.
Almost all of the problems I’ll describe in my case studies eventually presented themselves as triggering a hard fault (and thus ending up in a hard fault handler). It is common for HAL code provided by a vendor to provide weakly defined default hard fault handlers like so:
void Default_Handler()
{
  while (1) {
  }
}
void HardFault_Handler()   __attribute__((weak, alias("Default_Handler")));
At the very least, replacing these handlers with something that at least logs what’s happened can immediately point you in the direction of the problem:
void HardFault_Handler()   {
  log("A hard fault occurred!");
  asm volatile ("bkpt #0");
  while(1) {};
}
Note the ARM-specific “breakpoint” instruction for allowing an automatic halt when a debugger is connected.
The specificity of fault reporting will vary by MCU, but you should try to gain as much knowledge as possible about the fault that’s occurring. For example, on a Cortex-M7-based MCU, you can learn if the fault was:
- Caused by an invalid memory access (and sometimes what the offending bad address was)
- An unaligned load or store
- A divide by zero
- An undefined instruction
- An MPU (memory protection unit) violation (trying to write to a region marked read-only, for instance)
Sometimes, you get lucky, and the information received lets you immediately isolate the error. Otherwise, this gives you a clue for the general area to look at. For instance, if I see a hard fault from trying to access a bad memory address, I know to look for some form of memory “corruption”. While this can encompass a broad range of issues, I know at least the general problem I’m looking for.
Having exhausted some minimal effort options, let’s now take a more hands on approach to isolating the problem.
Step 4 - Isolate the Problem Surface Area with Logging and/or Debugging
This step aims to isolate where the problem occurs to the smallest possible piece of code. I don’t say “line of code” here because sometimes problems (especially related to stack/heap corruption) don’t happen in the same place each time. Firmware is often quite dynamic, responding to stimuli from the outside world. Here, we are trying to remove as many changing variables as possible. Ideally, we want to be able to reproduce the fault in the same place and the same way each time.
Methods to accomplish this can include:
- Adding log statements before/after the suspected fault area, moving them closer and closer together until the offending code is isolated
- Attaching a debugger and seeing if you can generate the fault while “stepping through” code
- Simplifying/mocking certain aspects of your firmware to make runs more repeatable (for instance, fixing a sensor to a specific value or set of values)
- For problems that only happen sporadically, setting up as much logging as you can surrounding the suspect code (state of the system, state of variables, etc.) and letting your firmware run overnight can help catch the issue. It must be noted that Memfault’s entire platform is dedicated to catching errors like these in shipped products! With cloud connected devices, you wouldn’t even need a debugger connected as core dumps are automatically uploaded for later analysis.
Don’t feel discouraged if you’ve completed this step and you still don’t quite understand what’s happening. For example, you may know that a bad memory access occurs at a specific function call in your program. But you still have no idea why it’s occurring. You might even call this function elsewhere, and it doesn’t generate a fault!
Now that you’ve hopefully isolated more or less where the error is occurring, we can start to dig into more subtle and nuanced potential root causes.
Step 5 - Keep an Eye on Your Stack
I’ve created a general rule for myself: Whenever there’s a hideous, hard-to-repeat, totally illogical, nonsensical issue happening in my firmware, I take a breath and ask myself: Is there any possibility I’m overflowing my stack? Several times, the answer to that question has been a resounding “yes”. Catching and debugging stack overflows is a topic that deserves an entire article; however, there are a couple of easy things to try that might help answer this question.
Do you know where your stack(s) live? This sounds like a silly question, however, there are many different potential configurations for where a stack lives in memory especially if you’re using an RTOS. This involves looking into your startup code to see where the initial stack pointer gets set and where that address comes from (hardcoded, linker symbol, etc.). In an RTOS that performs context switching, there will generally be a different stack for each thread/task in your system, any of which can overflow.
The easiest way to start probing for a potential stack overflow is to make your stack(s) bigger and see if that resolves the problem. More precise methods for catching overflows involve using “canary values” near the end of your stack or utilizing the MPU to generate a fault if the stack overflows into a forbidden region. This article on Embedded Artistry details the “canary method” while this article discusses utilizing the MPU, among other methods. Another thing to note is that if utilizing an RTOS, you may already have access to some optional stack overflow protection checks (usually at the cost of performance). For instance, FreeRTOS offers stack protection features.
Knowing where your stack “starts” and “ends” can be helpful when debugging. If you can pause on a breakpoint near the point of failure, you can read the stack pointer to get a glance at how close to an overflow condition you are.
Similarly to the stack, another troublesome piece of memory management could be our culprit.
Step 6 - Keep an Eye on Your Heap
Do you use dynamic memory allocation (think malloc(), calloc(), realloc())
in your application? If you answered no, are you sure? Generally speaking, to
even use any memory allocation functions (which are provided in the standard
library) a “system call” function _sbrk_r must be defined. For convenience,
many “code generation” style vendor tools will generate a default implementation
of _sbrk_r for you, as well as linker scripts and symbols that locate your
stack and heap. There are also a host of functions in the C and C++ standard
libraries that (implementation dependent) end up allocating memory under the
hood (printf(), sprintf(), std::string, std::Vector to name only a few).
The combination of these two leads many people (myself included at one point!)
to have dynamic memory allocation in their program under the hood without them
even realizing it. When starting a new project, I like to start by defining
_sbrk_r with a placeholder like so to ensure any memory allocation I wasn’t
expecting makes itself known:
char *_sbrk_r(int incr)
{
  log("Not so fast!");
  asm volatile ("bkpt #0");
  while(1) {};
  // Unreachable
  return NULL;
}
Dynamic memory allocation isn’t inherently a bad thing, however, it opens up the door for an entirely different class of errors. The following article from Oracle does a fairly good job at succinctly summing up some of the errors you could expect when using dynamic memory allocation.
There’s another error worth mentioning when the heap gets involved that is pretty specific to bare metal systems like the ones we work with. Oftentimes, the heap and stack on a bare metal system are configured like so:
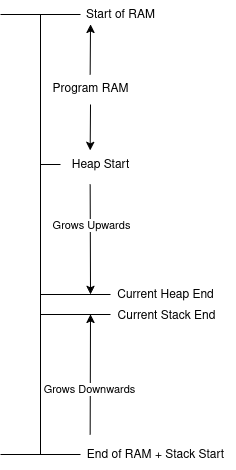
The stack grows downward in address space, while the heap grows upwards. Like two trains rushing towards each other on the same track, one getting large enough will eventually start to clobber the other. This produces behavior very similar to a stack overflow. Fortunately, because any heap expansion is called explicitly in code, checks can and should be implemented to trigger an error condition if the heap is about to grow beyond its bounds. Some RTOSes even include their own heap management schemes, such as FreeRTOS and Zephyr. Similar to stack inspection, stopping the program with a debugger and taking a look at the state of your heap (and the variables that have been allocated within it) before the offending portion of code can sometimes yield insights into potential memory corruption issues.
Having vetted the stack and the heap, it’s time to step down a level and get a little closer to the MCU itself.
Step 7 - Vet Critical Peripherals
We are now entering a rather not-fun section of debugging, which could uncharitably be called “grasping at straws”. At this point, you’ve gained a lot of confidence about bad behavior you aren’t doing, and yet you’re still getting that hard fault, nonsensical memory access, etc. Now, you’ll want to turn a critical gaze toward “mission-critical” peripherals that could be misconfigured. I’ll go through a couple of categories of peripherals that fall into this category and some common pitfalls for each.
Memory Mapped RAM/Flash
Memory Mapped RAM/Flash refers to an MCU that can map external RAM or Flash ICs in memory. A common example many readers may have experience with is the Raspberry Pi Pico. This chip (the RP2040 or new RP2350) has only immutable ROM memory internally for persistent storage and instead executes code loaded on an external flash IC. “Memory mapped” means that once appropriately configured, the processor can treat memory locations on these external chips as lying in a normal address space. As I will demonstrate in one of my case studies, misconfiguring one of these ICs can lead to VERY odd behavior. The configuration of these devices and the peripherals that enable memory mapping should be investigated using a fine-toothed comb.
DMA
DMA refers to direct memory access, a peripheral whose purpose is to perform memory transfers in parallel while the processor does other things. The DMA should be used very carefully, as it is incredibly easy to corrupt memory without careful usage. C and C++ do not know what the DMA is “doing” at any given time, so take extra care to verify whether or not the DMA is currently operating on a region of memory. Embedded engineers can do various dangerous things with the DMA, including:
- Telling the DMA to copy memory from an array that is about to go out of scope, the DMA will happily keep copying memory out of a location that is no longer valid
- Trying to modify memory in code that the DMA is already actively writing to, neither operation will succeed as intended
- Using the DMA with cached memory (see next topic)
Caching
As MCUs grow more complex, many are starting to come with instruction (ICache) and data (DCache) caches. While caching can significantly speed up program execution, it also brings several capital H headaches. To vastly oversimplify it, a processor’s cache stores a copy of commonly accessed data in a special location that’s much faster to access than getting it from RAM or flash storage. Generally, the processor handles deciding when and what to fetch from the cache (vs the actual memory location) for you. It gets complicated when you start bringing in peripherals like the DMA. The DMA often operates without “letting the processor know” that the cache needs to be refreshed, leading to fetching stale/erroneous data. If you even slightly suspect the cache might be contributing to your issue, try turning all caching off. Some processors even allow you to manually flush the cache with a register write. So, a more nuanced approach could be adding a call to flush the cache before a suspect operation.
MPU
Some MCUs come with a “Memory Protection Unit” or MPU. The MPU is used to designate what is allowed in specific regions of memory. For instance, one region might be read-only and allow code execution, while another might be read/write but disallow code execution. The MPU can often be complicated to configure, and misconfiguration can lead to unintentional hard faults. For example, this kind soul provides an extremely detailed write-up on the trials and tribulations of configuring the MPU for Cortex-M7-based STM32 chips.
Interrupt Controller
I could dedicate far more than a paragraph to all the trials and tribulations of configuring interrupts and interrupt handlers correctly, however, given the already large scope of this article, I’ll simply provide a couple of reminders:
- Do you have data that can be accessed in both interrupt and non-interrupt
contexts? If so, ensure you protect against any potential data races.
This article may surprise some, the
volatilequalifier does not provide a means of thread synchronization. - Is there anywhere in your code you disable/mask interrupts? Take extra care during these “critical sections” to avoid missing interrupts and potentially causing unintended behavior.
- If using an RTOS, are you using the appropriate interrupt/non-interrupt APIs (if applicable)? For instance, FreeRTOS has separate “interrupt safe” and “non-interrupt safe” APIs, and you must use them correctly to avoid undefined behavior.
Step 8 - MCU Errata and Application Notes
The reason checking the eratta and application notes is so far down the list is that this assumes at one point you did at least glance through the errata section of your MCU’s datasheet. Now, we’re digging back through errata and application notes, hoping that we missed something during the first readthrough and that we could attribute our odd behavior to a silicon bug or a known issue. Application notes can be extremely helpful to read through, especially for some of the more complicated/mission-critical peripherals listed above. Using the same STM32 example as for the MPU, ST has provided an application note specifically on using the DMA. There’s even a specific section with “Tips and Warnings”!
Step 9 - Ask for Help
And, when all else fails… there’s nothing wrong with asking for help. Tracking down and eliminating an especially brutal bug is very rewarding however at the end of the day products need to ship, days need to end, and people need to sleep. Other than the obvious of asking someone on your team or consulting Stack Overflow, I’ve found the following to be helpful:
- Vendor-specific forums for your chip
- Reaching out to a vendor and speaking with a Field Applications Engineer to help debug what might be wrong
- Looking at open-source projects that use your chip and may be using it in similar ways
Case Studies
Case Study #1 - Creative Stack Clobbering
I was in the middle of testing my port of Segger’s Real Time Trace (RTT) to an implementation written in the up-and-coming Zig Programming Language. My port (as well as the original RTT source code) has a feature that lets you specify a linker section to place your RTT control block. The control block is where the JLink probe writes/reads to enable transfer to/from the device. At this point, I had validated all other use cases other than this manual control block placement. Feeling very smart and very accomplished, I coded up the last sanity check, where I put the RTT control block in a newly defined linker section at the end of RAM. All of a sudden, reality started to crumble. Hard faults began appearing after a couple of logging statements. Seemingly what I logged and how much affected this program’s crashing behavior.
Step 1 - See What Changed
Fortunately, it is quite obvious in this case. Placing the control block at the end of RAM appears to break the code.
Step 2 - Utilize All Compiler Error Reporting Capabilities
Already done!
Step 3 - Utilize All MCU Error Reporting Capabilities
Also already done, and the error reporting, in this case, indicated “a hard fault was occurring”. I was using the Cortex M0+-based RP2040, so the hard fault cause doesn’t get any more specific.
Step 4 - Isolate the Problem Surface Area with Logging and/or Debugging
This step was pretty straightforward; I could initialize the control block without issue, however, one or more logging statements initiate the hard fault.
Step 5 - Keep an Eye on Your Stack
I quickly noticed that near the point of failure, variables all of a sudden started to have… wrong values. Wait… where is my stack again? Oh. OH. The astute reader probably already guessed from context, but my stack was hard-coded to start at the end of RAM. I had gotten complacent with other projects that used linker symbols to place the stack start and assumed that defining a new linker section for the RTT control block would protect against accidentally overriding the stack. This assumption was incorrect. I had created a monster where entering my logging functions would push data onto the stack, but writing bytes to my control block would actively clobber said stack data. Thus, oddball logging behavior where a couple of characters would transfer successfully, followed by a hard fault.
Case Study #2 - Undefined Fun Times
For the sake of simplicity, I had a class with two methods that looked something like so:
class ThisShouldBeFun {

  public:
  ...

  int first_function() {
    // Lots of sufficiently complicated code
  }

  void second_function() {
    // Has some side effect that changes the internal state of the class
  }
};
I had some odd behavior in my code, and after some debugging, I realized that even though I was calling first_function, somehow second_function was getting executed as well!?
Step 1 - See What Changed
I previously wasn’t using first_function, although it had been added to the class a while ago, so it didn’t appear in any recent diffs.
Step 2 - Utilize All Compiler Error Reporting Capabilities
Observers probably already saw my error: I didn’t include a return statement.
Per the C++ standard, a
non-void function terminating without returning a value is undefined behavior.
In my case, it appears as if that undefined behavior caused the next instruction
to be the second function’s address. I can wave my hands a little bit about
the in-memory layout of C++ classes, and how this might have happened, but I’ve
never been able to replicate this in Godbolt. You’ll just have to take my word
that in this specific corner of the universe, undefined behavior caused
first_function to terminate by calling second_function. The warning flag
-Wreturn-type (included in -Wall) would have saved me a major headache.
Case Study #3 - The Mystery of the Missing Serial Bytes
I was on a project that had two boards that communicated with each other via serial over UART. I was onboarding onto this project at the time, and an existing issue I noticed was that a packet (these boards implemented Modbus) would fail its CRC check and the command would have to be retried. Because of this retry routine, the communication still functioned, albeit not as fast as it could have. Eventually, and seemingly out of the blue, the number of CRC failures in packets skyrocketed, making the communication unusable and demanding immediate attention.
Step 1 - See What Changed
Trying to narrow down what changed was pretty maddening. None of the code changes had anything to do with code that touched serial communication. And yet, I could revert commits and get reliably “better” communication behavior, albeit with occasional failures. There also seemed to be a bizarre time component where serial communication would seem fine at first, but rapidly degraded after a minute or two.
Step 2 - Utilize All Compiler Error Reporting Capabilities
Done, and no findings.
Step 3 - Utilize All MCU Error Reporting Capabilities
Done, and no findings (this issue wasn’t generating hard faults).
Step 4 - Isolate the Problem Surface Area with Logging and/or Debugging
The findings in Step 1 made us all feel pretty miserable about the root cause, but due to the failure point, we were at least pretty sure the issue lay somewhere in the serial driver/peripheral configuration.
Step 5 - Keep an Eye on Your Stack
We found no evidence of stack overflows.
Step 6 - Keep an Eye on Your Heap
N/A, we weren’t using a heap.
Step 7 - Vet Critical Peripherals:
Thus, a long and painful slog through our UART driver code started. We were using the DMA to automatically transfer received bytes into a memory buffer on reception in the UART. Then, we serviced said buffer in an RTOS task whenever bytes were available. We couldn’t get rid of these bad bytes causing CRC failures no matter how closely we examined our peripheral configuration against the datasheet. The breakthrough came when I finally remembered something: this MCU has a cache. Turning off caching immediately fixed the problem. No more erroneous bytes, and thus no more CRC failures. Which led us to…
Step 8 - MCU Errata and Application Notes:
Reading an application note on caching on our MCU, we quickly realized the DMA does not at all care about the state of the cache. Once we fixed our cache management regarding the memory buffer in which our UART bytes were stored, we could turn the cache back on while eliminating the mysterious bad bytes. Because the cache was often out of date before implementing cache management, whether or not the received bytes were correct was almost entirely random, depending on other code execution and cache hits/misses. Thus, changing unrelated bits of code changed cache behavior and thus changed how often we got bad bytes.
Case Study #4 - Memory Faults in the Depths of Hell
This last one is the most painful yet satisfying bug I’ve ever dealt with. To set the stage, I was in the process of porting DOOM to the display board on the TK-02 coffee machine (I currently work as the lead firmware engineer at Terra Kaffe). This was entirely a side project for the fun and the challenge. Porting Doom to a “bare metal” system is a little spicier than for one with an actual OS. For instance, I replaced all allocation calls in Doom’s engine with an arena allocator that made use of an external SDRAM IC we use. This will become relevant later. Frustratingly, things were almost working. I would occasionally get the Doom splash screen to appear on the screen, but at seemingly random times, shortly thereafter, everything would freeze.
Step 1 - See What Changed
I didn’t have a baseline to diff against, as I was in the early stages of getting the engine running at all.
Step 2 - Utilize All Compiler Error Reporting Capabilities
Done, and no findings.
Step 3 - Utilize All MCU Error Reporting Capabilities
Whenever the program would freeze up, I would get an MPU access violation that
told me I was trying to access an invalid address. The address always had the
form 0xFFXXXXXX, which was indeed invalid.
Step 4 - Isolate the Problem Surface Area with Logging and/or Debugging
The code that kept throwing faults was in the section of the engine that
decompresses assets from the .WAD file (The DOOM engine’s proprietary data
compression format that would generally be stored on a floppy disk or CD-ROM)
and stores them in RAM via the arena allocator I mentioned before.
Frustratingly, it wasn’t always in the same place. Sometimes, it would get to
the splash screen, other times it would crash almost instantly. When it did make
it to the splash screen there were always lots of warnings from the engine about
bad assets, and some assets (character textures, etc.) were missing. Using a
debugger to walk up stack traces, it was clear that sometimes when accessing
something in SDRAM, a bogus address (beginning in 0xFF) would be produced.
Step 5 - Keep an Eye on Your Stack
Values having bogus addresses did seem to point to a potential stack overflow, but further investigation yielded no evidence the stack was getting anywhere close to overflowing.
Step 6 - Keep an Eye on Your Heap
We weren’t using the heap per se, however, the arena allocator functioned essentially as a heap. Careful investigation and logging of the allocator revealed we weren’t getting close to any overflow situations regarding the heap.
Step 7 - Vet Critical Peripherals
While I spent many hours excitedly getting pieces of the DOOM engine working, I
never thought to double-check some of my initial MCU configurations. After all,
I had a “known good” production version of this configuration running the
actual coffee machine firmware. But after many days and hours, convinced I had
somehow screwed something up in the engine implementation, I found the culprit:
a copy-paste error in a setup call that left one pin of the SDRAM IC
misconfigured, and electrically floating (only in the Doom project, the actual
production code was configured correctly). The pin that happened to be floating
controlled single-byte masking of the received data. Lo and behold, the single
byte it masked happened to be the most significant byte… So, I essentially
created a “random memory fault generator”. When the misconfigured pin floated a
little too high, it masked the MSB, mangling the received data to be
0xFFXXXXXX. This explained the odd engine behavior. If the stars aligned and
the SDRAM read errors only happened on non-critical textures (and in a way that
didn’t generate an MPU fault) the game would barely get to the splash screen. In
the end, it was all worth it to rip and tear on the TK-02:

Conclusion
Debugging elusive firmware failures can be incredibly maddening — but also deeply rewarding once you find the root cause. With the right strategy, even the most mysterious issues can be unraveled step by step. I’d love to hear your thoughts on these strategies or debugging stories of your own!
See anything you'd like to change? Submit a pull request or open an issue on our GitHub
 Hayden Riddiford is a firmware engineer with experience in consumer products and IoT. He is currently an embedded systems engineer at Terra Kaffe.