Hunting Bugs with Git Bisect
It’s one of those nights- your project has been moving along at breakneck pace, with all of its contributors committing refactors, improvements, and bugfixes. You’ve been using git commands so much recently that you can rely on your fingers’ muscle memory to do all of your git operations for you. All of a sudden, you get that dreaded message from a teammate:
The firmware flasher is broken, and we don’t know when it broke
If you’re anything like me, your reaction looks something like this.

Your brain starts swirling. “How did this break? What could’ve possibly caused that? Am I that far off my game that I somehow goofed this?”
You start to look around at the codebase, and nothing’s popping out to you as
an obvious cause of the bug. You run git log --oneline to look through the
recent commit history, but your heart starts to sink because you actually don’t
know when the bug might’ve been introduced. You ask your team in Slack “Does
anyone know when this broke?” You get more desperate and start checking out
random commits to see if it works. No luck.
What do you do now? If only there was a tool you could use to find where things broke in an organized fashion…
This is where the concept of bisecting comes to the rescue. Regardless of what version control system you are using there are options for bisecting. In this article, we will be using git, since it has a bisect feature built-in. If you use a different system, check the References section for bisecting solutions for Mercurial1, CVS2, or SVN3.
This article is a personal story of a time I had to run a bisect on a repository, and the thoughts that went through my mind as it happened. I touch on how to find a bug using git’s bisect feature and go over some easy strategies to narrow your search space as much as possible. Lastly, I detail some ways of speeding up that search through git bisect’s automation options.
Table of Contents
Setting the Scene
The System
To start, let’s introduce the system we’re using:
- A microcontroller with internal RAM
- A NOR flash chip with 4MiB of memory
In this particular instance, I was trying to bring up a new system where the NOR flash would be the boot medium. I could not memory map it, and therefore I needed to create a way of passing data through the system’s internal RAM into NOR flash.
Doesn’t sound hard, right? I could use a debugger to write internal RAM, and then use a small bit of firmware to write out data chunks to the flash chip. Sounds reasonable enough. So the system would look something like this:
- A small firmware binary that can receive commands, and use various locations in memory for the data to be read/written, as well as any relevant metadata
- A python script that could interface with the debugger to read and write these memory locations in the chip.
Using this system involves 5 main steps:
- Load the firmware
- Format the NOR flash
- Write the data from the file to RAM
- Write the data from RAM to NOR flash
- Verify the data in NOR flash matches the file
The Problem
Somewhere between version 1.0 and the current head of the repository, my teammates started reporting that the verify step (Step 5) from above was failing unexpectedly. The python script was reporting failures where there was no issue before. Although there were few commits, such issues can be very difficult to find if not approached methodically. Trying to find issues by testing commits one by one tends to look like this:

Thankfully, git bisect was there to come to the rescue. Come along and join me in re-living this bug-hunting adventure!
Starting With git bisect
Put simply, git bisect is a “divide-and-conquer” approach to finding where something changed in your codebase, and is most useful during those mysterious times when the search space is large and the root cause of a change in behavior is not clear.

What’s the Idea?
I’ll start by explaining the concept theoretically, and later on, we’ll apply it to a real-world example of bisecting my flasher example further down in this article. This is one of those concepts that I found far easier to learn and understand by example, so if my theoretical description is lackluster, hopefully going through a real-life example will help
Git bisect works by taking in the two most important pieces of information that you might have in such a situation: when did you know things were good, and where did you know things were bad? Once you input the “good” commit and the “bad” commit, the tool performs a binary search on the commits that lie in between, starting with the midpoint between the “good” and “bad” commits. The concept of a binary search is nothing new:
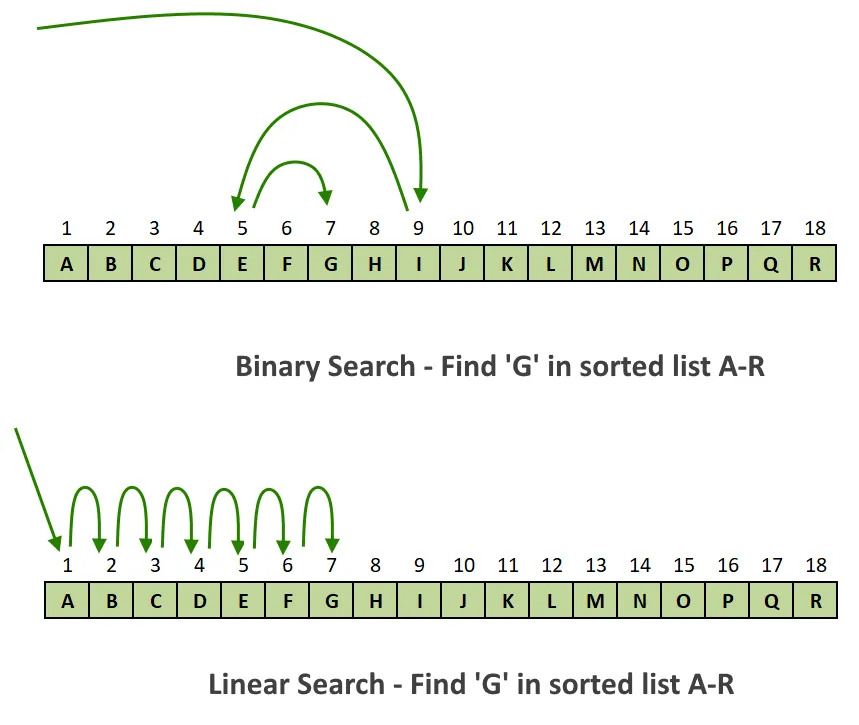
A git bisect is very similar to this visual, if you imagine letter A is your good commit, and letter R is your bad commit. At each point in the binary search, git will checkout the commit, and wait for you to run whatever tests you need to run. In this case, we checkout commit “I” and test it. Once you have determined if the commit is good or bad, you tell git as such. Now, git knows the following:
- If the midpoint commit was good, you know the commit that introduced the change is between your midpoint and the initial “bad” commit.
- If the midpoint commit was bad, you know the commit that introduced the change is between your midpoint and the initial “good” commit.
As a result, you have now effectively cut the whole search space in half, and can continue to the midpoint of the remaining search space. This procedure repeats on to commit E, to commit G, and finally to either F or H depending on whether G is good or bad. Once you’ve finished searching, you have isolated the commit that introduced the undesired behavior and can finally see what happened.
Typical/Important Commands
There are quite a few commands within the git bisect world, but here is the bare minimum you would need for a bisect.
-
git bisect start: puts git into bisect mode, awaiting further bisect commands -
git bisect bad <commit hash or tag>: Informs bisect which commit is known to be bad -
git bisect good <commit hash or tag>: Informs bisect which commit is known to be good -
git bisect reset: exits bisect mode, returns you to normal git mode.
Let’s Go Hunting! A Real Example of Bisecting
Time to actually bisect through my code and figure out why my flashing script isn’t working. Let’s go through this bisect and see what happened.
Setting Up the Bisect
Let’s look at my commit history first. I know this was good at v1.0, and bad at HEAD (AKA, my latest commit), so let’s get a shortlist of everything in between.
>>> git log --pretty=oneline v1.0~1..HEAD
e1952a1c Comment flasher files
51ed84b6 Comment main.c
b3a10580 Helpful python error message and traceback
f21a4c55 (tag v1.2) Add comments and static-ize flasher.c
47a89108 Actually improved performance
0afd538f Reverting performance improvements that made things slower
84c98ac9 Performance improvements
26338040 Refactor python script with classes
54526f51 (tag v1.1) Note the work that still needs to be done in the readme
9f0d9a91 Move flash driver to non-memory-mapped
e717c312 Repo linting changes
a2b8a742 More misc. changes
e0c258c0 Misc. Changes
cecc054a Integrate all the things
acf78303 (tag v1.0) Add initialization procedure
Cool, not too much here, just 15 commits. Let’s set up the bisect using the commands we just learned
git bisect start
git bisect bad HEAD (same as git bisect e1952a1c)
git bisect good v1.0 (same as git bisect acf78303)
Running the Bisect
Now we see this output:
Bisecting: 6 revisions left to test after this (roughly 3 steps)
[26338040b292e110c2086de6bc42d1c232005a58] Refactor python script with classes
In a very helpful output, git is telling us how many different commits we still need to run through, and is counting down about how many test steps we have left. The view of our bisect looks something like this right now:
e1952a1c Comment flasher files
51ed84b6 Comment main.c
b3a10580 Helpful python error message and traceback
f21a4c55 (tag v1.2) Add comments and static-ize flasher.c
47a89108 Actually improved performance
0afd538f Reverting performance improvements that made things slower
84c98ac9 Performance improvements
26338040 Refactor python script with classes
54526f51 (tag v1.1) Note the work that still needs to be done in the readme
9f0d9a91 Move flash driver to non-memory-mapped
e717c312 Repo linting changes
a2b8a742 More misc. changes
e0c258c0 Misc. Changes
cecc054a Integrate all the things
acf78303 (tag v1.0) Add initialization procedure
Git has now checked out commit 26338040 for us to test. This commit is effectively the midpoint between v1.0 and the head of our repo. Let’s run our python script to see what’s happening.
>>> python update.py
Verification failed!
We now know things were still bad at commit 26338040. Let’s tell git about that:
>>> git bisect bad
Bisecting: 3 revisions left to test after this (roughly 2 steps)
[a2b8a742e16e0f63d47a003bf9ad9b55ab912633] More misc. changes
At this point, as expected from a binary search, we’ve knocked out half our commits, and have one less step to test. Now that we know our midpoint is bad, git considers everything between our midpoint and HEAD to be bad, looking something like this:
e1952a1c Comment flasher files
51ed84b6 Comment main.c
b3a10580 Helpful python error message and traceback
f21a4c55 (tag v1.2) Add comments and static-ize flasher.c
47a89108 Actually improved performance
0afd538f Reverting performance improvements that made things slower
84c98ac9 Performance improvements
26338040 Refactor python script with classes
54526f51 (tag v1.1) Note the work that still needs to be done in the readme
9f0d9a91 Move flash driver to non-memory-mapped
e717c312 Repo linting changes
a2b8a742 More misc. changes
e0c258c0 Misc. Changes
cecc054a Integrate all the things
acf78303 (tag v1.0) Add initialization procedure
Future’s already looking brighter. Let’s test it again and tell git the result.
>>> python update.py
Verification failed!
>>> git bisect bad
Bisecting: 0 revisions left to test after this (roughly 1 step)
[e0c258c05343202c53a294ba59704bb02565c9d5] Misc. Changes
Things were still bad at commit a2b8a742. We’re getting there.
Side note- it’s always great to go through your own git history and see how incredibly helpful your commit messages were.
Now our view of the world looks like this. As I trudged along through this bisect, I couldn’t help but feel a particular form of shame at how long things had been broken…
e1952a1c Comment flasher files
51ed84b6 Comment main.c
b3a10580 Helpful python error message and traceback
f21a4c55 (tag v1.2) Add comments and static-ize flasher.c
47a89108 Actually improved performance
0afd538f Reverting performance improvements that made things slower
84c98ac9 Performance improvements
26338040 Refactor python script with classes
54526f51 (tag v1.1) Note the work that still needs to be done in the readme
9f0d9a91 Move flash driver to non-memory-mapped
e717c312 Repo linting changes
a2b8a742 More misc. changes
e0c258c0 Misc. Changes
cecc054a Integrate all the things
acf78303 (tag v1.0) Add initialization procedure
Self-pity aside, let’s keep going.
>>> python update.py
Verification failed!
>>> git bisect bad
Bisecting: 0 revisions left to test after this (roughly 0 steps)
[cecc054a35be79b84241b275253cc0a3a5287dc3] Integrate all the things
Just about there… One more step left, and our world will be crystal clear
e1952a1c Comment flasher files
51ed84b6 Comment main.c
b3a10580 Helpful python error message and traceback
f21a4c55 (tag v1.2) Add comments and static-ize flasher.c
47a89108 Actually improved performance
0afd538f Reverting performance improvements that made things slower
84c98ac9 Performance improvements
26338040 Refactor python script with classes
54526f51 (tag v1.1) Note the work that still needs to be done in the readme
9f0d9a91 Move flash driver to non-memory-mapped
e717c312 Repo linting changes
a2b8a742 More misc. changes
e0c258c0 Misc. Changes
cecc054a Integrate all the things
acf78303 (tag v1.0) Add initialization procedure
Now, at long last, let’s test our last commit and tell git.
>>> python update.py
Flashing successful!
>>> git bisect good
e0c258c05343202c53a294ba59704bb02565c9d5 is the first bad commit
Cool, we found the bad commit, and if we look at our world one last time, we see exactly where things went bad.
e1952a1c Comment flasher files
51ed84b6 Comment main.c
b3a10580 Helpful python error message and traceback
f21a4c55 (tag v1.2) Add comments and static-ize flasher.c
47a89108 Actually improved performance
0afd538f Reverting performance improvements that made things slower
84c98ac9 Performance improvements
26338040 Refactor python script with classes
54526f51 (tag v1.1) Note the work that still needs to be done in the readme
9f0d9a91 Move flash driver to non-memory-mapped
e717c312 Repo linting changes
a2b8a742 More misc. changes
e0c258c0 Misc. Changes
cecc054a Integrate all the things
acf78303 (tag v1.0) Add initialization procedure
Fixing the Bug
As we saw at the end of the last section, our bug seems to have been introduced with commit e0c258c0. Let’s check that changeset for verification changes…
/* @brief
 * Verify the given data from NOR flash
 * Return 0 if contents match
 */
static int prv_flasher_verify(void) {
[...]
+ uint8_t readback_data[size];
+ nor_flash_dev->operations.read(sector_to_compare, readback_data, size);
+ int return_code = memcmp((void *) DATA_PAYLOAD_ADDR, readback_data, size);
+ return (return_code == 0)
}
Ah, of course! This is an improper checking of memcmp’s return code. No wonder
the verification was failing. Looking at the reference for memcmp, we should
get 0 as the return code if the contents are the same. We capture this, but
instead of returning that directly, we return a boolean. The boolean value
true is usually nonzero under the hood, and thus, this function would return
a nonzero value if the memory matched. Our python script only considers our
verification successful if we return a zero return code.

Now that we know what the error is, let’s exit git bisect so we can get back to work. This is the easiest step of the bisect.
>>> git bisect reset
One quick modification, and we should be all set.
- int return_code = memcmp((void *) DATA_PAYLOAD_ADDR, readback_data, size);
- return (return_code == 0)
+ return memcmp((void *) DATA_PAYLOAD_ADDR, readback_data, size);
With this committed, problem solved!
Going Further
This was a fairly simple bisect example, with a search space of only 15 commits. As you can imagine, this complexity can increase fast when you’re working on a larger project with more contributors. This section includes some strategies on making your search go faster and making you a true bisect ninja.
Narrowing the Search Space
As the complexity and size of a project increases, the number of commits will likely grow as well. However, for a given issue, many of those commits may have a low likelihood of causing the problem. It would make a bisect much faster if we could throw out some of these commits based on what we know.
Searching Specific Directories/Files
Although you may not know where the behavior changed in the repo’s history, you might know which folders/files are likely candidates. Git bisect makes it trivially easy to narrow down the bisect to only commits that affected those folders/files, using the following syntax.
git bisect start -- <dir1> <dir2>
Let’s assume in our test case that we knew the python script wasn’t to blame,
rather just the mini-firmware that operates on-target, located in the
c_flasher folder. We could run this from the root of our repo, and git will
now only bisect commits that affected that folder.
git bisect start -- c_flasher/
You can also specify specific files to investigate if you have an idea where the bug might be.
Choosing the Correct Types of Commits
In your project, if you are working with multiple people and using pull requests to get your changes in, you might be using the non-fast forward merge strategy (as opposed to rebase). Atlassian has a great write-up4 about merge commits if you are not familiar.
Using a merge strategy works just fine for a project, but when it comes to git bisect, it can be a bit problematic. Your master branch could look something like the following:
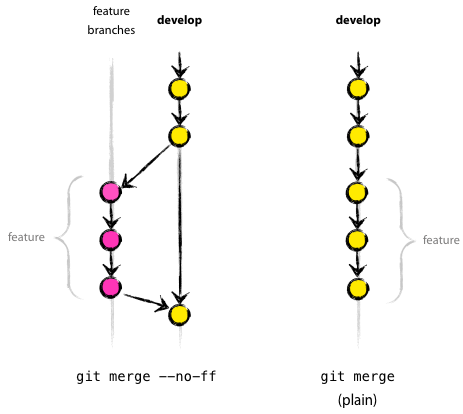
Unfortunately, if you’re trying to track down when the main branch (develop, in this case) went bad, you’re in for a world of hurt here. Git bisect sees all of these commits, including those on the feature branches, as fair game for a bisect. If you’re just looking for when develop broke, these extraneous commits are only going to cause you pain, as you only want to see the “merge commits”, which are what git creates whenever develop is changed.
In this case, after you have started your bisect, you’ll want to tell git to skip anything that isn’t a merge commit. That can be accomplished using this short bit of shell script, replacing the good commit and bad commit references with your own good and bad commits.
for rev in $(git rev-list <bad commit>..<good commit> --merges --first-parent);
do
  git rev-list $rev^2 --not $rev^
done | xargs git bisect skip
Automating git bisect
One thing you might have wondered through the entire manual bisect we did earlier was “Isn’t there an easier way to automate this?” After all, we were just running the same script every time, looking for a success or failure message, telling git, and then repeating the procedure until we were done.

Scripting the Testing
Git bisect has a very useful feature called git bisect run. You can pass in a
script or any program that returns exit codes for this. Git will interpret a
nonzero code as a failure/bad commit, and zero code as successful/good. There
are some nuances to this command that you should keep in mind, but rather than
explaining them, I’ll point you to the very helpful git bisect help reference.
In our case, every time we want to test something, we need to build our firmware code, and then run our python script. Our python script already returns 1 for an error case, and 0 for a successful case, so let’s construct a little shell script to do this for us.
$ cat ~/test.sh
#!/bin/sh

# Compile the FW code, exit with a nonzero code if we fail
make || exit 1
# Run the python script, exit with nonzero code if we fail
python update.py || exit 2
In essence, this will run make and our python script, and if either fails, we
will return a nonzero error code to indicate this is a bad commit.
Run the Automated Bisect
Now that we have our shell script, let’s tell git bisect to run it.
>>> git bisect start
>>> git bisect good v1.0
>>> git bisect bad HEAD
>>> git bisect run ./test.sh
e0c258c05343202c53a294ba59704bb02565c9d5 is the first bad commit
>>> git bisect reset
Well that was easy. By scripting away our problems, git is now able to save you a lot of time and effort in finding your issue. Yay!
Conclusion
I hope this article was a useful look into how git bisect works!
Bisecting is a pretty simple tool, but there’s a lot of ways to beef it up, and this article highlighted just a few of those. In any case, it’s always a good mentality to use when you’re hunting bugs. Even if you’re not using git, and just manually testing releases of software, you can still gather some good techniques from git bisect.
While it is a useful tool, git bisect is actually one of my last resorts in the process of debugging. Compared to other methods of tracking down a bug, bisecting can feel a bit too brute force-y sometimes. I tend to only use git bisect when I have no idea where something could have gone wrong, and I need to search through a lot of potentially unrelated changes to find where bad things happened.
As a closing note, always watch out for your function return codes, and always unit test your code along the way, so you can avoid the folly that I committed in this article’s example.
References
 Shiva Rajagopal is an embedded software engineer at Fitbit.