GitHub Actions for STM32CubeIDE
In this article, we will explore how to use GitHub Actions to automate building STM32CubeIDE projects. Eclipse-based IDEs like STM32CubeIDE are often used for developing embedded systems but can be a little tricky to build in a headless environment.
Table of Contents
STM32CubeIDE, Docker, and GitHub Actions

The STM32 series of microcontrollers from STMicroelectronics are very popular in the embedded industry. ST provides an in-house Eclipse-based IDE, STM32CubeIDE, for developing projects using these chips.
The STM32CubeIDE provides an all-in-one starting point for STM32-based projects, with example code, drivers, and middleware, and tools for configuring peripherals and generating code.
This IDE comes with both the graphical frontend (using Eclipse) and the necessary tools for building, flashing, and debugging STM32 projects (it bundles a pretty standard GCC ARM toolchain and the ST-Link tools for flashing and debugging).
Typically, developers install the STM32CubeIDE on their local machines and build projects using the GUI, but that manual and UI-based workflow doesn’t fit well with modern CI systems- we want to build our projects automatically, without clicking through a UI, and in a reproducible way.
To accomplish this, we’ll use Docker to create a containerized environment with STM32CubeIDE and its dependencies, and GitHub Actions to automate the build process!
Step 1: Setting Up the Docker Image
Note: STM32CubeIDE generates
Makefile’s when building a project- these could be checked into source control, and used directly when building a project, similar to this:$ PATH=~/STMicroelectronics/stm32cubeide_1.15.0/plugins/com.st.stm32cube.ide.mcu.externaltools.gnu-tools-for-stm32.12.3.rel1.linux64_1.0.100.202403111256/tools/bin:$PATH make -r -j8 -C Debug all arm-none-eabi-gccThe downside is this diverges from the normal UI-based workflow- and if the project configuration changes, requiring a Makefile update, that might not be automatically reflected in the CI build.
We’re going to stick with hard mode and build directly from the Eclipse command line to better replicate the UI workflow.
Since Docker containers are generally Linux-based and work best on the cheap Linux VMs provided by GitHub Actions (or other CI systems), we’ll use a Linux-based Docker image as our base.
Our Docker image only needs a few dependencies to run STM32CubeIDE:
-
git: we need this if we want to be able to clone our project from within the container - Linux version of
STM32CubeIDE: the main event! We’ll download the installer and run it when generating the image, which will “freeze” the IDE in the Docker image
With tools of this nature, I like to follow this process to create the image:
- start with a base Linux image
- interactively run through the installation steps until I get to a functional state
- copy the commands into a Dockerfile and generate the image
- test the image
# run a container from the base image, interactively
$ docker run --tty --interactive ubuntu:24.04
As of STM32CubeIDE version 1.17.0, the unattended install works on Ubuntu
24.04 out of the box, no need for workarounds! Thanks to
Daan Timmer for pointing this out, and
providing a fixed up Dockerfile 🥳!
Prior to STM32CubeIDE 1.17.0:
I first tried following the installation instructions provided by ST (PDF warning), which are pretty straightforward; in my case it was running this command after downloading the installer:sudo sh ./st-stm32cubeide_1.15.0_20695_20240315_1429_amd64.deb_bundle.shUnfortunately, the embedded script in that self-extracting installer doesn't fully support an unattended mode (at least in the versions I tested, 1.15 + 1.16). After some experimentation, I found a way to work around this; instead of running the installer as-is, I extracted the installation files from the package, and run them independently with a minor tweak.
Below is the final Dockerfile I used to create the image
FROM ubuntu:24.04

# Typical dockerfile stuff, try to suppress interactive prompts when installing
# packages
ENV DEBIAN_FRONTEND=noninteractive

# Install dependencies for STM32CubeIDE
RUN apt-get update && apt-get install --no-install-recommends -y \
    build-essential \
    ca-certificates \
    # we use git to clone our project when we build in GitHub actions
    git \
    # part of the Cube install script uses "killall", which is in psmisc
    psmisc \
    # we use this to extract the Cube installer
    unzip
    # don't clear apt cache, the stm32cubeide installer needs it
    # && rm -rf /var/lib/apt/lists/*

ARG STM32CUBE_VERSION=1.17.0_23558_20241125_2245
# Copy the installer file into the image. It needs to be downloaded into the
# directory where the Dockerfile is.
COPY en.st-stm32cubeide_${STM32CUBE_VERSION}_amd64.deb_bundle.sh.zip /tmp/stm32cubeide.sh.zip
RUN mkdir -p /tmp/stm32cubeide && \
    mv /tmp/stm32cubeide.sh.zip /tmp/stm32cubeide/stm32cubeide.sh.zip && \
    cd /tmp/stm32cubeide && \
    unzip stm32cubeide.sh.zip && \
    chmod +x st-stm32cubeide_${STM32CUBE_VERSION}_amd64.deb_bundle.sh && \
    LICENSE_ALREADY_ACCEPTED=1 ./st-stm32cubeide_${STM32CUBE_VERSION}_amd64.deb_bundle.sh && \
    rm -rf /tmp/stm32cubeide
Building the Docker Image
Once we’ve created the Dockerfile, we’ll build the image as usual:
# note that I'm tagging the image with the build date and putting it into a
# GitHub container registry namespace for later uploading to the GitHub
# container registry
$ DOCKER_BUILDKIT=1 docker build -t ghcr.io/noahp/stm32wba55-example:2025-02-24 -f Dockerfile .
Testing the Docker Image
To test it, we first need to figure out how to actually build an STM32CubeIDE project from the command line.
After a bit of digging, I found that the Eclipse IDE has a command-line build
option, aptly named -build. When running from a container, we need to first
import the project from the file system into the Eclipse workspace (in this
case, from our cloned Git repo), using the -import command, then we can build
it.
Note: I’m using a test project from here, because it’s one I’m familiar with, but the same process should work with any STM32CubeIDE project.
From the root of our test process, start the Docker container with the current directory mounted inside it, so we can build it!
$ docker run --rm --tty --interactive --volume=${PWD}:/workdir ghcr.io/noahp/stm32wba55-example:2024-08-01
Inside the Docker container, the STM32CubeIDE executable is located at
/opt/st/stm32cubeide_1.16.0/stm32cubeide. We will run this with the -import
command to import the project into the workspace, and the -data flag to
specify the workspace directory:
$ /opt/st/stm32cubeide_1.16.0/stm32cubeide --launcher.suppressErrors -nosplash \
  -application org.eclipse.cdt.managedbuilder.core.headlessbuild \
  -data /tmp/stm-workspace \
  -import "STM32CubeIDE"
Then, we run the -build command to build the project:
$ /opt/st/stm32cubeide_1.16.0/stm32cubeide --launcher.suppressErrors -nosplash \
  -application org.eclipse.cdt.managedbuilder.core.headlessbuild \
  -data /tmp/stm-workspace \
  -build BLE_p2pServer/Debug
That command will emit lots of output, then if it succeeds:
Finished building target: BLE_p2pServer.elf

arm-none-eabi-size  BLE_p2pServer.elf
arm-none-eabi-objdump -h -S BLE_p2pServer.elf  > "BLE_p2pServer.list"
arm-none-eabi-objcopy  -O binary BLE_p2pServer.elf  "BLE_p2pServer.bin"
   text    data     bss     dec     hex filename
 205944    1480   59560  266984   412e8 BLE_p2pServer.elf
Finished building: default.size.stdout

Finished building: BLE_p2pServer.bin

Finished building: BLE_p2pServer.list


13:25:31 Build Finished. 0 errors, 1 warnings. (took 2s.487ms)
🎉 Phew, we made it! That’s the most exciting part of this article. Now on to running the same build commands in a GitHub action.
Creating a GitHub Actions Workflow
For those unfamiliar with GitHub Actions, a quick overview can be found at the GitHub Actions documentation.
We’re going to create a workflow that does the following:
- clone the project code
- run the STM32CubeIDE build commands
- upload the build artifacts
Before we can start, let’s first upload our Docker image to the GitHub Container Registry. Uploading to the registry will allow us to use the image in our GitHub Actions workflow.
Pushing the image to the GitHub container registry requires logging in (instructions here), then doing the normal docker push command:
$ docker push ghcr.io/noahp/stm32wba55-example:2024-08-01
Next, we’ll open the container URL in our browser (https://ghcr.io/noahp/stm32wba55-example) and set the image to public so our GitHub Actions workflow can use it without logging in.
Now we’re ready to write our GitHub Actions workflow.
Implementing the Workflow
Our workflow is pretty simple- using the Docker image we just pushed, we’ll go through the steps outlined above.
Here’s the workflow file:
name: Build STM32 Project

on:
  pull_request:
    branches:
      - main
  push:
    branches:
      - main

  # enable manual triggering
  workflow_dispatch:

jobs:
  build:
    runs-on: ubuntu-latest
    container:
      image: ghcr.io/noahp/stm32wba55-example:2025-02-24

    steps:
      - name: Checkout code
        uses: actions/checkout@v4
        with:
          # submodules too
          submodules: recursive

      - name: Build project
        run: |
          /opt/st/stm32cubeide_1.17.0/stm32cubeide --launcher.suppressErrors -nosplash \
            -application org.eclipse.cdt.managedbuilder.core.headlessbuild \
            -data /tmp/stm-workspace \
            -import "STM32CubeIDE"

          /opt/st/stm32cubeide_1.17.0/stm32cubeide --launcher.suppressErrors -nosplash \
            -application org.eclipse.cdt.managedbuilder.core.headlessbuild \
            -data /tmp/stm-workspace \
            -build BLE_p2pServer/Debug

      - name: Upload artifacts
        uses: actions/upload-artifact@v4
        with:
          name: BLE_p2pServer.artifacts
          # The output artifacts are BLE_p2pServer.elf, BLE_p2pServer.map, etc.
          # Use a wildcard pattern to get them all
          path: STM32CubeIDE/Debug/BLE_p2pServer.*
And that’s it! We’ll check that into our test project, push it to a branch, and open a test pull request to see it in action.
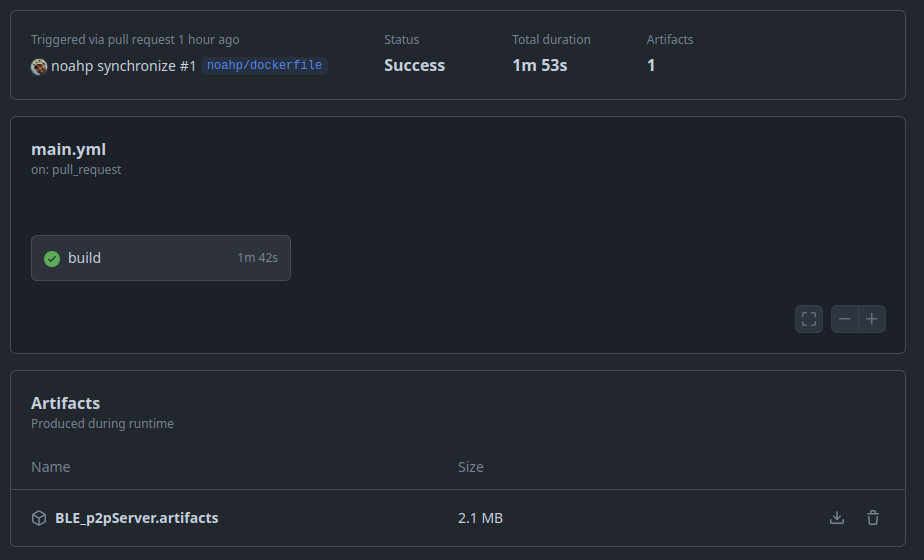
We can also download the artifacts from the GitHub Actions UI and confirm the uploaded files are correct ✅.
In Conclusion
I hope you enjoyed this article! It’s always a fun challenge to coax some of the less cooperative tools into working in a CI environment, and STM32CubeIDE was no exception.
You could use a similar process for other Eclipse-based IDEs since most support
the -build command line argument.
One last note- this example is saving the build artifacts (.elf and .bin
files, etc.) as GitHub Actions artifacts, but you could also upload them to a
cloud storage service, or even use the GitHub API to create a release with the
artifacts attached. One simple approach is to push the artifacts into AWS S3
storage under a folder named after the commit hash so you can easily find the
artifacts for a given commit.
Thanks for reading!
See anything you'd like to change? Submit a pull request or open an issue on our GitHub
References
 Noah Pendleton is an embedded software engineer at Memfault. Noah previously worked on embedded software teams at Fitbit and Markforged.