Integrating Memfault into an Embedded Linux Project
IoT devices have become ubiquitous. Given the number of new devices being deployed all over the world and far from the desks of developers, it is imperative to have a solid set of tools to manage them without being directly connected to them via JTAG, USB, or SSH. The necessary tasks in the IoT device lifecycle include device deployment and management, remote monitoring, and over-the-air (OTA) software updates. Memfault is a service that streamlines many of these critical tasks in a device-agnostic manner. Memfault supports devices built upon a variety of MCUs and RTOSs, Android (AOSP), and embedded Linux, the last one being the focus of this article.
In this blog post, I will demonstrate how to integrate Memfault’s offering on a Raspberry Pi 3B+ running embedded Linux.
If you would like to get started yourself integrating Memfault into your embedded Linux device, you can get started via their embedded Linux documentation page.
Table of Contents
Introduction to Yocto
As we are aware, the Raspberry Pi 3B+ (among other variants) runs an embedded Linux operating system. An embedded Linux operating system differs from a traditional Linux operating system commonly found on desktops. The latter allows users to add applications after the initial installation of the operating system and usually doesn’t allow for the addition of custom peripherals. The former is generally locked down in terms of the peripherals it supports and the applications that are part of the operating system. Embedded Linux is usually part of a board support package (BSP), which may also contain a bootloader (such as u-boot) and other firmware components. The Yocto Project/OpenEmbedded is a framework for creating a BSP for an embedded Linux platform. While it is not the only framework, Memfault’s use of the framework as part of its reference implementation makes it the obvious choice for this blog post.
The Yocto Project/OpenEmbedded uses different layers that implement various components or features of the BSP, such as the Linux kernel and bootloader. In our BSP, we will have the following layers:
- openembedded-core: The crux of The Yocto Project/OpenEmbedded, providing much of the tooling that goes into creating a BSP.
- meta-openembedded: Additional layers to supplement the core OpenEmbedded layer.
- poky: A reference BSP implementation provided by The Yocto Project.
- meta-raspberrypi: A layer that provides necessary components for a BSP on a Raspberry Pi.
- meta-swupdate: This layer is required for Memfault’s OTA offering.
- memfault-linux-sdk/meta-memfault: This layer contains the necessary applications and configuration files to interact with the Memfault backend.
- meta-memfault-rpi: Our layer will have the customizations required to interact with our specific Memfault sandbox.
Android’s repo tool facilitates downloading these layers without having to clone each of them separately. Each of these layers exists in a manifest file. The one used in this blog post can be found on GitHub at https://github.com/mabembedded/memfault-repo and is reproduced here:
<?xml version="1.0" encoding="UTF-8"?>
<manifest>
    <default sync-j="8" revision="dunfell"/>
    <remote name="oe" fetch="https://github.com/openembedded"/>
    <remote name="rpi" fetch="https://github.com/agherzan"/>
    <remote name="yocto" fetch="git://git.yoctoproject.org"/>
    <remote name="mab" fetch="https://github.com/mabembedded"/>
    <remote name="memfault" fetch="https://github.com/memfault"/>
    <remote name="swu" fetch="https://github.com/sbabic"/>

    <project name="meta-openembedded.git" path="sources/meta-openembedded" remote="oe"/>
    <project name="meta-raspberrypi.git" path="sources/meta-raspberrypi" remote="rpi"/>
    <project name="openembedded-core.git" path="sources/openembedded-core" remote="oe"/>
    <project name="poky.git" path="sources/poky" remote="yocto"/>
    <project name="memfault-linux-sdk.git" path="sources/memfault-linux-sdk" remote="memfault"/>
    <project name="meta-swupdate.git" path="sources/meta-swupdate" remote="swu"/>
    <project name="meta-memfault-rpi.git" path="sources/meta-memfault-rpi" remote="mab" revision="main">
        <linkfile src="scripts/setup.sh" dest="setup.sh"/>
    </project>
</manifest>
The default element at the top instructs repo about default parameters in case they are not specified. In this case, the sync-j attribute instructs repo to try to use eight threads when downloading the repositories. The revision attribute of the default element instructs repo to use the dunfell branch if none is specified for a specific project.
The remote element lists a particular remote repository, with the name attribute serving as a nickname to be used by the project element; the fetch element is the base URL of the repository.
Each project element corresponds to each layer in our specific implementation of The Yocto Project/OpenEmbedded. The name attribute is appended to the end of the fetch URL for the URL of the entire repository (i.e., the complete URL will be remote fetch + the project name). The path attribute will define the repository’s location. The remote attribute is used to reference back to a particular remote URL.
Finally, we also see a linkfile element, which allows us to create symbolic links. We will see why this is useful later.
Once we have the manifest file, we can set up our instantiation of The Yocto Project/OpenEmbedded by executing the following commands on a desktop Linux system:
$> repo init -u https://github.com/mabembedded/memfault-repo.git -b main
$> repo sync
The first command instructs repo to fetch the manifest file from the repository specified by the -u switch and branch specified by the -b switch. The second command instructs repo to begin fetching all of the repositories specified in the manifest file, placing them in the appropriate locations, and executing any further instructions indicated in the manifest file (such as creating a symbolic link).
After running the above commands, our directory structure should match the following:
$> ls -l
lrwxrwxrwx. 1 dev dev  42 Dec  9 14:55 setup.sh -> sources/meta-memfault-rpi/scripts/setup.sh
drwxr-xr-x. 1 dev dev 204 Dec  9 17:52 sources

$> ls sources

memfault-linux-sdk  meta-memfault-rpi  meta-openembedded  meta-raspberrypi  meta-swupdate  openembedded-core  poky
First, we can see that repo created a symbolic link called setup.sh, which points to the path specified in the manifest file. Second, we can see that the sources directory was created and contain the layers indicated in the manifest file.
The layer that is relevant for discussion in this blog post is our layer, called meta-memfault-rpi (the reader can refer to Memfault’s documentation for more information on the memfault-linux-sdk layer and documentation available online regarding the other layers).
Bitbake Configuration
If we drill into the meta-memfault-rpi layer, we can see the following directory structure:
ls meta-memfault-rpi/
conf  recipes-bsp  recipes-core  recipes-memfault  recipes-support  scripts  wic
The conf directory contains configuration settings that instruct bitbake (which is the tool provided by The Yocto Project/OpenEmbedded framework) on how to create our BSP. The relevant file within the conf directory is local.conf.sample. This file ultimately becomes one of the build configuration files, and the relevant lines are the following:
MACHINE ?= "raspberrypi3"
.
.
.
DISTRO_FEATURES +=  " systemd"
DISTRO_FEATURES_BACKFILL_CONSIDERED += "sysvinit"
.
.
.
LICENSE_FLAGS_WHITELIST += " commercial_memfaultd commercial_memfault-core-handler"
.
.
.
RPI_USE_U_BOOT = "1"
ENABLE_UART = "1"
KERNEL_IMAGETYPE = "uImage"
The first line specifies the MACHINE type, which describes the hardware that the BSP will support. The complement of MACHINE is DISTRO, which describes specific software customizations of a BSP. For example, in the following lines, particular features are added to the DISTRO. In this case, sysvinit is replaced with systemd.
A few lines below, we need to instruct The Yocto Project/OpenEmbedded to allow commercial licenses used by recipes provided by Memfault’s layer. While this step is called out in Memfault’s documentation, the above implementation is slightly different since we are using the LTS branch (dunfell) of The Yocto Project/OpenEmbedded and corresponding layers.
Finally, the last three lines are specific to the Raspberry Pi. The first line (RPI_USE_U_BOOT = "1") instructs The Yocto Project/OpenEmbedded to create the u-boot bootloader for the Raspberry Pi. While a typical installation of Raspbian on a Raspberry Pi doesn’t have u-boot preloaded, we need it for this exercise to perform OTA updates. The second line (ENABLE_UART = "1") ultimately enables console output on the UART port of the Raspberry Pi. Finally, the last line (KERNEL_IMAGETYPE = "uImage") instructs The Yocto Project/OpenEmbedded to create a Linux kernel image that can be loaded by u-boot.
We’re now going to look at the contents of the recipes-bsp directory, which usually contains recipes associated with the bootloader (i.e., u-boot). The contents of this directory are as follows:
[recipes-bsp 08:14:49]$ tree -d
.
|── libubootenv
│   └── files
└── rpi-uboot-scr
    └── files

4 directories
Under libubootenv/files/, we have a single file named fw_env.config. This file instructs u-boot where to store the environment settings used by u-boot on each boot. Under the rpi-uboot-scr/ directory, we have an append recipe that adds the following lines to the u-boot startup process:
saveenv
fdt addr ${fdt_addr} && fdt get value bootargs /chosen bootargs
if env exists rpipart;then echo Booting from mmcblk0p${rpipart};else setenv rpipart 2;echo rpipart not set, default to ${rpipart};fi
load mmc 0:${rpipart} ${kernel_addr_r} boot/@@KERNEL_IMAGETYPE@@
setenv bootargs "${bootargs} root=/dev/mmcblk0p${rpipart}"
@@KERNEL_BOOTCMD@@ ${kernel_addr_r} - ${fdt_addr}
The above lines determine whether the rpipart environment variable is set. If so, u-boot uses that partition to boot into Linux. If that environment variable is not set, then u-boot defaults to partition 2 on the SD card (referred to by mmcblk0).
The next directory in our layer is called recipes-core, which has the following contents:
[recipes-core 09:21:44]$ tree
.
└── images
    └── memfault-rpi.bb
As is typical with BSPs based on The Yocto Project/OpenEmbedded, this directory contains the recipe that will build our final image. memfault-rpi.bb has the following contents:
DESCRIPTION = "Memfault RPi test image"

IMAGE_FEATURES += "ssh-server-openssh"
IMAGE_FSTYPES += "wic"
WKS_FILE = "memfault-rpi.wks"

inherit core-image

IMAGE_INSTALL += "\
            memfault-device-info \
            u-boot-env \
            u-boot-fw-utils \
"
This recipe provides the following instructions to bitbake:
- Include an SSH server (specifically using OpenSSH) via the
IMAGE_FEATURESoption - Create a final image using the WIC format via the
IMAGE_FSTYPESoption - Use the file
memfault-rpi.wksas the basis for creating the final image via theWKS_FILEoption, which is located under thewicdirectory in our layer - Install the following packages in our final image (in addition to the baseline packages provided by the
core-imageclass in The Yocto Project/OpenEmbedded):- memfault-device-info: The core memfault service that will be running our Raspberry Pi
- u-boot-env, u-boot-fw-utils: The requisite packages to integrate u-boot with Memfault’s service.
Memfault Configuration
The final and most interesting directory is recipes-memfault, which includes our customizations to allow Memfault to link our Raspberry Pi with our specific backend. This directory has the following contents, which are along the lines of the instructions provided by Memfault:
[recipes-memfault 09:37:50]$ tree
.
├── memfaultd
│   └── memfaultd.append
└── memfault-device-info
    └── memfault-device-info.bb

2 directories, 2 files
memfaultd.append contains the relevant pieces of information to associate our Raspberry Pi with our specific backend:
do_install_append() {
    echo "{" > ${D}${sysconfdir}/memfaultd.conf
    echo "  \"base_url\": \"https://device.memfault.com\"," >> ${D}${sysconfdir}/memfaultd.conf
    echo "  \"project_key\": \"xxxxxxxxxxxxxxx\"," >> ${D}${sysconfdir}/memfaultd.conf
    echo "  \"software_type\": \"bsp\"," >> ${D}${sysconfdir}/memfaultd.conf
    echo "  \"software_version\": \"v1.0\"" >> ${D}${sysconfdir}/memfaultd.conf
    echo "  \"data_dir\": \"/data/\" >> ${D}${sysconfdir}/memfaultd.conf
    echo "}" >> ${D}${sysconfdir}/memfaultd.conf
}
We have set contrived values for the software_type and software_version parameters. In actual situations, these parameters would reflect meaningful information. In an upcoming blog post, we will revisit the significance and implication of the data_dir value, which will walk through the OTA process.
Finally, we come to the memfault-device-info.bb recipe, which has the following contents:
DESCRIPTION = "memfault-device-info application"
LICENSE = "CLOSED"

S = "${WORKDIR}"

do_compile() {
    echo "#!/bin/sh" > ${S}/memfault-device-info
    echo "echo MEMFAULT_DEVICE_ID=test-unit" >> ${S}/memfault-device-info
    echo "echo MEMFAULT_HARDWARE_VERSION=rpi3b" >> ${S}/memfault-device-info
}

do_install() {
    install -Dm 755 ${S}/memfault-device-info ${D}/${bindir}/memfault-device-info
}
Like the append recipe above, this recipe provides additional information about our hardware to the Memfault service running on our Raspberry Pi. Specifically, we’ve specified the ID of our unit and a hardware version. While this simple implementation is sufficient for a single unit for prototyping purposes, it would need to be more complex to account for multiple units and potential hardware revisions.
Building & Running Linux
To build the final image, we will need to execute the following commands (after running the steps at the beginning of this article to check out the source code for our BSP):
[yocto 10:14:16]$ source setup.sh
[yocto 10:15:33]$ bitbake memfault-rpi
Once the above commands complete, the final image will be located at build-memfault-rpi/tmp/deploy/images/raspberrypi3/memfault-rpi-raspberrypi3.wic.
After inserting an SD card, we can flash our image by executing the following command (where /dev/sdX would need to be replaced with the device associated with the SD card):
[yocto 10:32:47]$ sudo dd status=progress if=memfault-rpi-raspberrypi3.wic of=/dev/sdX
Then, after inserting the SD card into the Raspberry Pi, applying power, and logging in, we will need to execute the following commands to allow the Memfault service to start collecting and reporting information to the backend:
root@raspberrypi3:~# memfault-device-info –enable-data-collection
root@raspberrypi3:~# sync && sync && reboot
After the device reboots, we should see it appear in our Memfault backend!
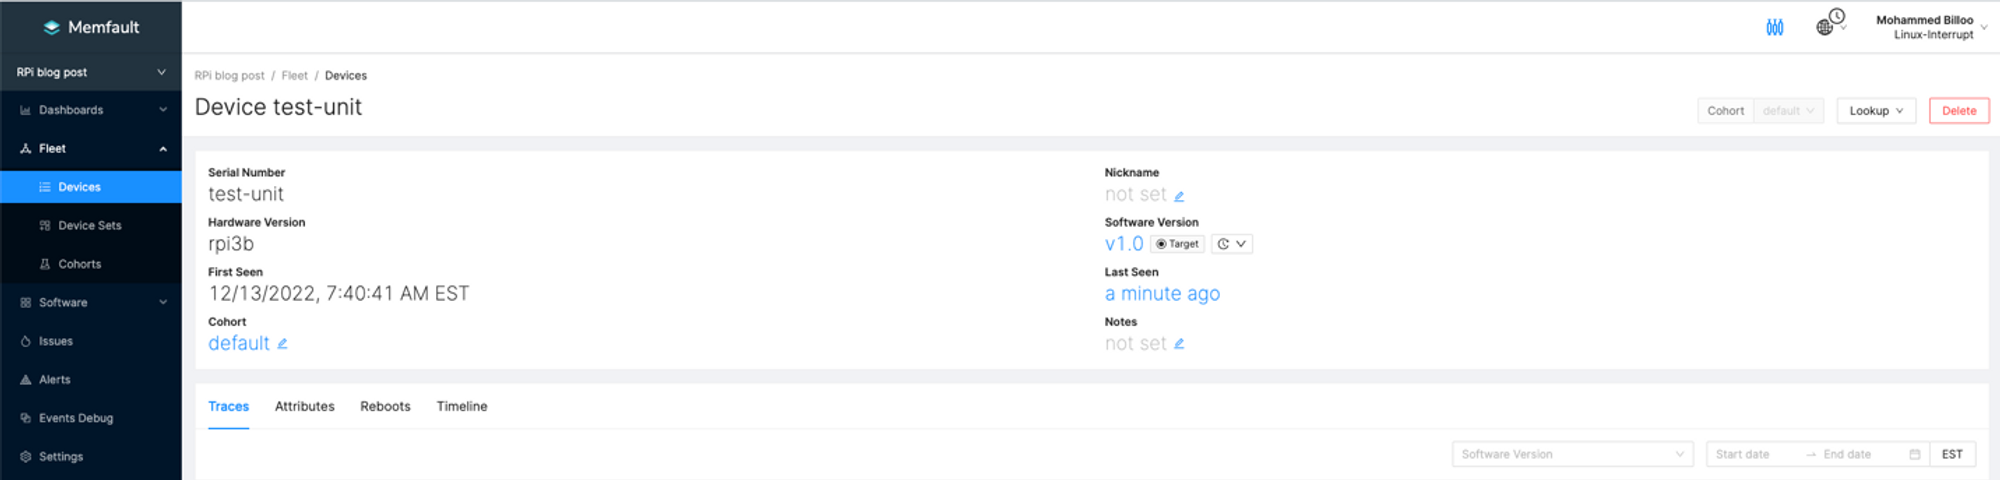
The above image shows the relevant information provided to the Memfault service, including the device ID (which corresponds to the Serial Number in the backend), the hardware, and the software version.
Closing Thoughts
In summary, Memfault is a hardware-agnostic service that supports device provisioning, management, OTA updates, and reporting of critical metrics of IoT devices. In this blog post, we demonstrated how to incorporate Memfault on a Raspberry Pi using The Yocto Project/OpenEmbedded as the baseline framework for the BSP. In the next blog post, we will describe relevant recipes in our BSP that will enable OTA updates and demonstrate the process on our Raspberry Pi.
See anything you'd like to change? Submit a pull request or open an issue on our GitHub
 Mohammed Billoo is an embedded Linux consultant with over 14 years of experience in embedded software across a multitude of domains, including Defense, Space, and Commercial. He is an avid blogger and contributor to the open-source community.