Better Firmware with LLVM/Clang
If you have ever done software development that involves Apple products, FreeBSD, WebAssembly, or Rust, you have used the wildly popular compiler toolchain known as LLVM. However, LLVM and the open source C-language compiler built on top of it (Clang) do not get a lot of attention in the embedded world.
In this article, I hope I can convince you that adding a Clang build target to your project can be a relatively simple and useful endeavor. We will cover how to take advantage of some of the rich features shipped with the toolchain and identify some memory leaks and mutex deadlocks in an example project at compile time! We will also walk through a step-by-step example of updating a GCC based ARM Cortex-M project to cross-compile with LLVM/Clang.
Note: While the focus of the article will be using LLVM/Clang with ARM Cortex-M embedded devices, the general overview of LLVM as well as the features leveraged can be applied to any architecture supported by the toolchain.
Table of Contents
- Background of GCC and Clang
- Benefits of Adding a Clang Build
- Example Project
- Installing LLVM/Clang
- Static Analysis With Clang and scan-build
- Setting up your project to compile with GCC & Clang
- Cross Compiling With Clang
- Compile Example Project with Both Clang and GCC!
- Linking GCC Objects with LLVMs Linker
- Final Thoughts
Background of GCC and Clang
The advent of open source compilers and toolchains traces back over 30 years to 1987 and the release of GCC 1.0. Originally, GCC was meant to compile GNU open source software written in C. The toolchain grew organically over time to target numerous architectures and support a variety of different languages. As a consequence, many aspects of the codebase have become complex to extend and work with.
The LLVM project is the “new” open source compiler on the block. It began as a research project at the University of Illinois at Urbana–Champaign in 20001. The early goals of the project were to create a more modular compiler toolchain by designing a collection of standalone libraries. The LLVM project really took root in 2005 when Apple hired one of the original designers, Chris Lattner, and invested heavily in making LLVM the default used for its own developer ecosystem. This bore Clang, the C, C++, and objective-C frontend to LLVM and modern day GNU GCC competitor.
Today, the LLVM toolchain has become ubiquitous in the software world and, in recent years, it has seen
adoption in the embedded world as well. Its favorable license in comparison to the GNU
toolchain (Apache 2 vs GPL3) along with its more modular architecture has made the LLVM toolchain a
default choice in the proprietary embedded compiler market. ARM scrapped their original compiler in
favor of an LLVM/Clang based one with the release of ARM Compiler 6 (armclang) and, more recently,
SEGGER built an ARM compiler based on the LLVM/Clang toolchain as
well2.
Benefits of Adding a Clang Build
Many embedded projects use GCC, or one of other proprietary compilers such as IAR or the ARM Compiler. You do not have to stop using your current compiler for builds to start benefiting from LLVM/Clang.
Adding a Clang build target to your pre-existing project has the following benefits:
- Static analysis! (More on this in the following sections)
- Makes your codebase less dependent on a single compiler feature set and makes it easier to transition from one compiler to another in the future (for example, a proprietary one to a free one).
- Two sets of error flags is better than one. You can use both compilers
-Werrorequivalent to maximize the issues you find before needing to do any debug on target. - By compiling with Clang, you are setting yourself up nicely for running unit tests and simulated builds on host platforms.
Example Project
Throughout the article we will use a simple example project that runs FreeRTOS and can be run on the NRF52840. If you would like to follow along locally all of the code can be found on GitHub.
Installing LLVM/Clang
The easiest way to get your hands on the latest release of the LLVM/Clang toolchain is to download the release for your OS from the “Pre-Built Binaries” section on the official website.
In this article, we use LLVM 10.0.0:
# OSX
$ wget "https://github.com/llvm/llvm-project/releases/download/llvmorg-10.0.0/clang+llvm-10.0.0-x86_64-apple-darwin.tar.xz"
$ tar -xf clang+llvm-10.0.0-x86_64-apple-darwin.tar.xz

# Ubuntu
$ wget "https://github.com/llvm/llvm-project/releases/download/llvmorg-10.0.0/clang+llvm-10.0.0-x86_64-linux-gnu-ubuntu-18.04.tar.xz"
$ tar -xf clang+llvm-10.0.0-x86_64-linux-gnu-ubuntu-18.04.tar.xz
Let’s add the toolchain to our path:
# OSX
$ export PATH=`pwd`/clang+llvm-10.0.0-x86_64-apple-darwin/bin:$PATH

# Ubuntu
$ export PATH=`pwd`/clang+llvm-10.0.0-x86_64-linux-gnu-ubuntu-18.04/bin:$PATH
You can sanity check that the install is working by running clang --version:
$ clang --version
clang version 10.0.0
Target: x86_64-apple-darwin18.5.0
Thread model: posix
InstalledDir: <SHOULD MATCH PATH YOU JUST ADDED ABOVE>
Static Analysis With Clang and scan-build
Further down in this post, we will dive into how to migrate a project using GCC to Clang, but first, let’s take a look at some of the awesome static analysis passes and checkers we can run on our example project with LLVM/Clang!
Overview of scan-build
scan-build is a static analyzer included as part of the LLVM toolchain. It works by intercepting calls to gcc or clang and making a static analysis pass.
scan-build works by overriding the CC and CXX used by CMake and Make. If you aren’t doing anything tricky in your project, invoking the tool is as simple as:
$ scan-build make
$ scan-build cmake ..
scan-build has a number of “Checkers”3 enabled by default. You can view them by running scan-build --help:
$ scan-build --help
CONTROLLING CHECKERS:

 A default group of checkers are always run unless explicitly disabled.
 Checkers may be enabled/disabled using the following options:

 -enable-checker [checker name]
 -disable-checker [checker name]
[...]
AVAILABLE CHECKERS:

 + core.CallAndMessage           Check for logical errors for function calls and Objective-C message expressions (e.g., uninitialized arguments, null function pointers)
 + core.DivideZero               Check for division by zero
 + core.DynamicTypePropagation   Generate dynamic type information
 + core.NonNullParamChecker      Check for null pointers passed as arguments to a function whose arguments are references or marked with the 'nonnull' attribute
 + core.NullDereference          Check for dereferences of null pointers
 + core.StackAddressEscape       Check that addresses to stack memory do not escape the function
 + core.UndefinedBinaryOperatorResult Check for undefined results of binary operators
[...]
NOTE: "+" indicates that an analysis is enabled by default.
The default set is a good starting point, and you can easily enable non-default ones or disable individual defaults. You can even implement your own custom pugins but these topics are outside the scope of this article.
Let’s run scan-build on our example project. We’ll see it finds a few interesting potential issues that neither Clang or GCC noticed during compilation.
Results will be emitted directly to the console but you can also browse them using the scan-view
command bundled with LLVM. scan-view will open an html representation of all the issues
discovered. From this view, you can easily filter by issue type and dig into the specifics of an analysis pass.
I’ve included the full output for the example project here but here’s an example of the type of information you will see:
Report Overview
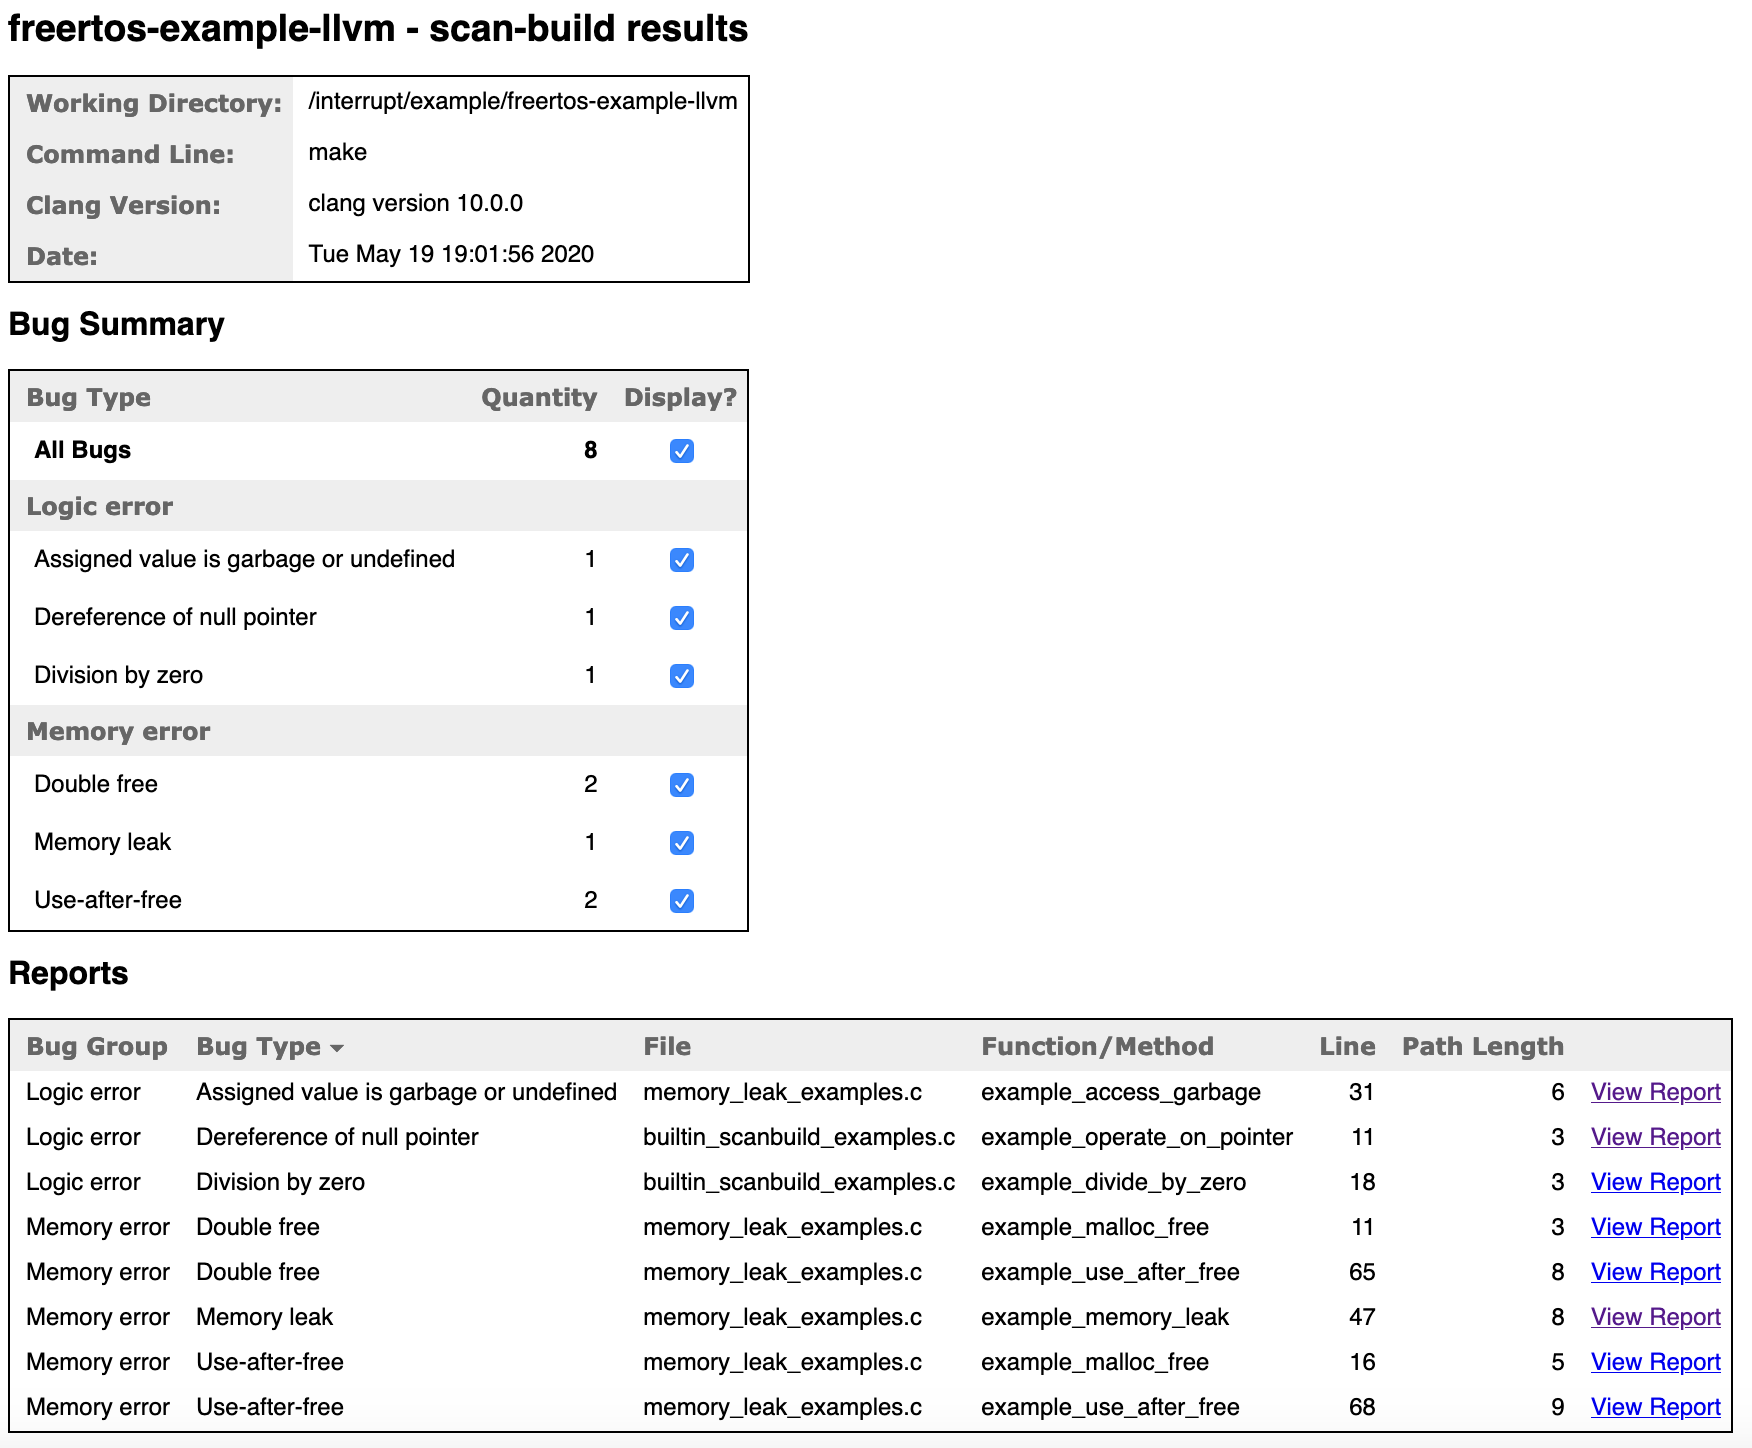
Report Analysis Example
Running scan-build
$ cd interrupt/examples/freertos-example-llvm/
$ make clean
$ scan-build make
scan-build: Using 'bin/clang-10' for static analysis
[...]
Linking library
Generated build/nrf52.elf
scan-build: 8 bugs found.
scan-build: Run 'scan-view /var/folders/dm/b0yt' to examine bug reports.
scan-build uses gcc by default on some platforms.
If this happens, you may see error messages related to unrecognized command line options and the ===GCC Compiler Detected=== message.
Set the compiler for scan-build to clang with the --use-cc and --use-c++ options:
$ scan-build --use-cc=clang --use-c++=clang make
core.NullDereference Checker
int example_operate_on_pointer(uint8_t *pointer) {
  int result = 0;
  if (pointer == NULL) {
    result = -1;
  }
  result += *pointer;
  return result;
}
src/builtin_scanbuild_examples.c:13:13:
  warning: Dereference of null pointer (loaded from variable 'pointer')
  result += *pointer;
NOTE: The NullDereference Checker only looks for null pointer accesses after there has already been a nullability check. This helps prevent the generation of false positives for functions that never get passed a NULL pointer.
core.DivideZero Checker
int example_divide_by_zero(int denominator) {
  int rv = 5;
  if (denominator == 0) {
    rv = 1 / denominator;
  }
  return rv;
}
src/builtin_scanbuild_examples.c:20:11: warning: Division by zero
  rv = 1 / denominator;
Enabling “Malloc” Static Analysis Checkers
scan-build also includes a sophisticated suite of dynamic memory checkers to catch bugs such as
memory leaks, use-after-free and double free errors (These are mostly run as part of the unix.Malloc checker). If you use the C standard library calls (i.e
calloc, malloc, free, etc) in your embedded project, these checks will work out of the box.
However, for many embedded projects this is not the case. It’s typical to have a heap (or “byte pool”) per subsystem (i.e network stack, graphics, sensor data, etc). This can help prevent one subsystem from taking down the other. In other embedded systems, RAM speed may not be heterogeneous, and it may be desirable to partition RAM into pools by access speed. This way subsystems requiring the fastest RAM (i.e graphics) can use one heap and subsystems which do not care can use slower RAM.
Conveniently, you can use compiler attributes to flag functions that behave like “malloc” and enable the
unix.Malloc checkers on them. Let’s set this up for the memory_pool.h file in our example project:
#pragma once
//! @file memory_pool.h

#include <stddef.h>

void *memory_pool_allocate(size_t size);
void memory_pool_free(void *ptr);
Attributes For Malloc Checking on Custom Functions
In our compiler.h header we will add the following:
#if defined(__clang__)

#define EXAMPLE_PROJ_MALLOC_LIKE_FUNC \
  __attribute__((ownership_returns(malloc)))

//! Note: Second Argument is the argument index for
//! the pointer being free'd. For simplicity, let's assume
//! the pointer is always in the 1st argument
#define EXAMPLE_PROJ_FREE_LIKE_FUNC \
__attribute__((ownership_takes(malloc, 1)))

#else

#define EXAMPLE_PROJ_MALLOC_LIKE_FUNC
#define EXAMPLE_PROJ_FREE_LIKE_FUNC

#endif
Aside: Prefix Project Macros!
Due to the C language’s lack of namespacing, it’s a good idea to prefix your macros to avoid collisions with
other libraries. (i.e MY_PROJECT_MIN() instead of MIN()).
This helps avoid define collisions with poorly structured libraries and prevents the use of the
#ifndef-#define-#endif anti-pattern:
#ifndef MIN
#define MIN(a, b) (((a) < (b)) ? (a) : (b))
#endif
Instrument Custom Malloc Implementation
We’ll update memory_pool.h to use the attributes defined above and apply one small workaround so the checker
works with our custom functions:
#pragma once
//! @file memory_pool.h

#include <stddef.h>

EXAMPLE_PROJ_MALLOC_LIKE_FUNC
void *memory_pool_allocate(size_t size);

//! As of LLVM 10, the "unix.MismatchedDeallocator" expects
//! memory to always be released with free() and will emit
//! the following error if not:
//!
//! "warning: Memory allocated by my_malloc_func(), should be
//! deallocated by free(), not my_free_func()"
//!
//! To circumvent the error for now we remap our custom free
//! function to free() when scan-build is running. Hopefully, future
//! releases of Clang make it possible to change this rule via annotations.
#ifdef __clang_analyzer__
#define memory_pool_free free
#endif

EXAMPLE_PROJ_FREE_LIKE_FUNC
void memory_pool_free(void *ptr);
Let’s try it out on a few examples:
uint32_t example_access_garbage(void) {
  const size_t size = 10;
  uint8_t *ptr = memory_pool_allocate(size);
  if (ptr == NULL) {
    return 0;
  }

  // access the data before setting it
  uint32_t sum = 0;
  for (size_t i = 0; i < size; i++) {
    sum += ptr[i];
  }

  return sum;
}
$ cd interrupt/examples/freertos-example-llvm/
$ make clean
$ scan-build make
[...]
src/memory_leak_examples.c:31:9:
  warning: Assigned value is garbage or undefined
    sum += ptr[i];
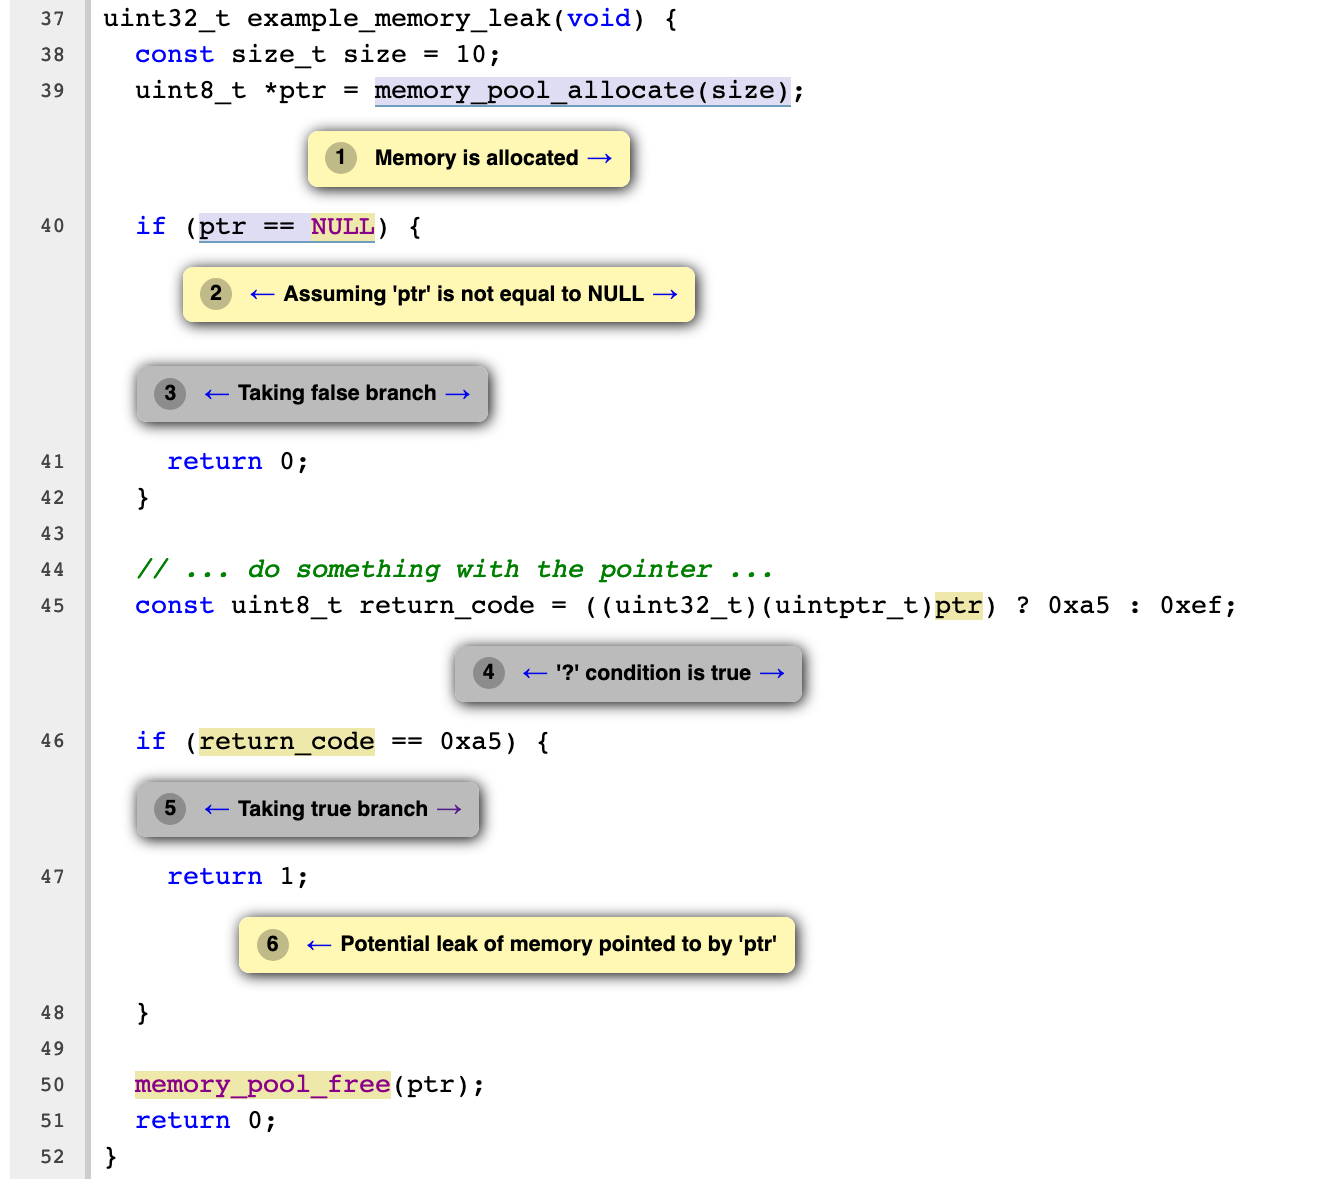
uint32_t example_memory_leak(void) {
  const size_t size = 10;
  uint8_t *ptr = memory_pool_allocate(size);
  if (ptr == NULL) {
    return 0;
  }

  // ... do something with the pointer ...
  const uint8_t return_code = ((uint32_t)(uintptr_t)ptr) ? 0xa5 : 0xef;
  if (return_code == 0xa5) {
    return 1;
  }

  memory_pool_free(ptr);
  return 0;
}
$ cd interrupt/examples/freertos-example-llvm/
$ make clean
$ scan-build make
[...]
src/memory_leak_examples.c:47:12:
  warning: Potential leak of memory pointed to by 'ptr'
    return 1;
Using Clangs Thread Safety Analysis for RTOS Mutexes
Clang also supports a Thread Safety Analyzer which can catch deadlocks and race
conditions that arise when writing multi-threaded applications (or using multiple tasks in a RTOS). The checkers are enabled at
compile time by using the -Wthread-safety compiler flag so there is zero runtime overhead!
The analyzer was contributed and is maintained by Google and is used “extensively in Google’s internal code base”.4 There is pretty good documentation about how to leverage the feature for C++. However, the analyzers can be used for C code as well via compiler attributes. It’s pretty common in an embedded system with an RTOS to have mutexes for subsystems such as an accelerometer or flash driver. In our example project we have:
//! @file mutex.h
void flash_lock(void);
void flash_unlock(void);

void accel_lock(void);
void accel_unlock(void);
To use the analyzer we need to annotate where locks are given and released. We can also
flag if certain functions require a lock. We can wrap all of these behind macros in compiler.h:
Macros helpers for utilizing -Wthread-safety in C
//! The Thread Safety Analyzers need an identifier to track things by
//! When using C++, this capability attribute can be bound to a Class.
//! For C, we'll just create a dummy variable that is not referenced
//! by actual code so it gets optimized away during compilation.
typedef int __attribute__((capability("mutex")))
  _ClangThreadSafetyLockReference;
#define INTERNAL_EXAMPLE_PROJ_DECLARE_LOCK_TRACKER(name) \
  extern _ClangThreadSafetyLockReference _##name

//! Flags a function that acquires a resource. In our example
//! we'll want to apply this attribute to flash_lock() and
//! accel_lock().
#define EXAMPLE_PROJ_FUNC_ACQUIRES_LOCK(name) \
  INTERNAL_EXAMPLE_PROJ_DECLARE_LOCK_TRACKER(name); \
  __attribute__((acquire_capability(_##name)))

//! Flags a function that releases a resource. For our example,
//! the accel_unlock() and flash_unlock() functions need this.
#define EXAMPLE_PROJ_FUNC_RELEASES_LOCK(name) \
  __attribute__((release_capability(_##name)))

//! Flags a function as requiring a lock be held by the time
//! it is invoked. For example, an "accel_read()" function.
#define EXAMPLE_PROJ_FUNC_REQUIRES_LOCK_HELD(name) \
  __attribute__((requires_capability(_##name)))

//! Disables thread safety checks for a function
//! This is required for the *_lock and *_unlock functions
//! in our example to prevent False positives.
#define EXAMPLE_PROJ_FUNC_DISABLE_LOCK_CHECKS \
  __attribute__((no_thread_safety_analysis))
Let’s update our code to take advantage of the annotations:
#pragma once

//! @file mutex.h
#include "example_project/compiler.h"

// ...

EXAMPLE_PROJ_FUNC_ACQUIRES_LOCK(flash)
void flash_lock(void);

EXAMPLE_PROJ_FUNC_RELEASES_LOCK(flash)
void flash_unlock(void);

EXAMPLE_PROJ_FUNC_ACQUIRES_LOCK(accel)
void accel_lock(void);

EXAMPLE_PROJ_FUNC_RELEASES_LOCK(accel)
void accel_unlock(void);

EXAMPLE_PROJ_FUNC_REQUIRES_LOCK_HELD(accel)
extern void example_func_requires_accel(void);
Now let’s try out a few examples:
void example_flash_lock_bug(void) {
  flash_lock();

  int rv = do_some_work_while_holding_locks();
  if (rv == -1) {
    return;
  }
  flash_unlock();
}
$ cd interrupt/examples/freertos-example-llvm/
$ make clean
$ CLI_CFLAG_OVERRIDES=-Wthread-safety COMPILER=clang make
[...]
src/mutex_examples.c:14:1:
  error: mutex '_flash' is not held on every path through here
      [-Werror,-Wthread-safety-analysis]
}
^
src/mutex_examples.c:7:3: note: mutex acquired here
  flash_lock();
void example_accel_lock_bug(void) {
  example_func_requires_accel();
}
$ cd interrupt/examples/freertos-example-llvm/
$ make clean
$ CLI_CFLAG_OVERRIDES=-Wthread-safety COMPILER=clang make
[...]
src/mutex_examples.c:17:3:
  error: calling function 'example_func_requires_accel' requires holding
      mutex '_accel' exclusively [-Werror,-Wthread-safety-analysis]
  example_func_requires_accel();
Pretty neat, right?!
Some additional checkers can be enabled via annotations as well to enforce certain locks are acquired before/after others. Take a look at the official documentation for more ideas!4.
Additional Clang Specific Compiler Warnings
Once you can compile your project with Clang, there are other compiler warnings not supported by other compilers that you can enable. These can be helpful for catching potential bugs or issues.
The exhaustive list of “Diagnostic Warnings” supported by Clang can be found in the official documentation online5. However, I find it easiest to run a build with all the possible Clang warnings enabled by using -Weverything, disabling all errors (-Wno-error) and piping the compilation output to a file I can grep after the fact. Let’s try it out on the example project:
$ make clean && CLI_CFLAG_OVERRIDES="-Weverything -Wno-error" \
  COMPILER=clang make &> compilation_results.txt
$ grep -o "\[\-W.*\].*" compilation_results.txt | sort -u
[-Wcovered-switch-default]
[-Wdocumentation-html]
[-Wdocumentation-unknown-command]
[-Wdocumentation]
[-Wextra-semi-stmt]
[-Wimplicit-int-conversion]
[-Wmissing-noreturn]
[-Wmissing-prototypes]
[-Wmissing-variable-declarations]
[-Wpadded]
[-Wpedantic]
[-Wunused-macros]
[-Wunused-parameter]
Sweet! We have discovered quite a few warnings we can go and investigate as to whether we want to enable or not.
Tip: For a production project, I actually like to leave
-Weverythingenabled. You can use a tool such as Conda to ensure all developers are on the same version of LLVM/Clang and see the exact same errors and-Wno-<warning>(i.e-Wno-pedantic) to disable any warnings that are not useful for your application.
Note: I haven’t had a chance to try it out yet but it’s worth noting that GCC is catching up on the static analysis front. In GCC 10, a bunch of new static analyzers were added via the
-fanalyzeroption.6
Setting up your project to compile with GCC & Clang
Now that we have seen a small sampling of what we can do with LLVM/Clang, let’s walk through the steps involved to update a GCC based project to compile with it!
Fortunately, the LLVM/Clang project has made every effort to support GNU GCC assembly, attributes, compiler flags & GNU linker script syntax, so a majority of the code in your project should already be compatible and the migration effort should be quite minimal.
Make Build System Compiler Aware
There will be a few system updates we will want to make depending on the compiler we are using. For example, Clang has a number of flags that GCC does not support so we will only want to enable those when Clang is in use.
Here is a template of what a makefile supporting both Clang and GCC targets can look like:
# Set things up to use the arm-none-eabi-gcc that is on
# our path by default but allow things to be easily overridden, i.e:
#
# COMPILER=<PATH_TO_OTHER_GCC_VERSION>/arm-none-eabi-gcc make
# COMPILER=clang make
COMPILER ?= arm-none-eabi-gcc
CC = $(COMPILER)

# [ ... ]

ifneq '' '$(findstring clang,$(CC_VERSION_INFO))'
$(info ===Clang Compiler Detected===)

COMPILER_SPECIFIC_CFLAGS +=
COMPILER_SPECIFIC_LDFLAGS +=

endif


ifneq '' '$(findstring gcc,$(CC_VERSION_INFO))'
$(info ===GCC Compiler Detected===)

COMPILER_SPECIFIC_CFLAGS +=
COMPILER_SPECIFIC_LDFLAGS +=

endif

CFLAGS += $(COMPILER_SPECIFIC_CFLAGS)
LDFLAGS += $(COMPILER_SPECIFIC_LDFLAGS)
Create a “compiler.h” header
You’ll probably encounter some code in your project that is compatible with GCC but not Clang. For any project supporting multiple compilers you will find a “compiler.h” style header that wraps compiler specifics behind a common macro. For example, for Clang you need to use a different attribute to disable optimizations on a function.
//! @file example_project/compiler.h

#if defined(__clang__)

#define EXAMPLE_PROJ_NO_OPT __attribute__((optnone))

#elif defined(__GNUC__)

#define EXAMPLE_PROJ_NO_OPT __attribute__((optimize("O0")))

#else
#  error "Unsupported Compiler"
#endif
Cross Compiling With Clang
Unlike GCC, a default build of Clang is multi-target capable. To cross compile all you have to do
is specify the appropriate --target argument into Clang. If no --target is specified it falls
back to its default behavior of targeting the native host architecture.
You can dump a list of the architectures supported by running llc --version:
$ llc --version
LLVM (http://llvm.org/):
  LLVM version 10.0.0
  Optimized build.
  Default target: x86_64-apple-darwin18.5.0
  Host CPU: skylake

  Registered Targets:
    aarch64    - AArch64 (little endian)
    aarch64_32 - AArch64 (little endian ILP32)
    aarch64_be - AArch64 (big endian)
    amdgcn     - AMD GCN GPUs
    arm        - ARM
[ ... ]
The Clang Target Triple
The value passed to --target itself is a bit complicated. The good thing is for ARM Cortex-M, you
can always pass the same value: --target=arm-none-eabi.
Feel free to skip to the next section if you aren’t interested in learning more about the
--targetargument internals.
Clang Target Triple Internals
The makeup of a --target value is actually:
<arch><sub>-<vendor>-<sys>-<abi>
A rough breakdown of what is expected for ARM targets is:
-
arch: One of the “registered targets” that was output fromllc --versionso for ARM it isarm. -
sub: When left blank the value is inferred from other flags specified as part of the compilation. For ARM Cortex-M,v6m,v7m,v7em,v8m, etc are all be legal values. -
vendor: For ARM this can be left blank or you can specifyunknownexplicitly. -
sys: For embedded targets this will benone. If you are compiling code targeting an OS, the name of the OS will be used. For example,linuxordarwin. -
abi: For Embedded ARM this will always beeabi(“embedded-application binary interface”)
If you stick with the --target=arm-none-eabi option suggested, the architecture will be resolved from the GCC compiler flags. (i.e Notably -mcpu or -march)
Confusingly, unspecified or invalid fields will be filled in or replaced under the hood by the LLVM toolchain. This can make it hard to determine if you have specified a legal target or not:
$ clang --target=armv7notrealsub-none-eabi --print-target-triple
armv7notrealsub-none-unknown-eabi
If you want to sanity check that the target being targeted is correct, the most reliable way I have found to do this is by compiling an empty file and emitting LLVM Intermediate Representation (IR). The “target triple” line will inform you what architecture code is actually being generated for:
Checking Target Triple By Dumping LLVM IR
$ touch test.c
$ clang --target=armv7notrealsub-none-eabi -emit-llvm -S test.c
$ cat test.ll | grep "target triple"
  target triple = "armv4t-none-unknown-eabi"
Updating Clang to cross-compile a “bare-metal” target
ARM Cortex-M “bare-metal” targets
When you compile an application to run on an operating system (i.e darwin or linux instead of none),
the C standard libraries will be picked up automatically for you. Code not targeting an OS is
often referred to as running on a “bare-metal” environment. With LLVM/Clang you
are responsible for providing locations of the standard libraries in this scenario, which is comprised of:
- The C standard library7 –
libc.a - Mathematical Functions of C standard library – Often, this is exported in a separate library,
libm.a. - Compiler Built-Ins – Most compilers include a set of built-in functions. The compiler will
opportunistically replace parts of your code with builtins for better performance or to save code
space. With GNU GCC these builtins are exposed via
libgcc.a8. With clang they are exposed vialibclang_rt.builtins.*.a. There is no formal specification for what builtins need to be implemented but Clang makes every effort to match the exact subset required by GCC.
Fortunately, for ARM Cortex-M development, the official GNU Arm toolchain9 bundles pre-compiled variants of Newlib’s libc and libm.
When you compile a project with the GNU Arm toolchain, libc.a & libm.a from the pre-compiled
Newlib as well as GCC’s libgcc.a will be linked into your project automatically.
I would suggest instead using the compiler flag --nostdlib to disable this behavior. This will force you
to manually specify these targets (by adding -lc, -lm, & -lgcc to your LDFLAGS). It makes it
more explicit when library dependencies are pulled into your project and easier to experiment with
swapping in alternative versions of the standard library.
Adding standard libraries to Clang “bare-metal” compilation
Clang does not bundle a C standard library for “bare-metal” ARM Cortex-M targets, so the recommendation in this scenario is to use the libraries included with the GNU Arm toolchain.
GCC and Clang expose some useful compiler arguments to make this straightforward to accomplish. Notably, with
Clang we can use --sysroot to change the default search path Clang uses for standard includes.
In our Makefile we can use the following arm-none-eabi-gcc compiler commands to programmatically
build the paths we need to provide to Clang.
-
-print-sysrootfor the path to pass to Clangs--sysrootoption -
-print-multi-directorythis will display where libc.a and libm.a within the gcc toolchain are located relative to$SYS_ROOT/lib -
-print-libgcc-file-namewill dump the complete path to GCC builtin functions (libgcc.a)
Makefile Modifications
Putting it all together and updating the Makefile we started above we have:
# Note: These arguments will be used by clang to select
# the specific architecture target when we use the
# invoke Clang with --target=arm-none-eabi
ARCH_CFLAGS += \
  -mthumb -mcpu=cortex-m4 \
  -mfloat-abi=hard -mfpu=fpv4-sp-d16 \

# [ ... ]

ifneq '' '$(findstring clang,$(CC_VERSION_INFO))'
$(info ===Clang Compiler Detected===)

# Default assumes a GNU Arm toolchain is on your path
# but an explicit path can also be provided by doing
# ARM_GNU_CC=<PATH_TO_GCC> make
ARM_CORTEXM_SYSROOT = \
  $(shell $(ARM_GNU_CC) $(ARCH_CFLAGS) -print-sysroot 2>&1)

# The directory where Newlib's libc.a & libm.a reside
# for the specific target architecture
ARM_CORTEXM_MULTI_DIR = \
  $(shell $(ARM_GNU_CC) $(ARCH_CFLAGS) -print-multi-directory 2>&1)

# Pick up builtins needed for compilation
ARM_CORTEXM_BUILTINS ?= \
$(shell $(ARM_GNU_CC) $(ARCH_CFLAGS) -print-libgcc-file-name 2>&1)

COMPILER_SPECIFIC_CFLAGS += \
  --target=arm-none-eabi \
  --sysroot=$(ARM_CORTEXM_SYSROOT)

COMPILER_SPECIFIC_LDFLAGS += \
  -L$(ARM_CORTEXM_SYSROOT)/lib/$(ARM_CORTEXM_MULTI_DIR) \
  $(ARM_CORTEXM_BUILTINS)
endif
Use Clang’s -Oz instead of -Os
For embedded projects, the quality of a compiler is often evaluated by how small of a binary it can
create. With GCC, the smallest code is emitted when compiling with the -Os option. With Clang,
you will want to use -Oz instead which enables additional space optimizations beyond those
enabled by Clang’s version of -Os.
ifneq '' '$(findstring clang,$(CC_VERSION_INFO))'
$(info ===Clang Compiler Detected===)
# [ ... ]

COMPILER_SPECIFIC_CFLAGS += \
...
  -0z
endif

ifneq '' '$(findstring gcc,$(CC_VERSION_INFO))'
$(info ===GCC Compiler Detected===)

COMPILER_SPECIFIC_CFLAGS += \
  -Os
endif
Compiling libclang_rt.builtins*.a for ARM Cortex-M
If you are interested in taking the road less traveled, it is possible to compile LLVMs builtin library for ARM Cortex-M though I would not recommend it.
At this point we can compile our project with either GCC and Clang! Skip ahead to the next section to try that out instead!
You can even find some documentation about the endeavor here.
Disclaimers: At the time of writing this article,
- Some of the official documentation, such as the instructions for “Alternative using a cmake cache” no longer work.
- It does not appear possible to compile a builtin targeting the Cortex-M hard float ABI (i.e
armv7emtarget). - It does not appear possible to compile
libclang_rtfor ARM Cortex-M on OSX. You need to use Docker or be running on Linux natively.
Setting up environment for libclang_rt build
$ export ARM_SYSROOT=$(arm-none-eabi-gcc -print-sysroot)

# This needs to be a complete ARM target triple to pick up
# architecture specific optimizations
#   Cortex M0, M0+: armv6m-none-eabi
#   Cortex M3: armv7m-none-eabi
#   Cortex M4, M7: armv7em-none-eabi
#   Cortex M33: armv8m-none-eabi
# Let's target Cortex M3 as an example:
$ export NONE_EABI_TARGET=armv7m-none-eabi

$ export LLVM_BIN_PATH=$(dirname $(which clang))

# Only Soft Float ABI seems to work
$ export NONE_EABI_TARGET_FLAGS="-mthumb -mfloat-abi=soft -mfpu=none"
Configuring and Compiling libclang_rt for baremetal
Once you have set up the env you will need to checkout the compiler-rt project and compiler:
$ git clone https://github.com/llvm/llvm-project.git llvm-project
$ cd llvm-project/compiler-rt
$ mkdir build
$ cd build

$ cmake -G "Unix Makefiles" -DCMAKE_BUILD_TYPE=Release \
-DCMAKE_TRY_COMPILE_TARGET_TYPE=STATIC_LIBRARY \
-DCOMPILER_RT_OS_DIR="baremetal" \
-DCOMPILER_RT_BUILD_BUILTINS=ON \
-DCOMPILER_RT_BUILD_SANITIZERS=OFF \
-DCOMPILER_RT_BUILD_XRAY=OFF \
-DCOMPILER_RT_BUILD_LIBFUZZER=OFF \
-DCOMPILER_RT_BUILD_PROFILE=OFF \
-DCMAKE_C_COMPILER=${LLVM_BIN_PATH}/clang \
-DCMAKE_C_COMPILER_TARGET=${NONE_EABI_TARGET} \
-DCMAKE_ASM_COMPILER_TARGET=${NONE_EABI_TARGET} \
-DCMAKE_AR=${LLVM_BIN_PATH}/llvm-ar \
-DCMAKE_NM=${LLVM_BIN_PATH}/llvm-nm \
-DCMAKE_LINKER=${LLVM_BIN_PATH}/ld.lld \
-DCMAKE_RANLIB=${LLVM_BIN_PATH}/llvm-ranlib \
-DCOMPILER_RT_BAREMETAL_BUILD=ON \
-DCOMPILER_RT_DEFAULT_TARGET_ONLY=ON \
-DLLVM_CONFIG_PATH=${LLVM_BIN_PATH}/llvm-config \
-DCMAKE_C_FLAGS= ${NONE_EABI_TARGET_FLAGS} \
-DCMAKE_ASM_FLAGS=${NONE_EABI_TARGET_FLAGS} \
-DCOMPILER_RT_INCLUDE_TESTS=OFF \
-DCMAKE_SYSROOT=${ARM_SYSROOT} ..

$ make
...
[100%] Built target clang_rt.builtins-armv7m
Scanning dependencies of target builtins
[100%] Built target builtins
Scanning dependencies of target compiler-rt-headers
[100%] Built target compiler-rt-headers
Scanning dependencies of target compiler-rt
[100%] Built target compiler-rt
At the end of the build, the Clang libgcc.a equivalent will be emitted to ./lib/baremetal/libclang_rt.builtins-armv7m.a
You can swap libgcc with the generated libclang_rtin our example project by overrding
ARM_CORTEXM_BUILTINS when invoking make:
Swapping libgcc with libclang_rt.builtins-armv7m
$ cd interrupt/examples/freertos-example-llvm/
$ make clean
$ ARM_CORTEXM_BUILTINS=\
  <PATH_TO>/lib/baremetal/libclang_rt.builtins-armv7m.a make
Compile Example Project with Both Clang and GCC!
At this point, we can compile our example project with either GCC or Clang! Let’s take a look at the results:
Clang Build
$ cd interrupt/examples/freertos-example-llvm/
$ make clean
$ COMPILER=clang make
===Clang Compiler Detected===
# [...]
Linking library
Generated build/nrf52.elf
   text    data     bss     dec     hex	filename
  10094    2368   13048   25510    63a6	build/nrf52.elf
GCC Build
$ cd interrupt/examples/freertos-example-llvm/
$ make clean
$ COMPILER=arm-none-eabi-gcc make
===GCC Compiler Detected===
# [...]
Linking library
Generated build/nrf52.elf
Generated build/nrf52.elf
   text    data     bss     dec     hex	filename
   9846    2112   13328   25286    62c6	build/nrf52.elf
Observations
We can see for our simple example app the sizes are within about 1% of each other (25,510 bytes for Clang vs 25,286 bytes for GCC).
Linking GCC Objects with LLVMs Linker
The LLVM linker (ld.lld) 10 strives to be a drop-in replacement for the GNU linkers and has come a long way in recent years in terms of compatibility.
There’s some pretty bold claims made on the official docs that may make you want to try it out:
LLD is very fast. When you link a large program on a multicore machine, you can expect that LLD runs more than twice as fast as the GNU gold linker. Your mileage may vary, though.
As of GCC911, it is even possible to tell GCC to use it instead of the GNU linker with the
-fuse-ld=lld option:
$ export LLVM_BIN_PATH=$(dirname $(which ld.lld))
$ make clean
# NOTE: The -B<PATH> argument tells GCC to search PATH
# for binaries
$ CLI_LDFLAG_OVERRIDES="-B${LLVM_ROOT} -Wl,-fuse-ld=lld" \
  COMPILER=arm-none-eabi-gcc make
Final Thoughts
I first experimented with Clang for Cortex-M in 2013 and at the time the backend for code-size optimization for ARM just didn’t compete with other compilers like GCC. These days it seems like things are getting pretty close, and I’m quite impressed at how the toolchain has progressed overall.
I hope this post gave you a useful overview of how to cross-compile your embedded ARM project with LLVM/Clang and some of the neat things you can do once you have that working.
I’d love to hear if you already using LLVM/Clang in your embedded project today and if so, whether it is for static analysis or for generating actual binaries. Either way, let us know in the discussion area below!
See anything you'd like to change? Submit a pull request or open an issue on our GitHub
References
-
If a deep dive into the history of GCC and LLVM is your thing, this article is great! ↩
 Chris Coleman is a founder and CTO at Memfault. Prior to founding Memfault, Chris worked on the embedded software teams at Sun, Pebble, and Fitbit.