A Modern C Development Environment
Sometimes, C/C++ projects have a long development cycle. When working on such a project, it can be easy to take our development environment for granted, and forget about the effort invested in its bring-up. The build environment works like magic, the test framework is neatly integrated, and the CI/CD pipeline relieves us of tedious, repetitive tasks.
For me, all it took was a simple thought: How do I best develop a C library, consisting of only a handful of files, but developed out of the context of my current, comfortable development environment? And there I was, back in the cold reality of C/C++, where you have the freedom - or obligation - to choose the entire development environment yourself.
In this article we’ll go over how to set up a containerized development environment for C projects. We’ll touch on setting up a build system using CMake, a testing environment using Unity, and even how to use our containerized environment in our CI pipeline!
Maybe this little writeup helps the next person that is feeling a little overwhelmed when trying to start a new C/C++ project from scratch, with their hands frozen over the keyboard, thinking about all those things that need to be done before even starting to write a single line of code…
A “modern” development environment
Throughout this article, we’ll set up a complete, containerized development environment for a C project:
- We’ll create a Docker image that we can use as a development container with vscode
- Based on a minimal Dummy library, we’ll set up the tools to build the library within the container.
- We’ll set up the static code analyzer
clang-tidyto check our code for common mistakes. -
clang-formatwill help us to keep our code base nicely formatted and tidy. - We’ll set up the Unity, executed on host via Ceedling to test our dummy function.
- And finally, we’ll set up a GitHub workflow to execute, build, and test our project using the same Docker image that we’re using locally.
Disclaimer: There are endless possibilities to set up environments and this is just one of them. Please be lenient in case some of my solutions are not ideal or could be solved differently.
Throughout this article, I’ll make use of the Docker command line interface. It is, however, out of the scope to discuss the basic concepts or the Docker command line parameters. In case you don’t understand why certain parameters are needed, I’d kindly ask you to refer to the online documentation.
The impatient reader can just skip ahead and open the example project on GitHub. If you’re happy to be walked through the steps, however, I’d be happy to guide you through the entire setup.
Table of Contents
Containers for development
Working with embedded systems or C/C++ sometimes requires installing lots of specialized tools or compilers. If you are working on different projects at the same time, you’ll easily end up with conflicting versions. Therefore, whenever feasible, I tend to run everything within a Docker container.
Another benefit is that you can also use your Dockerfiles as recipes in case you need to install tools locally. The real benefit, however, is that it makes it easy for anyone to join a project by using either a prebuilt image or by attempting to build the image locally. Also, your CI can use the same environment as you do!
Why Docker? Where’s the catch?
Don’t get me wrong, Docker is far from being perfect and I experienced plenty of issues personally, but it is a decent solution if you keep some limitations in mind. If you’re new to Docker, maybe consider the following:
- Dockerfiles are not stable. A Dockerfile that built just fine yesterday might fail to build today. There are simply too many external dependencies.
- Docker is not platform-independent. Especially if you’re running a container on other CPU architectures, e.g., Apple ARM, you’ll notice that some things don’t run. We’ll see this later.
- Some Docker features are only supported in Linux or dedicated Windows containers. E.g., mounting a USB device into a Docker container is not supported on all platforms; a limitation known since 2016.
- Docker - just like all the big companies out there - can suddenly deprecate even major features of their tools. I experienced this with docker-machine. It is always best not to bet 100% on one technology and you always need to be prepared to switch.
- Docker is no longer entirely free to use. At the time of writing, Docker was still free to use for personal use and small businesses, but please make sure to check their latest license agreement.
With all this in mind, Docker images are an elegant solution for development environments, especially if you have the chance to spin up your own registry. This sounds harder than it is since solutions already exist, e.g., Google Cloud, JFrog Artifactory, and other providers.
I have personally experienced the huge upside of this with my first dockerized environment. By pulling the images from a registry of a project that was parked for over four years, I had the development environment back up and running in under 10 minutes.
Let’s do this
Let’s start from zero with an empty repository:
mkdir cproject
cd cproject
git init
Make sure you have Docker installed and running. Create the following builder.Dockerfile in the root directory of the project:
ARG base_tag=bullseye
ARG base_img=mcr.microsoft.com/vscode/devcontainers/base:dev-${base_tag}

FROM --platform=linux/amd64 ${base_img} AS builder-install

RUN apt-get update --fix-missing && apt-get -y upgrade
RUN apt-get install -y --no-install-recommends \
    apt-utils \
    curl \
    cmake \
    build-essential \
    gcc \
    g++-multilib \
    locales \
    make \
    ruby \
    gcovr \
    wget \
    && rm -rf /var/lib/apt/lists/*
Note: Throughout this article, I’ll only show relevant parts of the Dockerfile and may omit some sections that you’ll find in the Dockerfile in the demo repository.
This Dockerifle specifies a base image and installs some packages that we’ll use in future steps. I won’t go into detail about each package: When creating your image you’ll soon notice if something is missing and you can just extend this list of packages. What is important is the following:
- For the base image, I highly recommend using a specific tag. The
aptpackages vary wildly between base images, so choosing a tag buys you a bit more time until your Dockerfiles fail, e.g., when theaptregistry changes. - For development images, I tend to use a specific platform. This is important in later steps, where specific tools might not exist for the CPU architecture of your machine, e.g., if you’re using an Apple ARM-based computer.
If you’re not using vscode you could also specify a different base image, e.g., base_img=debian:${base_tag}. In this article we’re spinning up a development environment with vscode and we’ll therefore stick to an image that is supported by its Dev Containers.
The image is built with the following command, which might take a little time to execute:
docker build -f builder.Dockerfile -t cproject-builder:latest .
Note: Running this command again will execute much faster since all steps within a Dockerfile are cached! Only if, e.g., you add new packages to the list, the whole step will be re-executed.
A shortcut for verbose command line invocations
Docker commands are quite verbose, and they only tend to become even longer, which is why I typically park my most used commands in a makefile in the project root. Assuming you have make installed, you could do the following to make your life a little easier. Your future self will thank you for not having to remember all commands:
project_name=cproject
builder-build :
  docker build -f builder.Dockerfile -t $(project_name)-builder:latest .
Now, all you need to do is the following to rebuild your image:
make builder-build
Note: A more elegant solution than
makefilesis Invoke, presented in a previous article. Since I’m a dinosaur, however, and for the sake of simplicity, I’ll stick tomakefilesin this article.
Let’s spin up a container from our image and take it for a test drive:
$ docker run --rm -it --platform linux/amd64 cproject-builder:latest /bin/bash

$ gcc --version
gcc (Debian 10.2.1-6) 10.2.1 20210110
Copyright (C) 2020 Free Software Foundation, Inc.
This is free software; see the source for copying conditions.  There is NO
warranty; not even for MERCHANTABILITY or FITNESS FOR A PARTICULAR PURPOSE.

$ cmake --version
cmake version 3.18.4
CMake suite maintained and supported by Kitware (kitware.com/cmake).

$ exit
When using apt, the version of the tools that have been installed depends on the base image and therefore on the package registry. If you want to install specific versions, you can do this by executing custom RUN commands as we’ll see later.
Visual Studio Code Dev Containers
The downside of not having all tools installed locally is that those tools can not be leveraged by your IDE of choice. E.g., when using vscode you won’t be able to properly set up intellisense or any other helpers if you don’t have any compiler installed.
vscode allows you to run an instance of the editor within a so-called development container. This is also the reason why we chose the mcr.microsoft.com/vscode/devcontainers/base image as the base image: We can connect vscode within our builder container and therefore have all the tools installed in our Docker image available! Notice, however, that this vscode instance does not match your local vscode installation. This vscode instance is created from scratch and works very similar to remote instances: E.g., you need to explicitly install all the extensions and provide all the settings that you have already set up in your local instance. Have a look at the tutorial for the exact steps or in case anything fails whilst following along this article. For now, I assume that you have vscode and the Dev Containers extension installed.
By creating the .devcontainer/devcontainer.json file, we can tell vscode to use our newly built image for its development container. We’re also installing three extensions within this vscode instance by using the customizations.extensions field in the devcontainer.json configuration file:
{
  "name": "C",
  "build": {
    "dockerfile": "../builder.Dockerfile"
  },
  "runArgs": ["--platform=linux/amd64"],
  "customizations": {
    "vscode": {
      "settings": {
        "terminal.integrated.defaultProfile.linux": "bash",
        "extensions.verifySignature": false
      },
      "extensions": ["ms-vscode.cpptools", "ms-vscode.cmake-tools", "cschlosser.doxdocgen"]
    }
  }
}
If you now reload your window or reopen vscode (using the cproject folder as the root folder!) vscode should now ask you if it should use the detected development container.
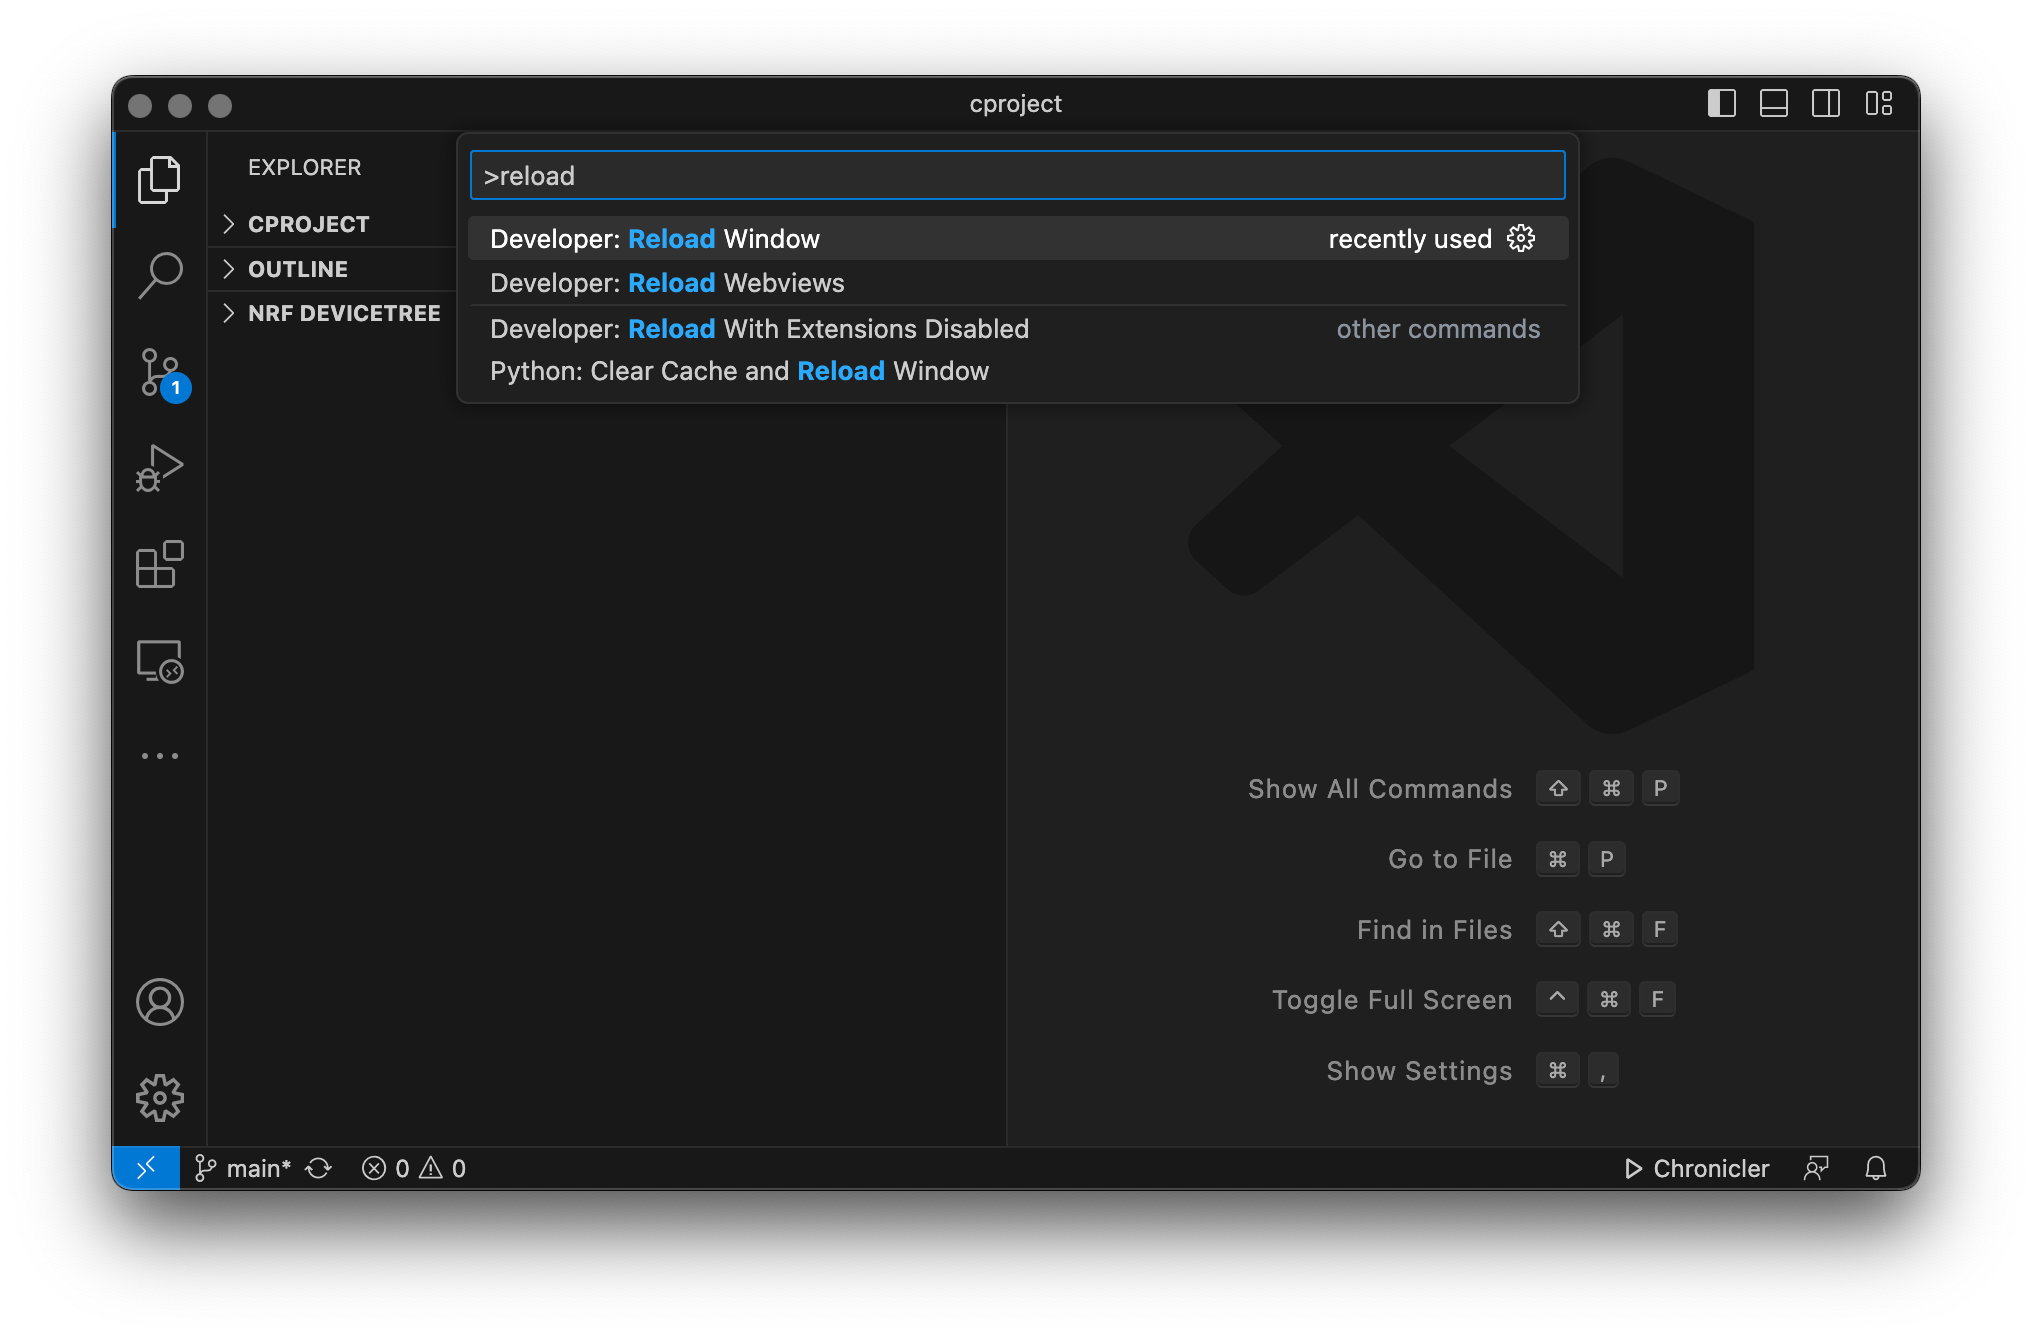
It’ll take a while for vscode to set up your container and install the extensions, but in the end you should have vscode connected to your Linux container, with all previous tools installed.

A skeleton subsystem
For this article, we’ll create a single .c and .h pair, built using cmake, with a single random number generator function, as follows:
$ tree --charset=utf-8 --dirsfirst
.
├── include
│   └── dummy
│       └── dummy.h
├── src
│   └── dummy.c
├── CMakeLists.txt
├── builder.Dockerfile
└── makefile <- this is just our makefile containing the docker commands
#include "dummy/dummy.h"
uint8_t dummy_random(void)
{
    return 4U; // determined by fair dice roll.
}
I’ll spare you the details, the CMakeLists.txt simply defines a library named “Dummy” and adds the corresponding files to the library. Have a look at the example project on GitHub and its CMakeLists.txt file. What’s important is: This already builds within our development container and vscode! Open the integrated terminal in your remote instance and execute cmake as follows.
$ cmake -B build
-- The C compiler identification is GNU 10.2.1
-- Detecting C compiler ABI info
-- Detecting C compiler ABI info - done
-- Check for working C compiler: /usr/bin/cc - skipped
-- Detecting C compile features
-- Detecting C compile features - done
-- Configuring done
-- Generating done
-- Build files have been written to: /workspaces/cproject/build
$ cmake --build build
Scanning dependencies of target Dummy
[ 50%] Building C object CMakeFiles/Dummy.dir/src/dummy.c.o
[100%] Linking C static library libDummy.a
[100%] Built target Dummy
Building outside of vscode and mounting volumes
Not everyone is a friend of vscode. All the magic happening behind the scenes in an IDE is not everyone’s favorite flavor and it is always good to know how to handle things without an IDE, so I’d like to provide an alternative setup that will also be important once we deal with the GitHub workflow, where we simply have to step out of the comforts of an IDE.
One such magic step that vscode does for you - and that we’ll now need to do ourselves - is managing the files within the root container. We’ll use a volume to make all files available within the container. At the same time, this makes all modifications that happen inside the container also visible outside of it. We update our Dockerfile with the following commands:
VOLUME ["/builder/mnt"]
WORKDIR /builder/mnt
This defines a volume that we can later use to mount our project directory when executing docker run, and the workdir instruction tells Docker to make this the default path for all future steps. Don’t forget to rebuild the image, otherwise, the changes will not be available!
make builder-build
A note on Docker volumes
As mentioned in the introduction, Docker does not behave the same way on all platforms. Only on Linux or when using Windows containers on Windows, containers run “natively” and thus without major penalties. If you’re running a Linux container on macOS or Windows - in very simple words - they execute within a VM (though admittedly it is a bit more complicated than that).
The key takeaway is that since the container is executed in a VM, the I/O performance is significantly worse compared to a container that is run natively. For compiled languages or for any process that creates a lot of files, this impact can be significant since the overhead can be up to 100x of what you’re experiencing natively. This can lead to longer build or generation times.
Thankfully, Docker has provided a good solution for macOS with the VirtioFS file-sharing implementation. All you need to do is enable it in your Docker configuration:
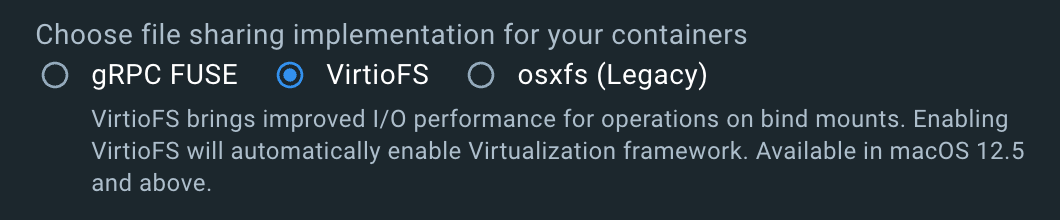
For Windows, at the time of writing, I don’t know of a similar solution so you might have to dig a little deeper in case you run into performance problems. Personally, I’ve successfully used docker-sync before, but it is a bit harder to handle.
Running the development container manually
Now we can run the following command to spin up the container with our project folder mounted as a volume:
$ docker run \
    --rm \
    -it \
    --platform linux/amd64 \
    --workdir /builder/mnt \
    -v .:/builder/mnt \
    cproject-builder:latest \
    /bin/bash
The current directory “.” is now available within the container as /builder/mnt. And - just like in our development container - we’re able to build the project:
$ rm -rf build

$ cmake -B build
-- The C compiler identification is GNU 10.2.1
-- Detecting C compiler ABI info
-- Detecting C compiler ABI info - done
-- Check for working C compiler: /usr/bin/cc - skipped
-- Detecting C compile features
-- Detecting C compile features - done
-- Configuring done
-- Generating done
-- Build files have been written to: /builder/mnt/build

$ cmake --build build
Scanning dependencies of target Dummy
[ 50%] Building C object CMakeFiles/Dummy.dir/src/dummy.c.o
[100%] Linking C static library libDummy.a
[100%] Built target Dummy
Since the command to spin up the container is rather verbose, I tend to also use a make target in my makefile for that, such that all I need to type is make builder-run:
builder-run :
  docker run \
    --rm \
    -it \
    --platform linux/amd64 \
    --workdir /builder/mnt \
    -v .:/builder/mnt \
    $(project_name)-builder:latest \
    /bin/bash
Installing clang tools for formatting and static code analysis
The flexibility of C and C++ comes with plenty of massive footguns so, I try to add at least a minimal static code analysis to my project. This helps to catch the most obvious mistakes and gives some extra confidence in the codebase. There are plenty of tools out there, but my personal preference so far is clang-tidy.
Also, when collaborating on a codebase, a formatter is always a nice thing to have, and since we’re installing clang-tidy anyhow, we might as well go ahead and install clang-format.
The two configuration files .clang-format and .clang-tidy are placed into the root directory of the project such that any IDE picks them up automatically. I won’t go into detail about the options of the two tools and will just assume that the reader follows the previous links for more details or copies the files from the example project on GitHub. So this is what we have now:
$ tree --charset=utf-8 --dirsfirst -a -I build -I .git -L 1
.
├── .devcontainer
├── include
├── src
├── .clang-format
├── .clang-tidy
├── CMakeLists.txt
├── builder.Dockerfile
└── makefile
Installing specific in the builder image
Here’s a catch with clang-tidy and clang-format: The configuration files must match the tool version, they are not necessarily backward compatible. It is therefore important to install compatible versions for your configuration files. Since we have a container we’ll always be using the correct version! The installation, however, can be tricky. Why? Running apt-get to install the tools does not always work since the package registries typically contain ancient tool versions. One way around this is to install them manually in our Dockerfile:
ARG base_tag=bullseye
ARG llvm_version=16
RUN apt-get update --fix-missing && apt-get -y upgrade
RUN apt-get install -y --no-install-recommends \
    gnupg2 \
    gnupg-agent \
    ca-certificates \
    && rm -rf /var/lib/apt/lists/*

RUN curl --fail --silent --show-error --location https://apt.llvm.org/llvm-snapshot.gpg.key | apt-key add -
RUN echo "deb http://apt.llvm.org/$base_tag/ llvm-toolchain-$base_tag-$llvm_version main" >> /etc/apt/sources.list.d/llvm.list

RUN apt-get update --fix-missing && apt-get -y upgrade
RUN apt-get install -y --no-install-recommends \
    clang-format-${llvm_version} \
    clang-tidy-${llvm_version} \
    && rm -rf /var/lib/apt/lists/*

RUN ln -s /usr/bin/clang-format-${llvm_version} /usr/local/bin/clang-format
RUN ln -s /usr/bin/clang-tidy-${llvm_version} /usr/local/bin/clang-tidy
This is one of the steps in a Dockerfile that I’ve previously mentioned which can break quite easily when you’re trying to rebuild an image in a couple of years. In case you’re happy with the packages provided for your base images, you can also simply install the packages that are provided with the apt registry. Now both clang-format and clang-tidy are available in the image:
$ make builder-build
$ make builder-run

$ clang-format --version
Debian clang-format version 16.0.6 (++20230704084212+7cbf1a259152-1~exp1~20230704204302.101)

$ clang-tidy --version
Debian LLVM version 16.0.6
  Optimized build.
Using clang-format in the Development Container
vscode typically needs to be instructed to rebuild the development container from the Dockerfile. You can do so explicitly using the command prompt:
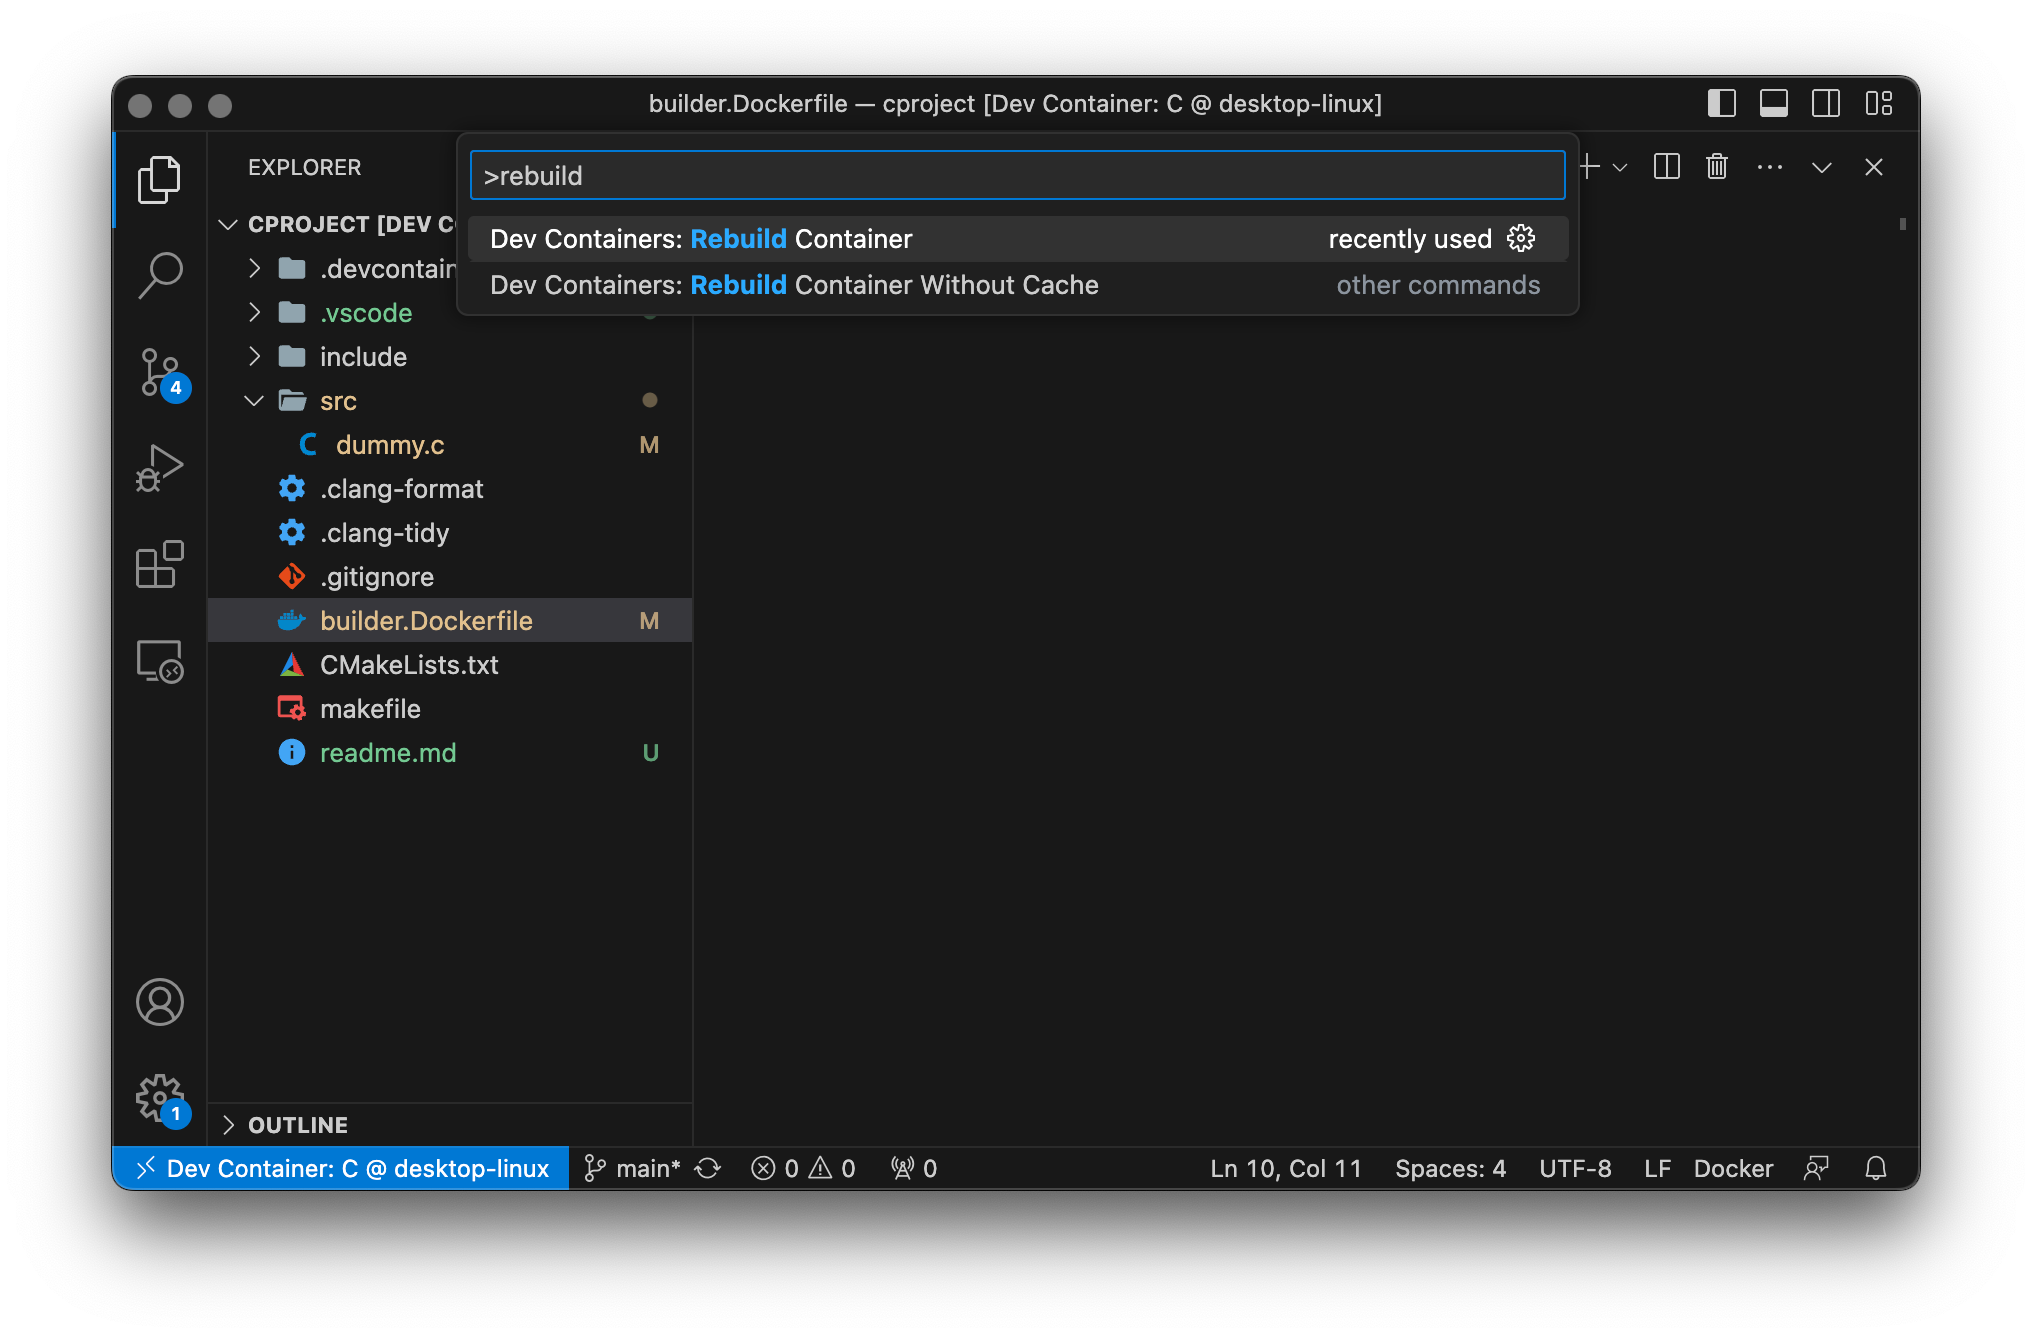
Now you have clang-tidy and clang-format available within your development container. You can now also instruct vscode to automatically format your files on save. For this, we create a workspace configuration .vscode/settings.json file:
{
  "[c]": {
    "editor.formatOnSave": true
  },
  "[cpp]": {
    "editor.formatOnSave": true
  },
  "C_Cpp.default.compileCommands": "${workspaceFolder}/src/build/compile_commands.json",
  "cmake.configureOnOpen": true
}
I’ve hidden a little detail here: clang-tidy operates on the compile_commands.json file that can be created when using cmake as a build system. I’ve enabled this option within the CMakeLists.txt file. At the same time, we’re allowing the cmake extension for vscode to configure the project when opening and therefore have all the fancy buttons and actions available to build the project in case you don’t like the command line. Personally, I still fall back to the command line. But then, I’m a dinosaur.
Now, if you open the dummy.c file in your editor it will automatically format it according to the rules in your .clang-format file whenever you save the file. But what if someone in your team doesn’t use vscode or forgot to enable the format-on-save feature?
Wrapping clang-format and clang-tidy calls
This section is a little self-promotion of two wrapper scripts for clang-format and clang-tidy that I am maintaining: run-clang-tidy and run-clang-format. Both tools are command line tools written in Rust that simplify and parallelize the execution of clang-format and clang-tidy from the command line.
In our builder.dockerfile we’ll now install the released, architecture-specific versions from the GitHub repositories of run-clang-tidy and run-clang-format.
RUN mkdir -p /usr/local/run-clang-format
RUN wget -O clang-utils.tgz "https://github.com/lmapii/run-clang-format/releases/download/v1.4.10/run-clang-format-v1.4.10-i686-unknown-linux-gnu.tar.gz" && \
    tar -C /usr/local/run-clang-format -xzf clang-utils.tgz --strip-components 1 && \
    rm clang-utils.tgz

ENV PATH /usr/local/run-clang-format:$PATH
RUN run-clang-format --version

RUN mkdir -p /usr/local/run-clang-tidy
RUN wget -O clang-utils.tgz "https://github.com/lmapii/run-clang-tidy/releases/download/v0.2.1/run-clang-tidy-v0.2.1-i686-unknown-linux-gnu.tar.gz" && \
    tar -C /usr/local/run-clang-tidy -xzf clang-utils.tgz --strip-components 1 && \
    rm clang-utils.tgz

ENV PATH /usr/local/run-clang-tidy:$PATH
RUN run-clang-format --version
Instead of just downloading the pre-built binaries, it is also possible to use the below steps to install Rust and its package manager cargo using the Rust toolchain installer rustup, and then install the two tools by running cargo install:
RUN curl https://sh.rustup.rs -sSf | sh -s -- --default-toolchain stable -y
ENV PATH=/root/.cargo/bin:$PATH

RUN cargo install run-clang-format
RUN cargo install run-clang-tidy
While this approach is less verbose, it significantly increases the image size and image build time: First of all, this installs the full Rust toolchain, which in my tests increased the image size by almost 1 GB, and second the cargo install commands compile both tools and all of its dependencies from scratch, which - on my machine - took almost 4 minutes for each. When creating such builder images, it is therefore always important to find the right fit for your need: If you won’t be developing using Rust you might be better off not installing it in your builder. This way, you keep build times and the image size as low as possible - no matter how awesome Rust is.
But let’s keep on working on our development environment. Why do we need run-clang-tidy and run-clang-format? These wrapper scripts allow to define the execution of clang-format and clang-tidy based on .json input files. Within these files, it is possible to efficiently filter all files, e.g., third-party software for which the format-on-save would be more cumbersome than helpful. Since we’ll be adding unit tests later, we can prepare the configurations already:
For formatting, we simply need to provide the paths to the source files and filters for files that we want to exclude from formatting or from the glob expansion:
{
  "paths": ["./src/**/*.[ch]", "./include/**/*.[h]", "./tests/unittest/test/*.[ch]"],
  "filterPre": [".*"],
  "filterPost": ["./src/build/**", "./tests/unittest/build/**", "./tests/unittest/generated"]
}
For the static analysis, we also need to tell the tool where to find the compile_commands.json:
{
  "paths": ["./src/**/*.[ch]", "./include/**/*.[h]"],
  "filterPre": [".*"],
  "filterPost": ["./build/**"],
  "buildRoot": "./build"
}
Now we just need to update our image and run the commands. Whether you do this by spinning up your container or by rebuilding the vscode development container is up to you, it should run in both environments:
$ make builder-build
$ make builder-run

$ run-clang-format clang-format.json
 [ 1/5 ] No style file specified, assuming .clang-format exists in the project tree
 [ 2/5 ] Found 2 files for the provided path patterns
 [ 3/5 ] Found clang-format version 16.0.6 using command clang-format
 [ 4/5 ] Executing clang-format ...

  Formatting /builder/mnt/src/dummy.c
  Formatting /builder/mnt/include/dummy/dummy.h
     Running [==========================] 2/2
     Finished in 0 seconds

$ run-clang-tidy clang-tidy.json
 [ 1/6 ] No tidy file specified, assuming .clang-tidy exists in the project tree
 [ 2/6 ] Using build root /workspaces/cproject/build
 [ 3/6 ] Found 1 files for the provided path patterns
 [ 4/6 ] Found clang-tidy version 16.0.6 using command clang-tidy
 [ 5/6 ] Executing clang-tidy ...

          Ok /workspaces/cproject/src/dummy.c
     Running [==========================] 1/1
     Finished in 1 second
Note: Instead of running
cmake --build buildevery time you modify your files, you can now also simply execute the static code analysis instead. It also compiles your files, but at the same time points out some of the mistakes that you have enabled.
Adding unit tests
We’re already able to build our library, analyze it and have a formatter in place. One more thing that we need in our development environment is a unit test framework.
For this article, I’ve chosen the Unity test framework, executed on the host via Ceedling. I’m using this framework since it is quite easy to extend the integration to also execute tests on an actual target hardware in case you’re developing an embedded system.
Installing Unity and Ceedling in the builder image
In the first step of our builder image we already installed ruby, so installing our unit test tools is very straightforward:
# install unity cmock and ceedling (unit test environment)
RUN gem install ceedling
# set standard encoding to UTF-8 for ruby (and thus ceedling)
ENV RUBYOPT "-KU -E utf-8:utf-8"
After rebuilding our image we’re good to go!
make builder-build
Configuring Unity and running unit tests
Lots of resources exist on how to set up Unity and Ceedling, including an excellent article on Embedded Artistry or the ThrowTheSwitch’s own articles. In short, you set the configuration switches for Unity in a dedicated unity_config.h file, and configure Ceedling with the project.yml. Ceedling is a neat little helper that generates all the test runners for you, so all you need to do is add your test files and tell Ceedling how to detect them. Have a look at the files in the example project on GitHub in case you need details!
In the project.yml we told Ceedling that our tests will be located in the tests/unittest/test directory and all test file names have the prefix test. So all we need to do is to add our test_dummy.c file to test our implementation, leading to the following files added:
$ tree --charset=utf-8 --dirsfirst -- tests
tests
└── unittest
    ├── support
    │   └── unity_config.h
    ├── test
    │   └── test_dummy.c
    └── project.yml
We can then create our first unit test tests/unittest/test/test_dummy.c:
#include "dummy/dummy.h"
#include "unity.h"

void setUp(void) {}
void tearDown(void) {}

void test_dummy(void)
{
    TEST_ASSERT_EQUAL(4U, dummy_random());
}
If you’re in your vscode development container, you can run the following straight from the integrated terminal. Otherwise, spin up the container using make builder-run to execute your tests:
$ ceedling test:all

Test 'test_dummy.c'
-------------------
Generating runner for test_dummy.c...
Compiling test_dummy_runner.c...
Compiling test_dummy.c...
Compiling unity.c...
Compiling dummy.c...
Compiling cmock.c...
Linking test_dummy.out...
Running test_dummy.out...

--------------------
OVERALL TEST SUMMARY
--------------------
TESTED:  1
PASSED:  1
FAILED:  0
IGNORED: 0
Bonus: Coverage reports
The previously mentioned article on Embedded Artistry also shows how to configure coverage reports. This is already set up in the project.yml of the GitHub example project, and since we included gcovr in the apt packages of our image, we are good to run our unit tests with coverage:
$ ceedling gcov:all

Test 'test_dummy.c'
-------------------
Compiling test_dummy_runner.c...
Compiling test_dummy.c...
Compiling dummy.c with coverage...
Compiling unity.c...
Compiling cmock.c...
Linking test_dummy.out...
Running test_dummy.out...

--------------------------
GCOV: OVERALL TEST SUMMARY
--------------------------
TESTED:  1
PASSED:  1
FAILED:  0
IGNORED: 0

---------------------------
GCOV: CODE COVERAGE SUMMARY
---------------------------
dummy.c Lines executed:100.00% of 2
dummy.c No branches
dummy.c No calls
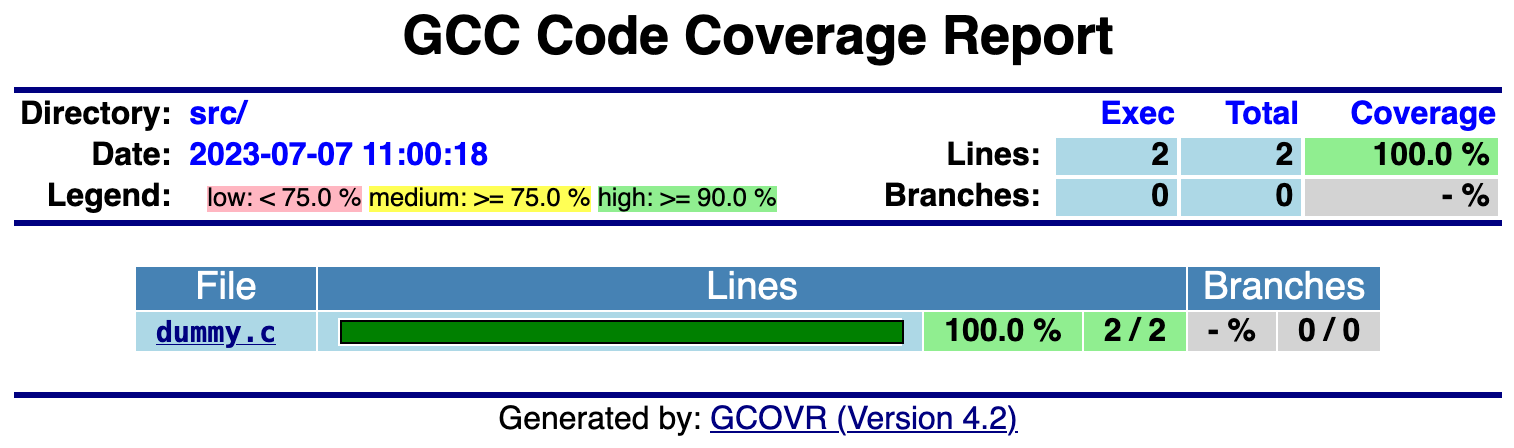
The project.yml also sets up a utility for generating coverage reports. In this demo project we can generate a gcovr HTML report with the following command:
$ ceedling utils:gcov
Creating gcov results report(s) in 'build/artifacts/gcov'... Done in 1.359 seconds.
You’ll now find the HTML report in tests/unittest/build/artifacts/gcov/GcovCoverageResults.html.
Getting started with GitHub workflows
We’ve gotten quite far already, and this setup is way beyond the “works on my machine” type of environment. All of your contributors can now build a development container and execute all steps to build or test your project. There is one more thing that we should do to keep the project stable even if we’re not actively working on it: setting up a pipeline that periodically ensures that the environment still works.
Continuously testing and checking your code is important. Pipelines are now available on all major platforms such as GitHub, GitLab, or Bitbucket. In this article, we’ll set up a GitHub action which periodically builds our image and tests our code.
There’s yet another catch though: Ensuring that your Docker images build and using those Docker images in your pipeline can sometimes be a bit tedious. At the time of writing, GitHub has support for so-called container actions that allow executing pipeline steps inside a Docker container. These steps, however, assume that the image exists on some registry, e.g., dockerhub, and is not built within the action itself.
Since nowadays dockerhub is no longer entirely free to use, we will still try to execute all steps within a Docker image that is built as part of the pipeline. This makes the pipeline steps less elegant and very verbose, but I’ll choose this approach over having to use multiple actions or a container registry.
Adding a GitHub action
GitHub actions are added .yml workflow files in the .github/workflows directory of the repository. We’ll name our workflow file ci.yml:
name: ci
on:
  push:
    branches:
    - main
  schedule:
    - cron: '0 1 * * 0'
jobs:
  # empty
With the above configuration, the jobs in this action are executed at 01:00 every Sunday and on every push to the main branch.
Building an image in a GitHub action
Building a Docker image in your pipeline is quite straightforward due to the existing GitHub actions:
jobs:
  docker-build:
    runs-on: ubuntu-latest
    steps:
      - uses: actions/checkout@v4
      - uses: docker/setup-buildx-action@v3
        name: Build builder-image
        with:
          context: .
          file: builder.Dockerfile
          tags: cproject-builder:latest
  build-and-test:
    needs: docker-build
    # TODO: needs cproject-builder:latest
The problem is that all jobs are isolated and that data including Docker images must be shared explicitly between jobs. Without sharing, cproject-builder:latest is not available in the next job build-and-test.
Using caches to share images between jobs
The proposed solution by Docker is to share an image using artifacts. Artifacts are files that can be stored in steps in a GitHub action and thus be downloaded in a subsequent step. For our builder image this is very problematic since the builder image is very large:
- Uploading the image takes a very long time.
- Artifact count towards the storage limit in your GitHub plan. A free plan only has 500 MB of storage.
- Downloading the image in subsequent steps also takes a very long time.
My favorite solution for this problem is using cache dependencies. Similar to the proposed solution by Docker, we build the image and store it in a file, which is then accessible using a cache. Another benefit of this approach is, that for subsequent actions and if the Dockerfile did not change, the image is not rebuilt!
jobs:
  docker-build:
    runs-on: ubuntu-latest
    steps:
      - uses: actions/checkout@v4
      - uses: docker/setup-buildx-action@v3
      -
        name: Create docker cache folder
        run: mkdir -p /tmp/docker
      -
        name: Restore docker image
        id: cache-docker
        uses: actions/cache@v4
        with:
          path: /tmp/docker
          key: ${{ runner.os }}-docker-${{ hashFiles('builder.Dockerfile') }}
      -
        name: Build docker builder-image
        if: steps.cache-docker.outputs.cache-hit != 'true'
        uses: docker/build-push-action@v5
        with:
          context: .
          file: builder.Dockerfile
          tags: cproject-builder:latest
          outputs: type=docker,dest=/tmp/docker/${{ runner.os }}-builder-image.tar
At the time of writing caches do not count towards the storage limit of your GitHub account. The only downside that I’ve encountered, is that caches are not shared between actions of different branches and that you’ll need to manage your caches in case you have too many branches using images.
Using the cached image to build the project
In the next job, we load the builder image and execute our actions. As mentioned before, the image is not available yet and therefore we cannot use the much more elegant GitHub actions for containers. It does, however, do its job and does so efficiently since restoring a cache takes much less time than downloading an artifact:
jobs:
  docker-build:
    # <snip>
  build-and-test:
    runs-on: ubuntu-latest
    needs: docker-build
    steps:
      - uses: actions/checkout@v4
      - uses: docker/setup-buildx-action@v3
      -
        name: Restore docker image
        id: cache-docker
        uses: actions/cache@v4
        with:
          path: /tmp/docker
          key: ${{ runner.os }}-docker-${{ hashFiles('builder.Dockerfile') }}
      -
        name: Load image
        run: |
          docker load --input /tmp/docker/${{ runner.os }}-builder-image.tar
          docker image ls -a
      -
        name: Build library
        run: |
          docker run \
            --rm \
            --platform linux/amd64 \
            --workdir /builder/mnt \
            -v ${{ github.workspace }}:/builder/mnt \
            cproject-builder:latest \
            /bin/bash -c "rm -rf build; cmake -B build; cmake --build build"
This job needs the previous docker-build to pass, then restores the docker image from the cache and builds the project within the image using cmake. Here the downside of this approach is visible: We always need to use the entire docker run command to execute our steps.
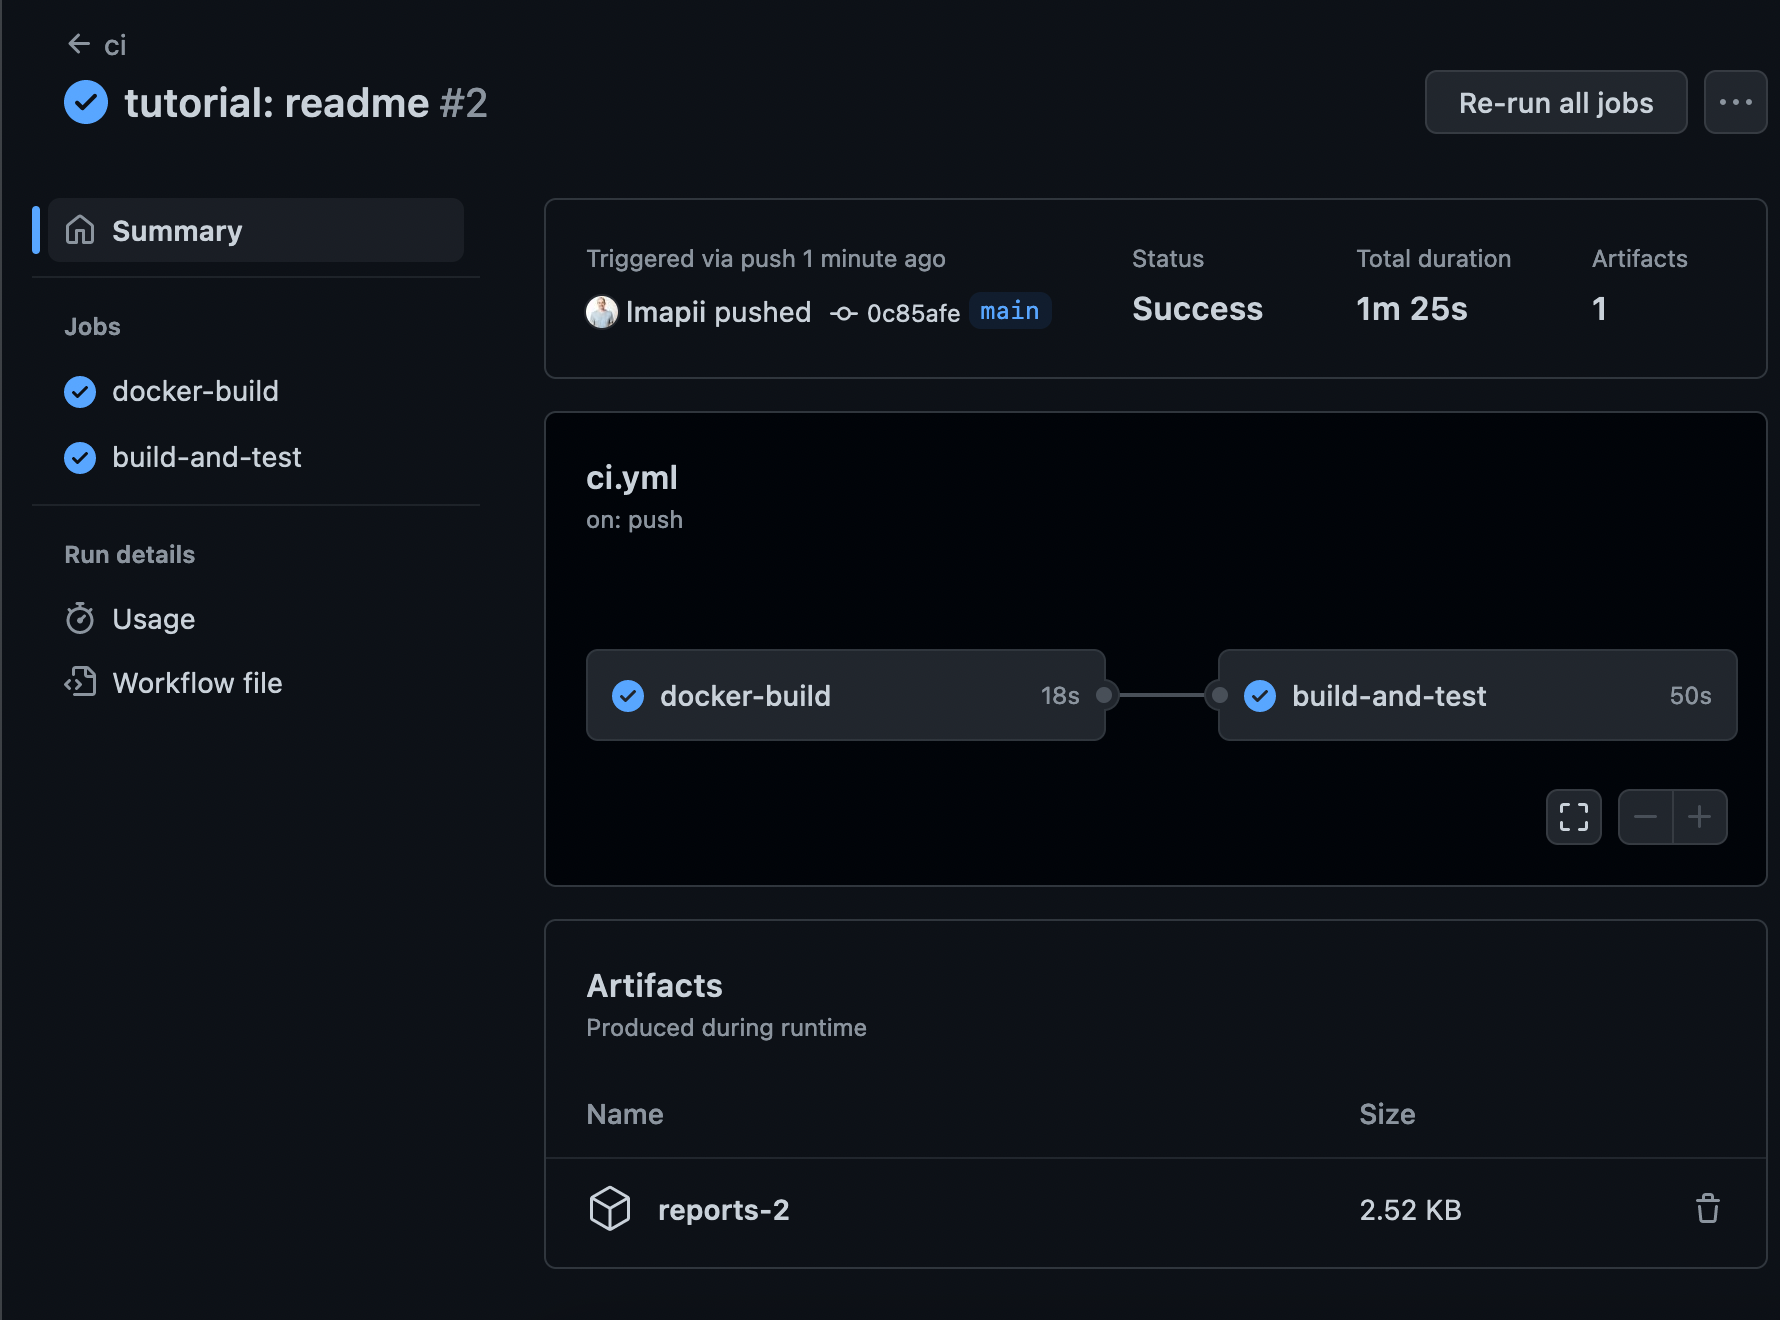
Running the tests and storing the coverage report as an artifact
We can now run the same commands that we used previously to run the unit tests with coverage and generate our coverage report. In addition, we can store this coverage report as an artifact in our pipeline such that we can download it after any successful run.
jobs:
  docker-build:
    # <snip>
  build-and-test:
    runs-on: ubuntu-latest
    needs: docker-build
    steps:
      # <snip>
      -
        name: Test library
        run: |
          docker run \
            --rm \
            --platform linux/amd64 \
            --workdir /builder/mnt/tests/unittest \
            -v ${{ github.workspace }}:/builder/mnt \
            cproject-builder:latest \
            /bin/bash -c "ceedling clobber; ceedling gcov:all; ceedling utils:gcov"
      -
        name: Archive coverage results
        shell: bash
        run: |
          staging="reports-${{github.run_number}}"
          mkdir -p "$staging"
          cp -r tests/unittest/build/artifacts/gcov "$staging"
          tar czf "$staging.tar.gz" "$staging"
          echo "ASSET=$staging.tar.gz" >> $GITHUB_ENV
      -
        name: Archive artifacts
        uses: actions/upload-artifact@v4
        with:
          name: reports-${{github.run_number}}
          path: ${{ env.ASSET }}
          retention-days: 3
Never forget to specify a retention period for your artifacts, since otherwise, it is very easy to hit the storage limit of your GitHub plan.
Conclusion
If you’ve managed to bear with me until this point, thank you for reading! Our job is done here, the library builds, the report is available as an artifact, and all of this without clogging our computer with tools.
But are we really ever done? A development environment grows with the project, and so will your base image. Even at this point, it grew fairly large, and if that is a problem for you or your contributors, you should look into some of the strategies to reduce your image size. Another strategy is to split images based on their usage, e.g., use a different image for building and another one for testing. This can greatly reduce your image size and allows you to use already stripped-down base images.
One last thing that is worth mentioning, is that with Docker Desktop you can now comfortably inspect your image for vulnerabilities, and also check the size impact of each step in your Dockerfile and even its base image:

This is a great starting point in case you want to reduce the image size or update packages. E.g., you could uninstall unused packages using apt remove as a last step in your Dockerfile, or install a more recent version of ruby using the Ruby Version Manager instead of relying on the outdated version that comes with apt. This discussion, however, is far beyond the scope of this article.
As mentioned throughout the article, the example project is available on GitHub. Feel free to point out my mistakes or add some improvements to the project yourself!
You have now all the skills to set up a containerized C/C++ project with a CI on GitHub. With this at hand, it should be easy to add a specific compiler to your Dockerfile or to clean up all the mistakes that I did when setting up the CI.
See anything you'd like to change? Submit a pull request or open an issue on our GitHub
References
 Martin Lampacher is a Freelance Embedded Engineer based in the Italian Alps.