Bluetooth Low Energy: A Primer
Introduction
You’ve probably heard the term IoT (Internet of Things) many times, and seen the hype in the media surrounding it. Simply stated, IoT refers to connecting devices to each other and to the Internet. IoT often depends on wireless technologies, which have been used to add connectivity to a slew of devices that were never connected before (even flip-flops!).
In today’s post, we will be covering one of the most popular low-power IoT technologies: Bluetooth Low Energy (BLE). We will give an overview of how BLE works, dig into each protocol layer, and walk you through an example setting up BLE on a Nordic nRF52 microcontroller.
Table of Contents
Basics of Bluetooth Low Energy (BLE)
Bluetooth Low Energy (BLE) is a low power wireless technology used for connecting devices with each other. BLE operates in the 2.4 GHz ISM (Industrial, Scientific, and Medical) band, and is targeted towards applications that need to consume less power and may need to run on batteries for longer periods of time — months, and even years.
Bluetooth started as a short-distance cable replacement technology. For example, to replace wires in devices such as a mouse, keyboard, or a PC communicating with a Personal Digital Assistant (PDA) which were popular in the late 1990s and early 2000s. The first official version of Bluetooth was released by Ericsson in 1994, named after King Harald “Bluetooth” Gormsson of Denmark who helped unify warring factions in the 10th century CE.
Bluetooth Low Energy (BLE) was introduced in the 4.0 version of the Bluetooth specification in 2010. The original Bluetooth defined in the previous versions is referred to as Bluetooth Classic. BLE was not an upgrade to Bluetooth Classic, but rather it’s a new technology that utilizes the Bluetooth brand but focuses on the Internet of Things (IoT) applications where small amounts of data are transferred at lower speeds. It’s important to note that there’s a big difference between Bluetooth Classic and Bluetooth Low Energy in terms of technical specification, implementation and the types of applications they’re each suitable for.
Bluetooth Classic vs. Bluetooth Low Energy
Itʼs important to note that thereʼs a big difference between Bluetooth Classic and Bluetooth Low Energy in terms of technical specification, implementation, and the types of applications to which theyʼre each suited. This is in addition to the fact that they are incompatible with each other.
Some of the notable differences are summarized in the following table:
| Bluetooth Classic | BLE |
|---|---|
| Used for streaming applications such as audio streaming, file transfers, and headsets | Used for sensor data, control of devices, and low-bandwidth applications |
| Not optimized for low power, but has a higher data rate (3Mbps maximum compared to 2Mbps for BLE) | Meant for low power, low duty data cycles |
| Operates over 79 RF (radio frequency) channels | Operates over 40 RF channels. |
| Discovery occurs on 32 channels | Discovery occurs on 3 channels, leading to quicker discovery and connections than Bluetooth Classic |
BLE has gone through some major revisions and changes in the short time since its official release in 2010, with the most recent major updates being Bluetooth 5 released in December 2016 and Bluetooth 5.1 released in January 2019.
Bluetooth 5 introduced many important upgrades to the Bluetooth specification, most of which were focused on BLE. Some of the most important enhancements include twice the speed, four times the range, and eight times the advertising data capacity.
On the other hand, Bluetooth 5.1 focused on direction finding by utilizing Angle of Arrival (AoA) and Angle of Departure (AoD) techniques.
Benefits and Drawbacks of BLE
Every technology has its own benefits and limitations, and BLE is no exception. It’s important to know these pros and cons to be able to determine whether BLE is suitable for your specific application and use case or not.
Benefits
- Lower power consumption even when compared to other low power technologies. This is achived by keeping the radio off as much as possible and sending small amounts of data at low transfer speeds.
- No cost to access the official specification documents. With most other wireless protocols and technologies, you would have to be a member of the official group or consortium for that technology in order to access the specification.
- Lower cost of modules and chipsets, even when compared to other similar technologies.
- Most importantly, its existence in most smartphones in the market.
Drawbacks and limitations
- Data Throughput: the data throughput of BLE is limited by the physical radio layer (PHY) data rate, which is the rate at which the radio transmits data. This rate depends on the Bluetooth version used. For Bluetooth 4.2 and earlier, the rate is fixed at 1 Mbps. For Bluetooth 5 and later, however, the rate varies depending on the mode and PHY used. The rate can be 1 Mbps like earlier versions, or 2 Mbps when utilizing the high-speed feature.
-
Range: Bluetooth Low Energy (and Bluetooth in general) was designed for short-range applications and hence its range of operation is limited. There are a few factors that affect the range of BLE:
- BLE operates in the 2.4 GHz ISM spectrum which is greatly affected by obstacles that exist all around us such as metal objects, walls, and water (especially human bodies).
- Performance and design of the antenna of the BLE device.
- Physical enclosure and orientation of the device.
- Gateway Requirement for Internet Connectivity: In order to transfer data from a BLE-only device to the Internet, another BLE device that has an IP connection is needed to receive this data and then, in turn, relay it to another IP device (or to the Internet).
Bluetooth Low Energy Architecture
Here’s a diagram showing the different levels of the architecture of BLE:
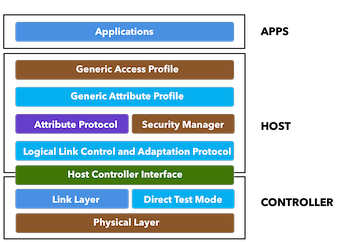
The good thing is that, as a developer looking to develop BLE applications, you won’t have to worry much about the layers below the Security Manager and Attribute Protocol. But lets at least cover the definitions of these layers:
-
The Physical Layer (PHY) refers to the physical radio used for communication and for modulating/demodulating the data. It operates in the ISM band (2.4 GHz spectrum).
-
The Link Layer is the layer that interfaces with the Physical Layer (Radio) and provides the higher levels an abstraction and a way to interact with the radio (through an intermediary level called the HCI layer which we’ll discuss shortly). It is responsible for managing the state of the radio as well as the timing requirements for adhering to the Bluetooth Low Energy specification.
-
Direct Test Mode: the purpose of this mode is to test the operation of the radio at the physical level (such as transmission power, receiver sensitivity, etc.).
-
The Host Controller Interface (HCI) layer is a standard protocol defined by the Bluetooth specification that allows the Host layer to communicate with the Controller layer. These layers could exist on separate chips, or they could exist on the same chip.
-
The Logical Link Control and Adaptation Protocol (L2CAP) layer acts as a protocol multiplexing layer. It takes multiple protocols from the upper layers and places them in standard BLE packets that are passed down to the lower layers beneath it.
-
The Security Manager defines the protocols and algorithms for generating and exchanging keys between two devices. It involves five security features: pairing, bonding, authentication, encryption, and message integrity.
-
The Attribute Protocol (ATT) defines how a server exposes its data to a client and how this data is structured. There are two roles within the ATT:
- Server: the device that exposes the data it controls or contains, and possibly some other aspects of server behavior that other devices may be able to control.
- Client: the device that interfaces with the server with the purpose of reading the server’s exposed data and/or controlling the server’s behavior.
GAP, Advertising, Scanning, and Connections
GAP stands for Generic Access Profile. It provides a framework that defines how BLE devices interact with each other. This includes:
- Roles of BLE devices
- Advertisements (Broadcasting, Discovery, Advertisement parameters, Advertisement data)
- Connection establishment (initiating connections, accepting connections, Connection parameters)
- Security
The different roles of a BLE device are:
- Broadcaster: a device that sends out Advertisements and does not receive packets or allow Connections from others.
- Observer: a device that listens to others sending out Advertising Packets, but does not initiate a Connection with the Advertising device.
- Central: a device that discovers and listens to other devices that are Advertising. A Central also has the capability of connecting to an Advertising device.
- Peripheral: a device that Advertises and accepts Connections from Central devices.
Keep in mind that a single device may operate in multiple Roles at the same time. For example, your smartphone can operate in the Central role when communicating with your smartwatch, and also act in the Peripheral role while communicating with a PC.
Advertising & Scanning
In the Advertising state a device sends out packets containing useful data for others to receive and process. The packets are sent at a fixed interval defined as the Advertising Interval. There are 40 RF channels in BLE, each separated by 2 MHz (center-to-center), as shown in the following figure. Three of these channels are called the Primary Advertising Channels, while the remaining 37 channels are used for Secondary Advertisements and for Data Packet transfer during a Connection.

Advertisements always start with Advertisement Packets sent on the 3 Primary Advertising Channels (or a subset of these Channels). This allows Centrals to find the Advertising device (Peripheral or Broadcaster) and parse its Advertising packets. The Central can then Initiate a Connection if the Advertiser allows it (Peripheral devices).
Scanning
Centrals tune into the three Primary Advertising Channels one at a time. So, in order for a Central to discover a Peripheral, the Central has to be tuned into the same channel that the Peripheral is Advertising on at that given point. To increase the possibility of this happening, and in order to make it happen quickly, the different advertising and scanning parameters can be adjusted.
Connections
In order for two BLE devices to connect to each other, the following needs to happen:
- The Peripheral needs to start Advertising and send out Connectable Advertisement packets.
- The Central device needs to be Scanning for Advertisements while the Peripheral is Advertising.
- If the Central happens to be listening on an Advertising Channel that the Peripheral is Advertising on, then the Central device discovers the Peripheral and is able to read the Advertisement packet and all the necessary information in order to establish a Connection.
- The Central then sends a Connection Request packet.
- The peripheral always listens for a short interval on the same Advertising Channel after it sends out the Advertising packet. This allows it to receive the Connection Request packet from the Central device — which triggers the forming of the Connection between the two devices.
After that, the Connection is considered “created” but not yet “established”. A Connection is considered “established ” once the device receives a packet from its peer device. After a Connection becomes established, the Central becomes known as the Master, and the Peripheral becomes known as the Slave. The Master is responsible for managing the Connection, controlling the Connection Parameters and the timing of the different events within a Connection.
Connection Events
During a Connection Event, the Master and Slave alternate sending data packets to each other until neither side has data to send. Here are a few aspects of Connections that are very important to know:
- A Connection Event contains at least one packet sent by the Master. The Slave always sends a packet back if it received a packet from the Master.
- If the Master does not receive a packet back from the Slave, the Master will close the Connection Event — it resumes sending packets at the next Connection Event.
- The Connection Event can be closed by either side.
- The starting points of consecutive Connection Events are spaced by a period of time called the Connection Interval.
Connection Parameters
The most important parameters that define a Connection include:
- Connection Interval: the interval at which two connected BLE devices wake up the radio and exchange data (at each Connection Event).
- Slave Latency: this value allows the Peripheral to skip a number of consecutive Connection Events and not listen to the Central at these Connection Events without compromising the Connection. For example, a Slave Latency of 3 allows a Slave to skip 3 Connection Events and a value of 0 means that the Slave has to send data to the Master at every Connection Event.
- Supervision Timeout: the maximum time between two received data packets before the Connection is considered lost.
GATT, Services, and Characteristics
The main reason to connect two BLE devices to each other is to transfer data between them. Without a Connection, it is not possible to have a bidirectional data transfer between two BLE devices.
Which brings us to the concept of GATT…
The Generic Attribute Profile (GATT) defines the format of the data exposed by a BLE device. It also defines the procedures needed to access the data exposed by a device.
There are two Roles within GATT: Server and Client. The Server is the device that exposes the data it controls or contains, and possibly some other aspects of its behavior that other devices may be able to control. A Client, on the other hand, is the device that interfaces with the Server with the purpose of reading the Server’s exposed data and/or controlling the Server’s behavior.
Keep in mind that a BLE device can act as both a Server and a Client at the same time. Simply put, it acts as the Server for the sake of exposing its own data, and as a Client when accessing another device’s data.
Services and Characteristics
Services and Characteristics are probably the two most used terms in BLE! That’s why understanding them is crucial, especially for BLE devices that establish a connection with each other.
To better understand GATT, we need to cover a few important concepts (including Services and Characteristics):
- Attributes: a generic term for any type of data exposed by the Server and defines the structure of this data. For example, Services and Characteristics (both defined below) are types of Attributes.
- Services: a grouping of one or more Attributes (some of which are Characteristics). It’s meant to group together related Attributes that satisfy a specific functionality on the Server. For example, the SIG-adopted Battery Service contains one Characteristic called the Battery Level.
- Characteristics: a Characteristic is always part of a Service and it represents a piece of information/data that a Server wants to expose to a client. For example, the Battery Level Characteristic represents the remaining power level of a battery in a device which can be read by a Client.
- Profiles: Profiles are much broader in definition from Services. They are concerned with defining the behavior of both the Client and Server when it comes to Services, Characteristics and even Connections and security requirements. Services and their specifications, on the other hand, deal with the implementation of these Services and Characteristics on the Server side only.
A simplified representation of a Service:
Service——|
    |—Characteristic 1
    |—Characteristic 2
     ...
    |—Characteristic N
In BLE, there are six types of operations on Characteristics:
- Commands: sent by the Client to the Server and do not require a Response (defined below). One example of a Command is a Write Command, which does not require a Response from the Server.
- Requests: sent by the Client to the Server and require a Response. Some examples of Requests include: Read Requests and Write Requests.
- Responses: sent by the Server in response to a Request.
- Notifications: sent by the Server to the Client to let the Client know that a specific Characteristic Value has changed. In order for this to be triggered and sent by the Server, the Client has to enable Notifications for the Characteristic of interest. Note that a Notification does not require a Response from the Client to acknowledge its receipt.
-
Indications: sent by the Server to the Client. They are very similar to Notifications but require an acknowledgment to be sent back from the Client to let the Server know that the Indication was successfully received.
Note: Notifications and Indications are exposed via the Client Characteristic Configuration Descriptor (CCCD) Attribute. Writing a “1” to this Attribute value enables Notifications, whereas writing a “2” enables Indications. Writing a “0” disables both Notifications and Indications.
- Confirmations: sent by the Client to the Server. These are the acknowledgment packets sent back to the Server to let it know that the Client received an Indication successfully.
Now that we’ve gone through the basics of BLE, we can take that knowledge and apply it to practice. In the next section, we will implement a simple BLE Peripheral running on the nRF52840 development kit.
Implementation of a BLE Peripheral (nRF52 example)
Rather than relying on an IDE, we’ll be using the command line for almost everything, and all steps should work pretty much on any Linux or macOS machine.
Hardware required:
Here’s a list of the hardware components required for following the steps in this tutorial:
- An nRF52840 development kit (PCA10056).
- A macOS computer (though most of these steps are transferrable to Linux and Windows).
- A smartphone that supports BLE (if your phone was manufactured in the past 3 years or so, it most likely supports BLE).
- A micro-USB cable for connecting the development kit to your computer.
Software required:
Here’s a list of the software packages required for following the steps in this tutorial:
- Nordic Semiconductor’s nRF5 SDK (we’ll be using SDK version 15.3.0).
- Nordic Semiconductor’s nRF5 Command Line Tools for macOS (we’ll be using version 9.8.1).
- SEGGER J-Link Software for macOS (we’ll be using version V6.44g).
- GNU Arm Embedded Toolchain (we’ll be using version 7-2017-q4-major which is recommended by Nordic per this article).
- CoolTerm serial terminal program (or any other serial terminal program).
- Xcode Command Line Tools — For installation steps, I found this tutorial quite helpful and easy to follow.
- A BLE Central mobile app such as nRF Connect (iOS or Android) or LightBlue (iOS or Android)
Setup
Let’s go through the different steps for downloading the necessary software packages.
For each of these downloads, you can place them anywhere on your machine. I recommend having them all in a single folder, to make it easier to locate later on.
If you’ve read and followed the steps in our previous post Debugging Firmware with GDB, you would already have all the necessary software packages installed and set up (and you could safely skip the installation section).
1. nRF5 SDK
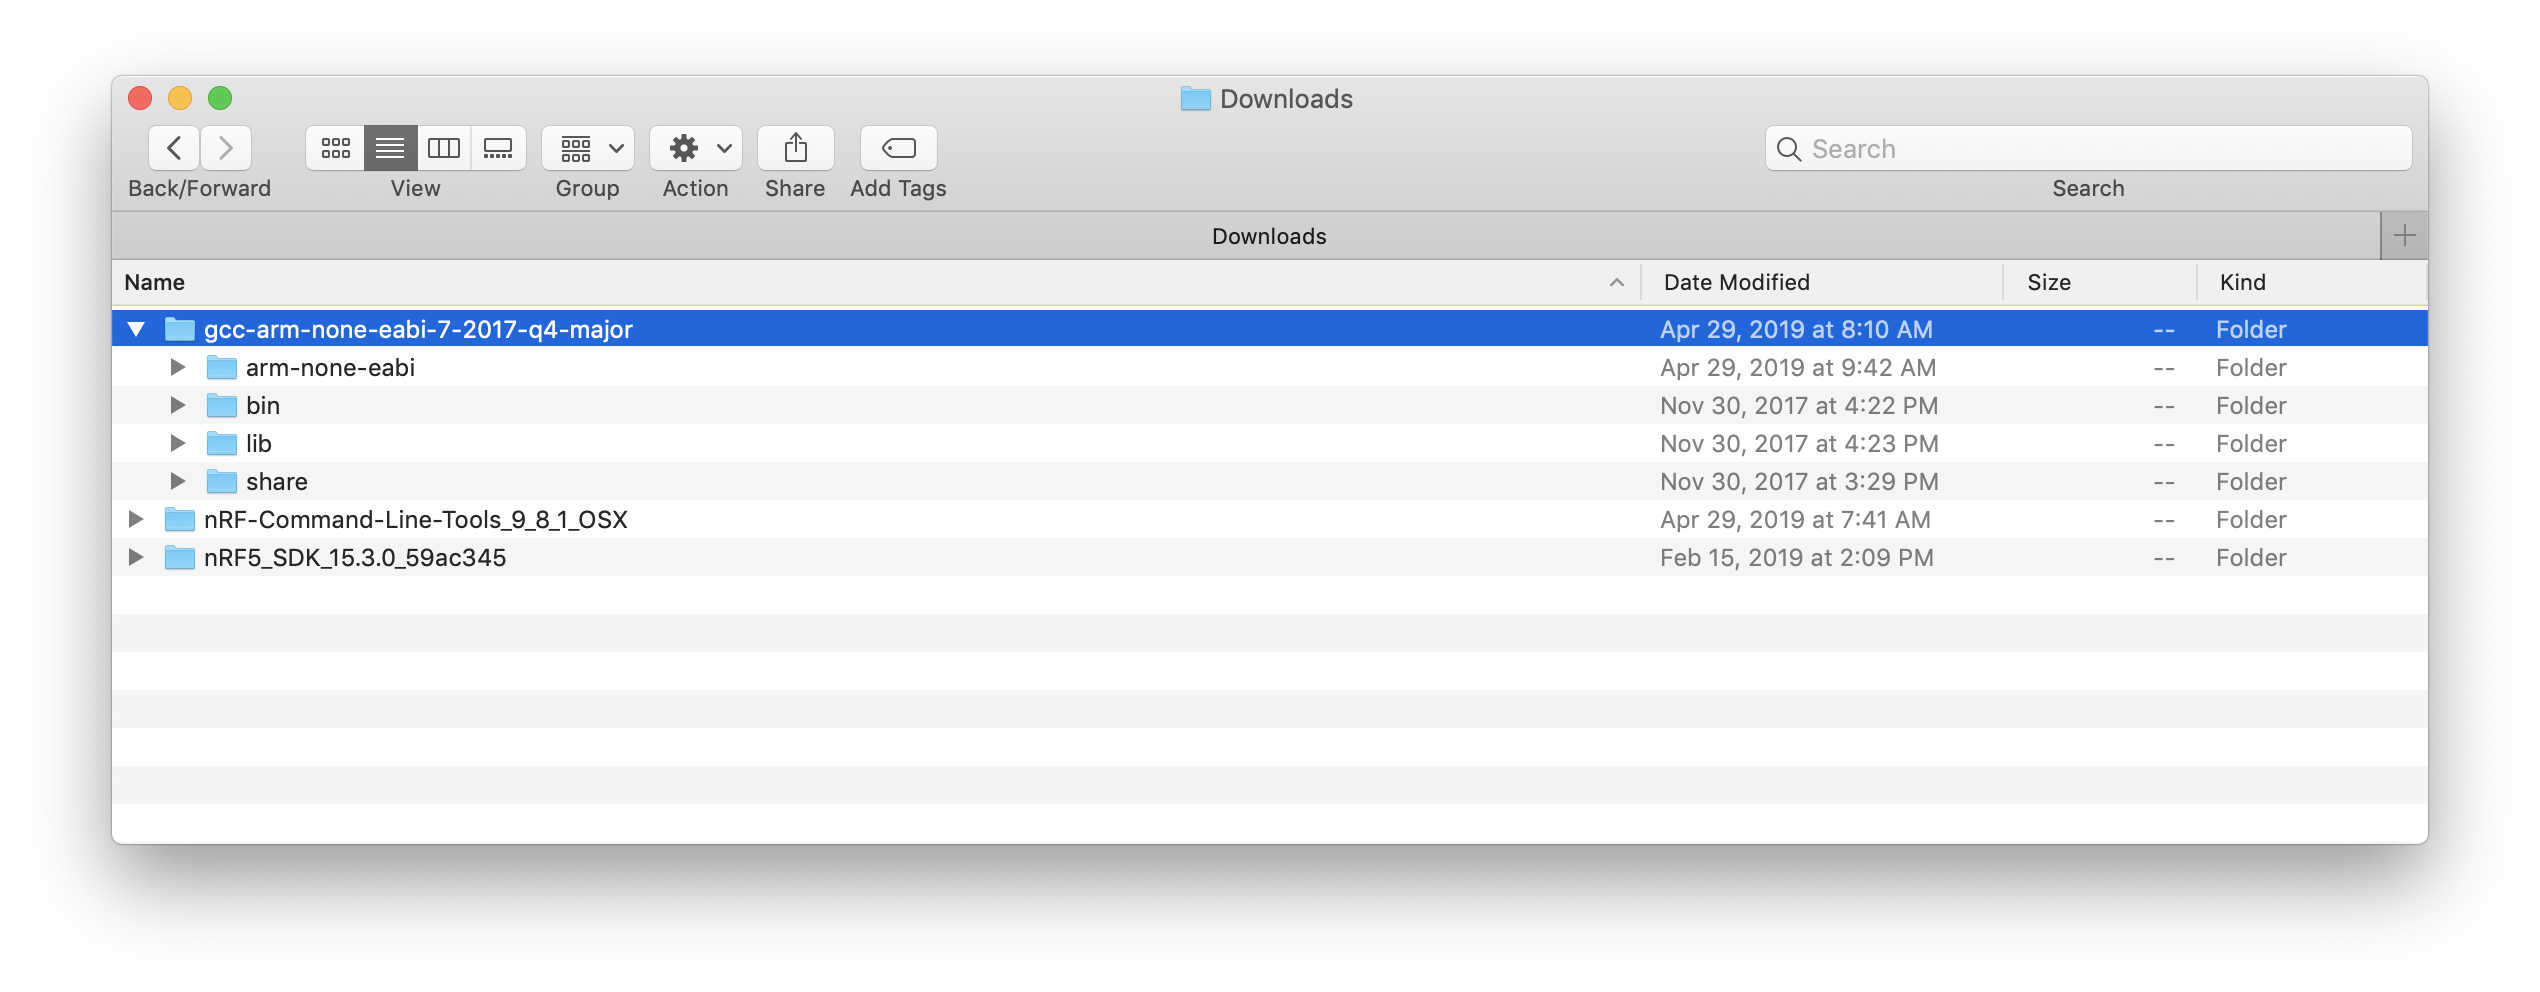
Installation of the nRF5 SDK is straightforward. All you need to do is download the SDK tarball from Nordic’s website and then extract it.
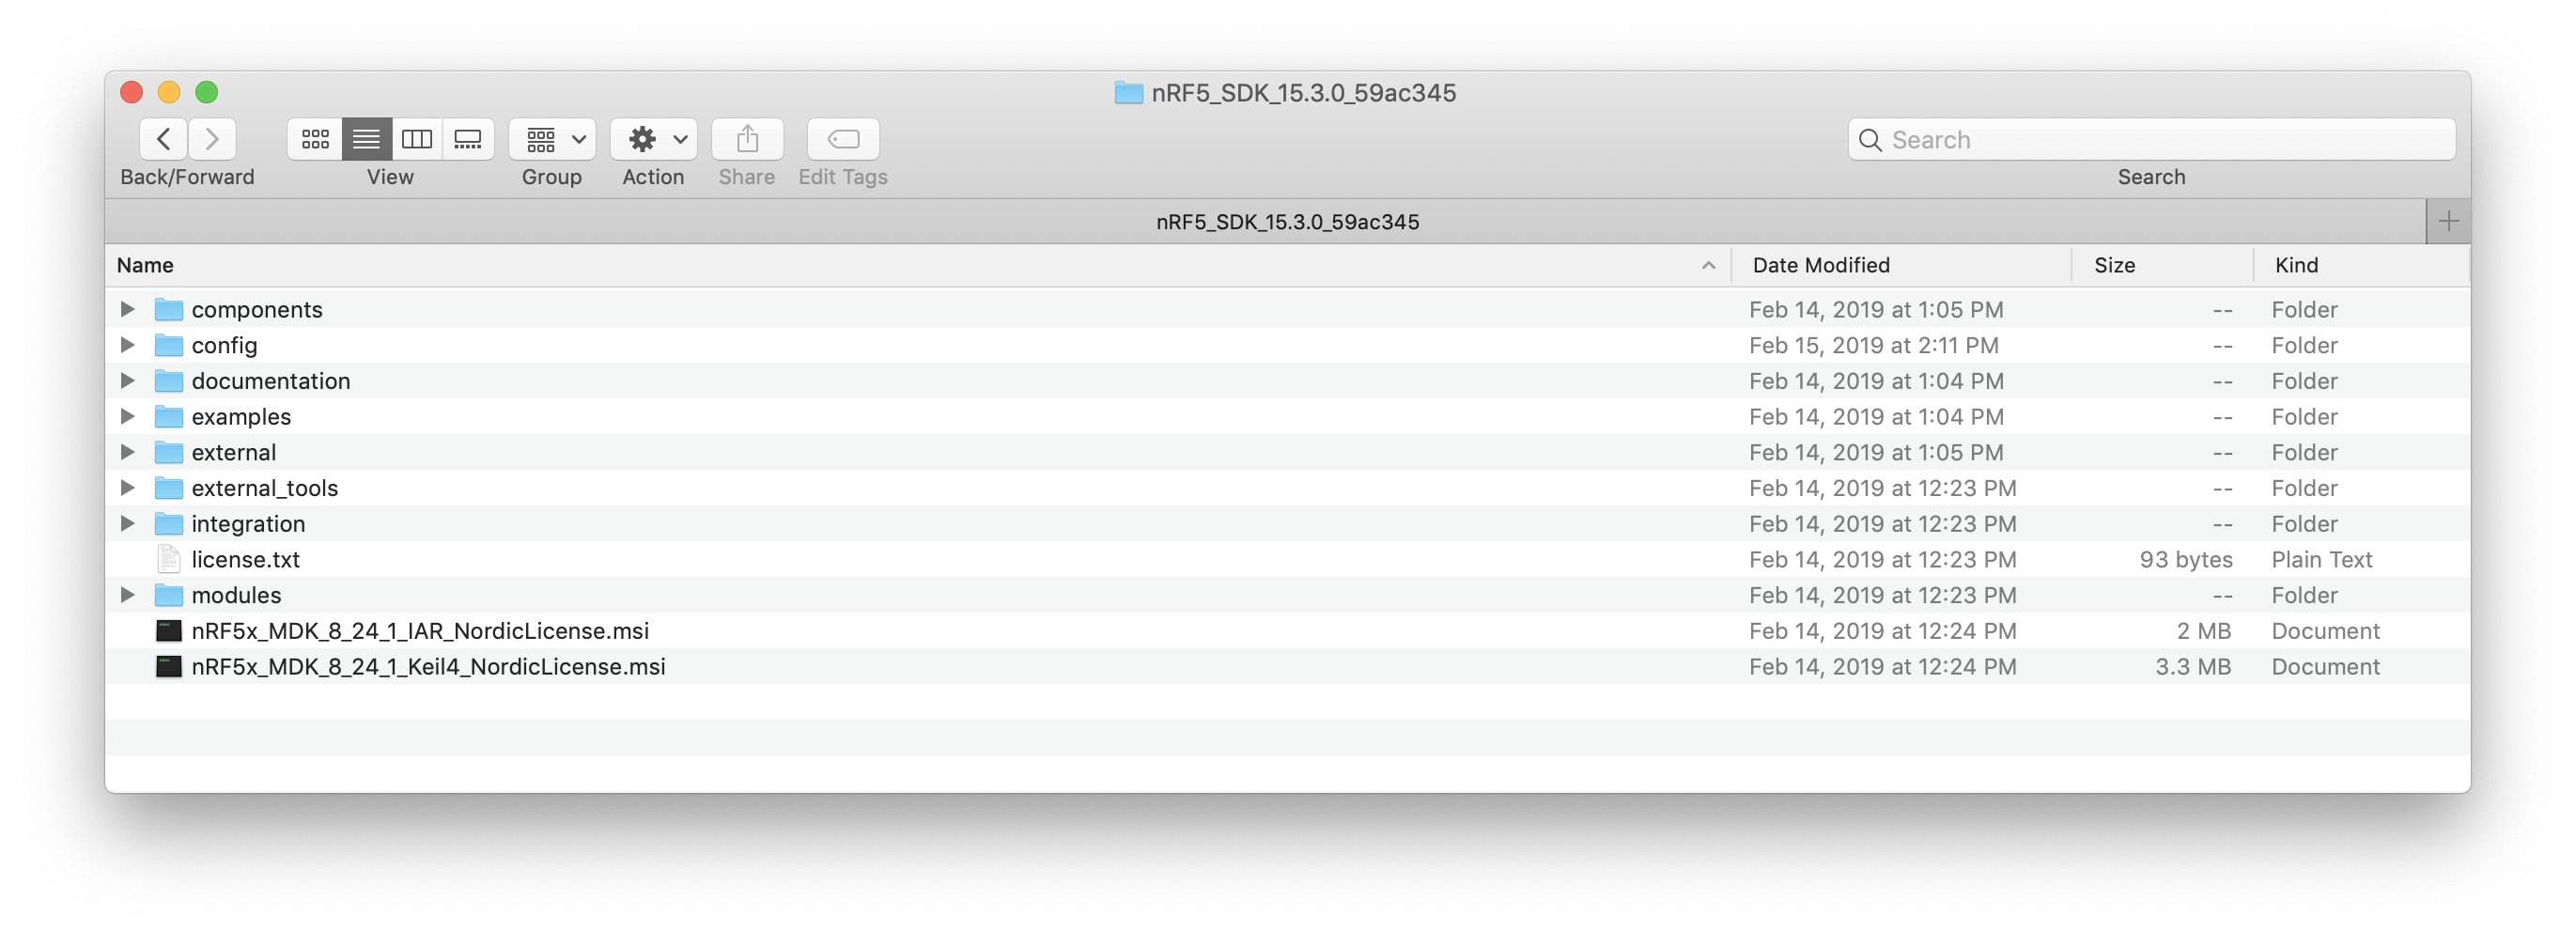
Once you extract it, you should see the following directory structure:
2. nRF5 Command Line Tools
Next, we need to install the nRF5 Command Line Tools. These include nrfjprog, which is a tool for programming your nRF52 development kit via the Segger J-Link debugger and needed in our case for working from the command line.
Link to download the nRF5 Command Line Tools
First, make sure you select the appropriate operating system (macOS in our case).
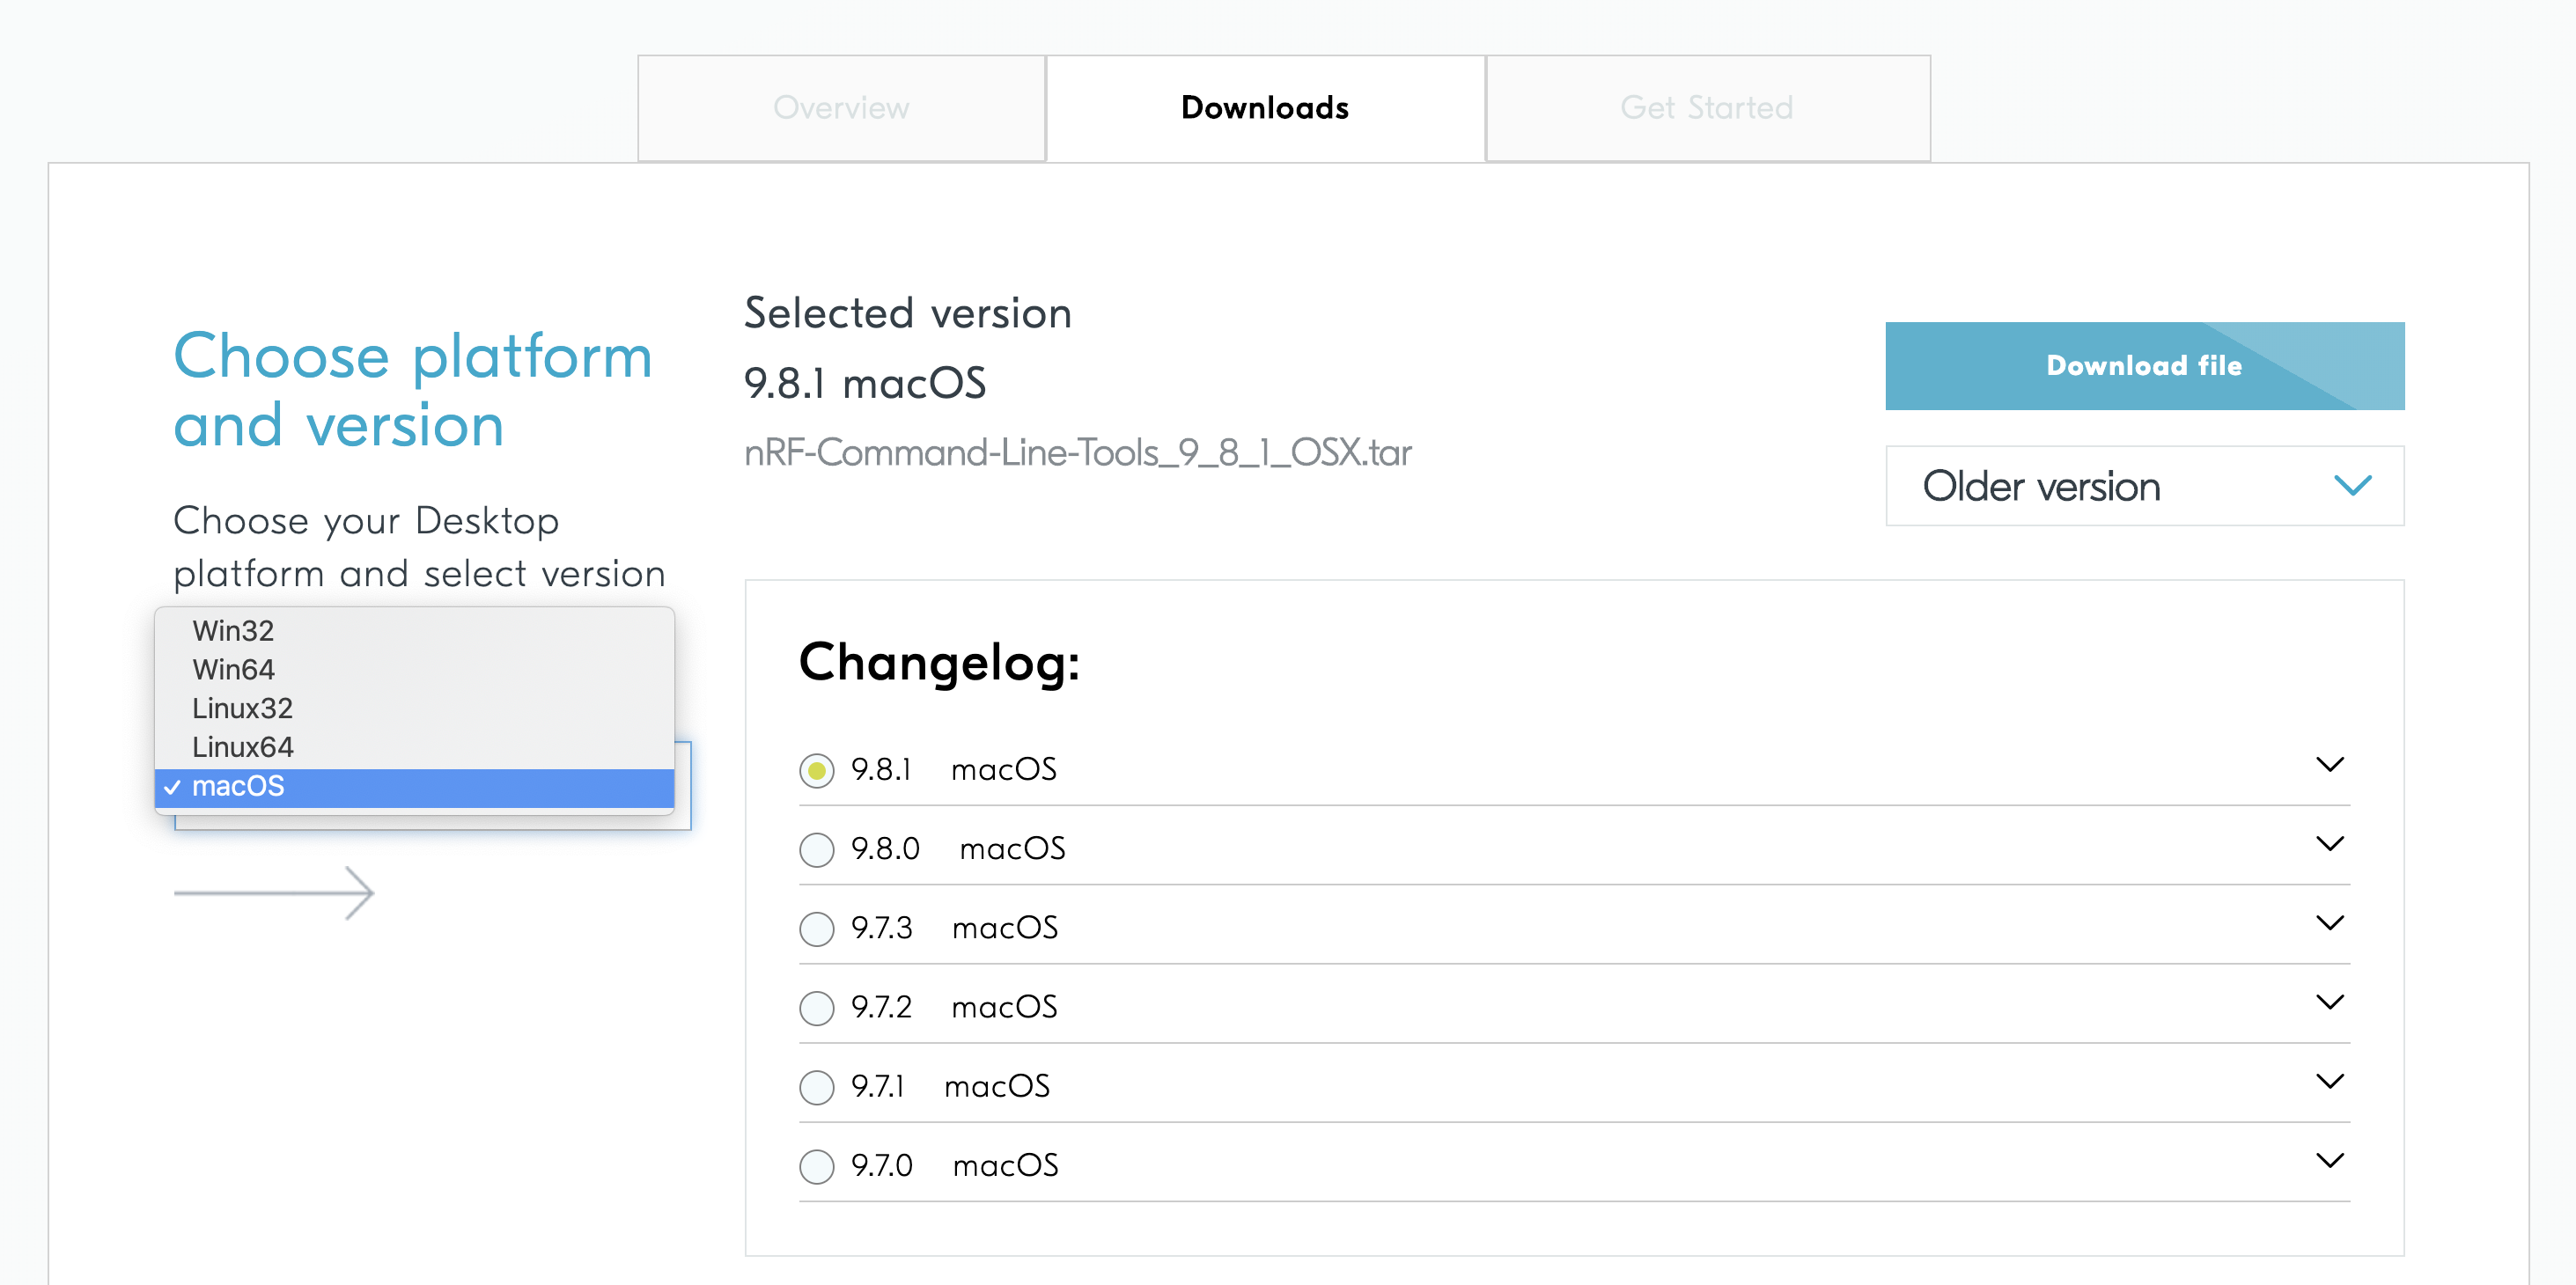
Select the latest version, and then click “Download File”.
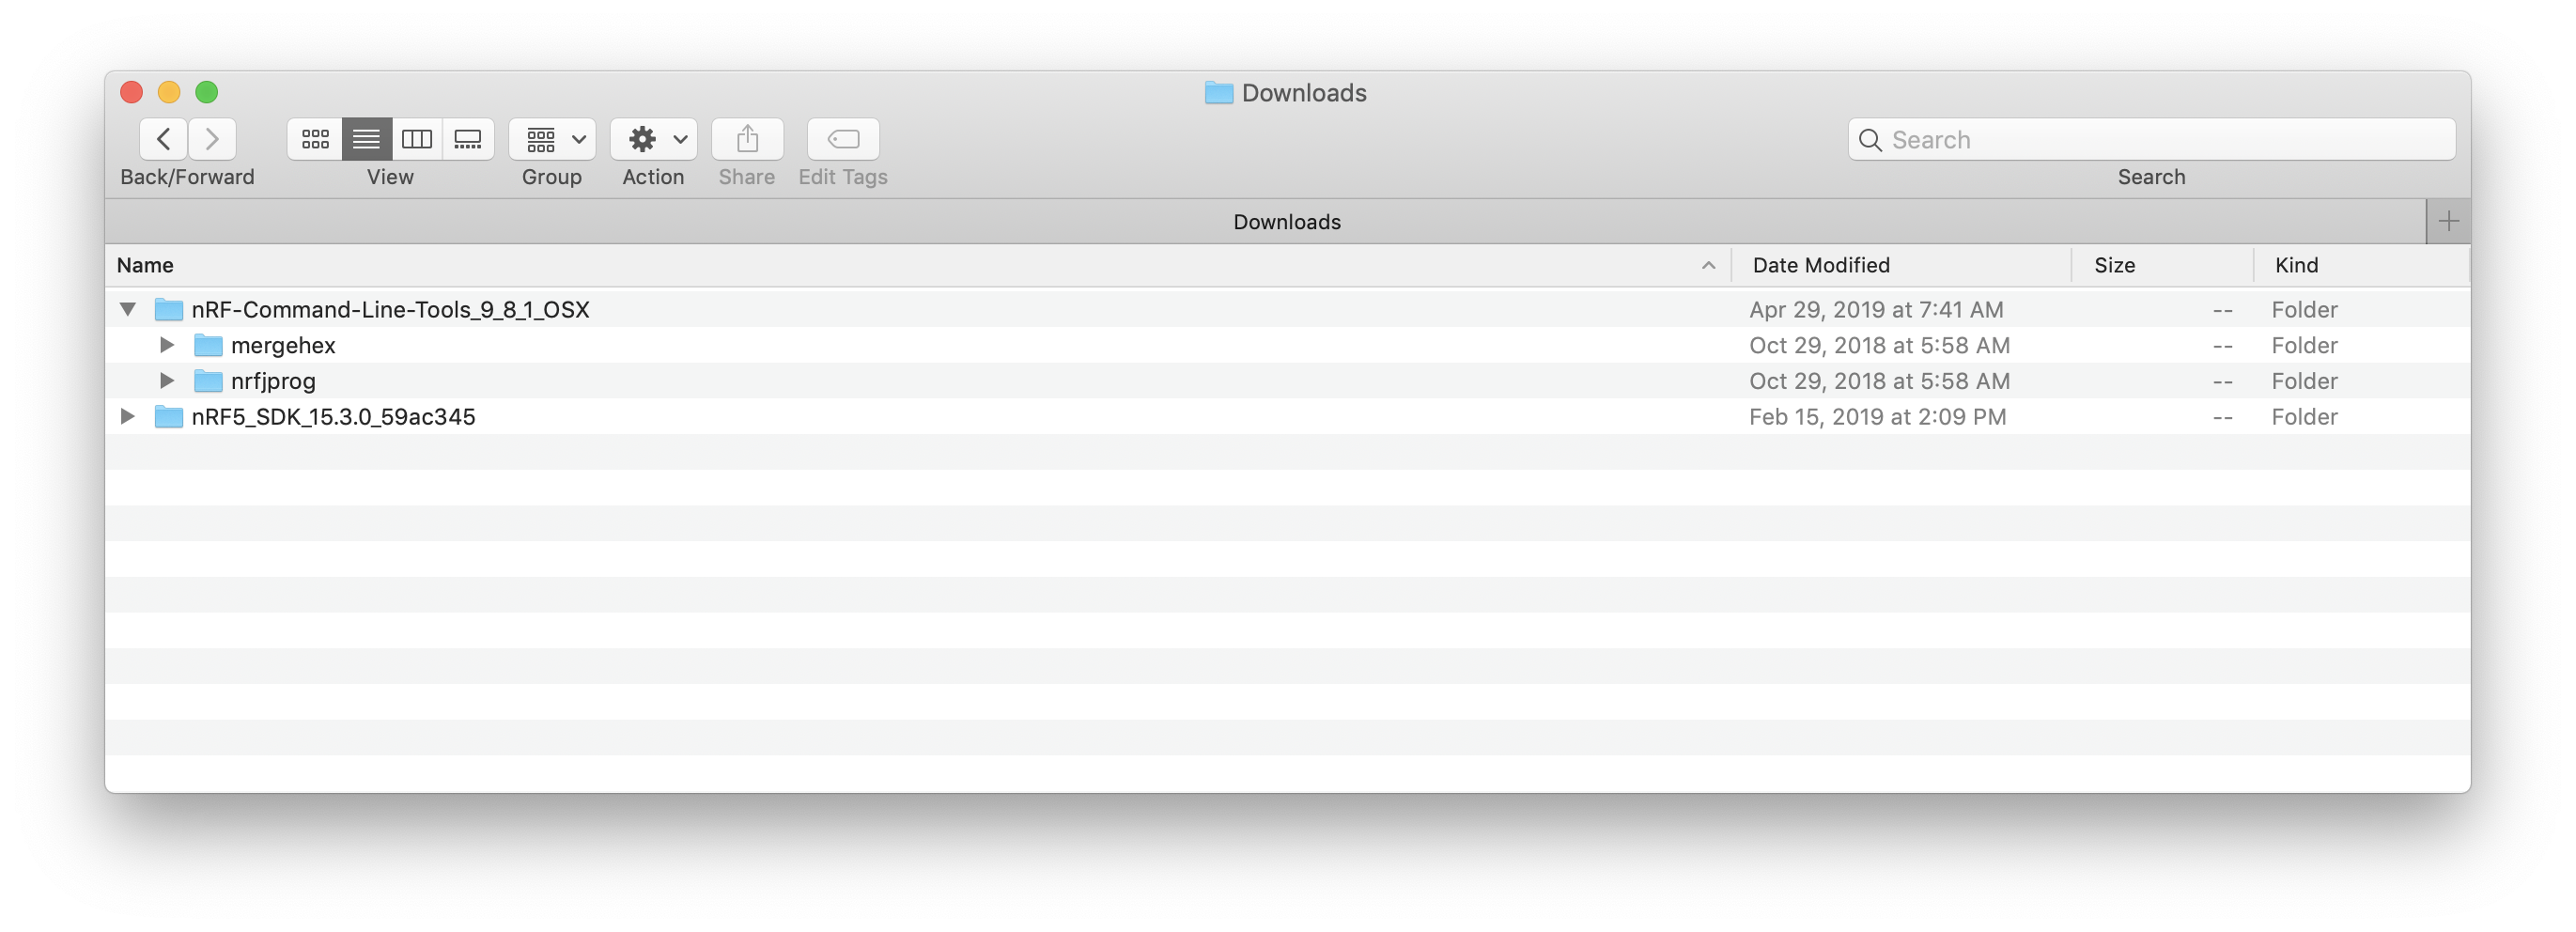
This is what the contents of the folder should look like:
3. SEGGER J-Link
The SEGGER J-Link software is needed for the GDB Server interface to the nRF52 chipset on the development kit.
So let’s go ahead and download the software.
Link to download SEGGER J-Link Software

This download (for macOS) is a .pkg installer file. Once you download it, simply double-click it and go through the installation process.

4. GNU Arm Embedded Toolchain
The next software package that we need to install is the GNU Arm Embedded Toolchain which includes the compiler (gcc) and debugger (gdb) for the Arm architecture (which the nRF52840 chipset is based on).
Direct link to download the GNU Arm Embedded Toolchain (version 7-2017-q4-major)
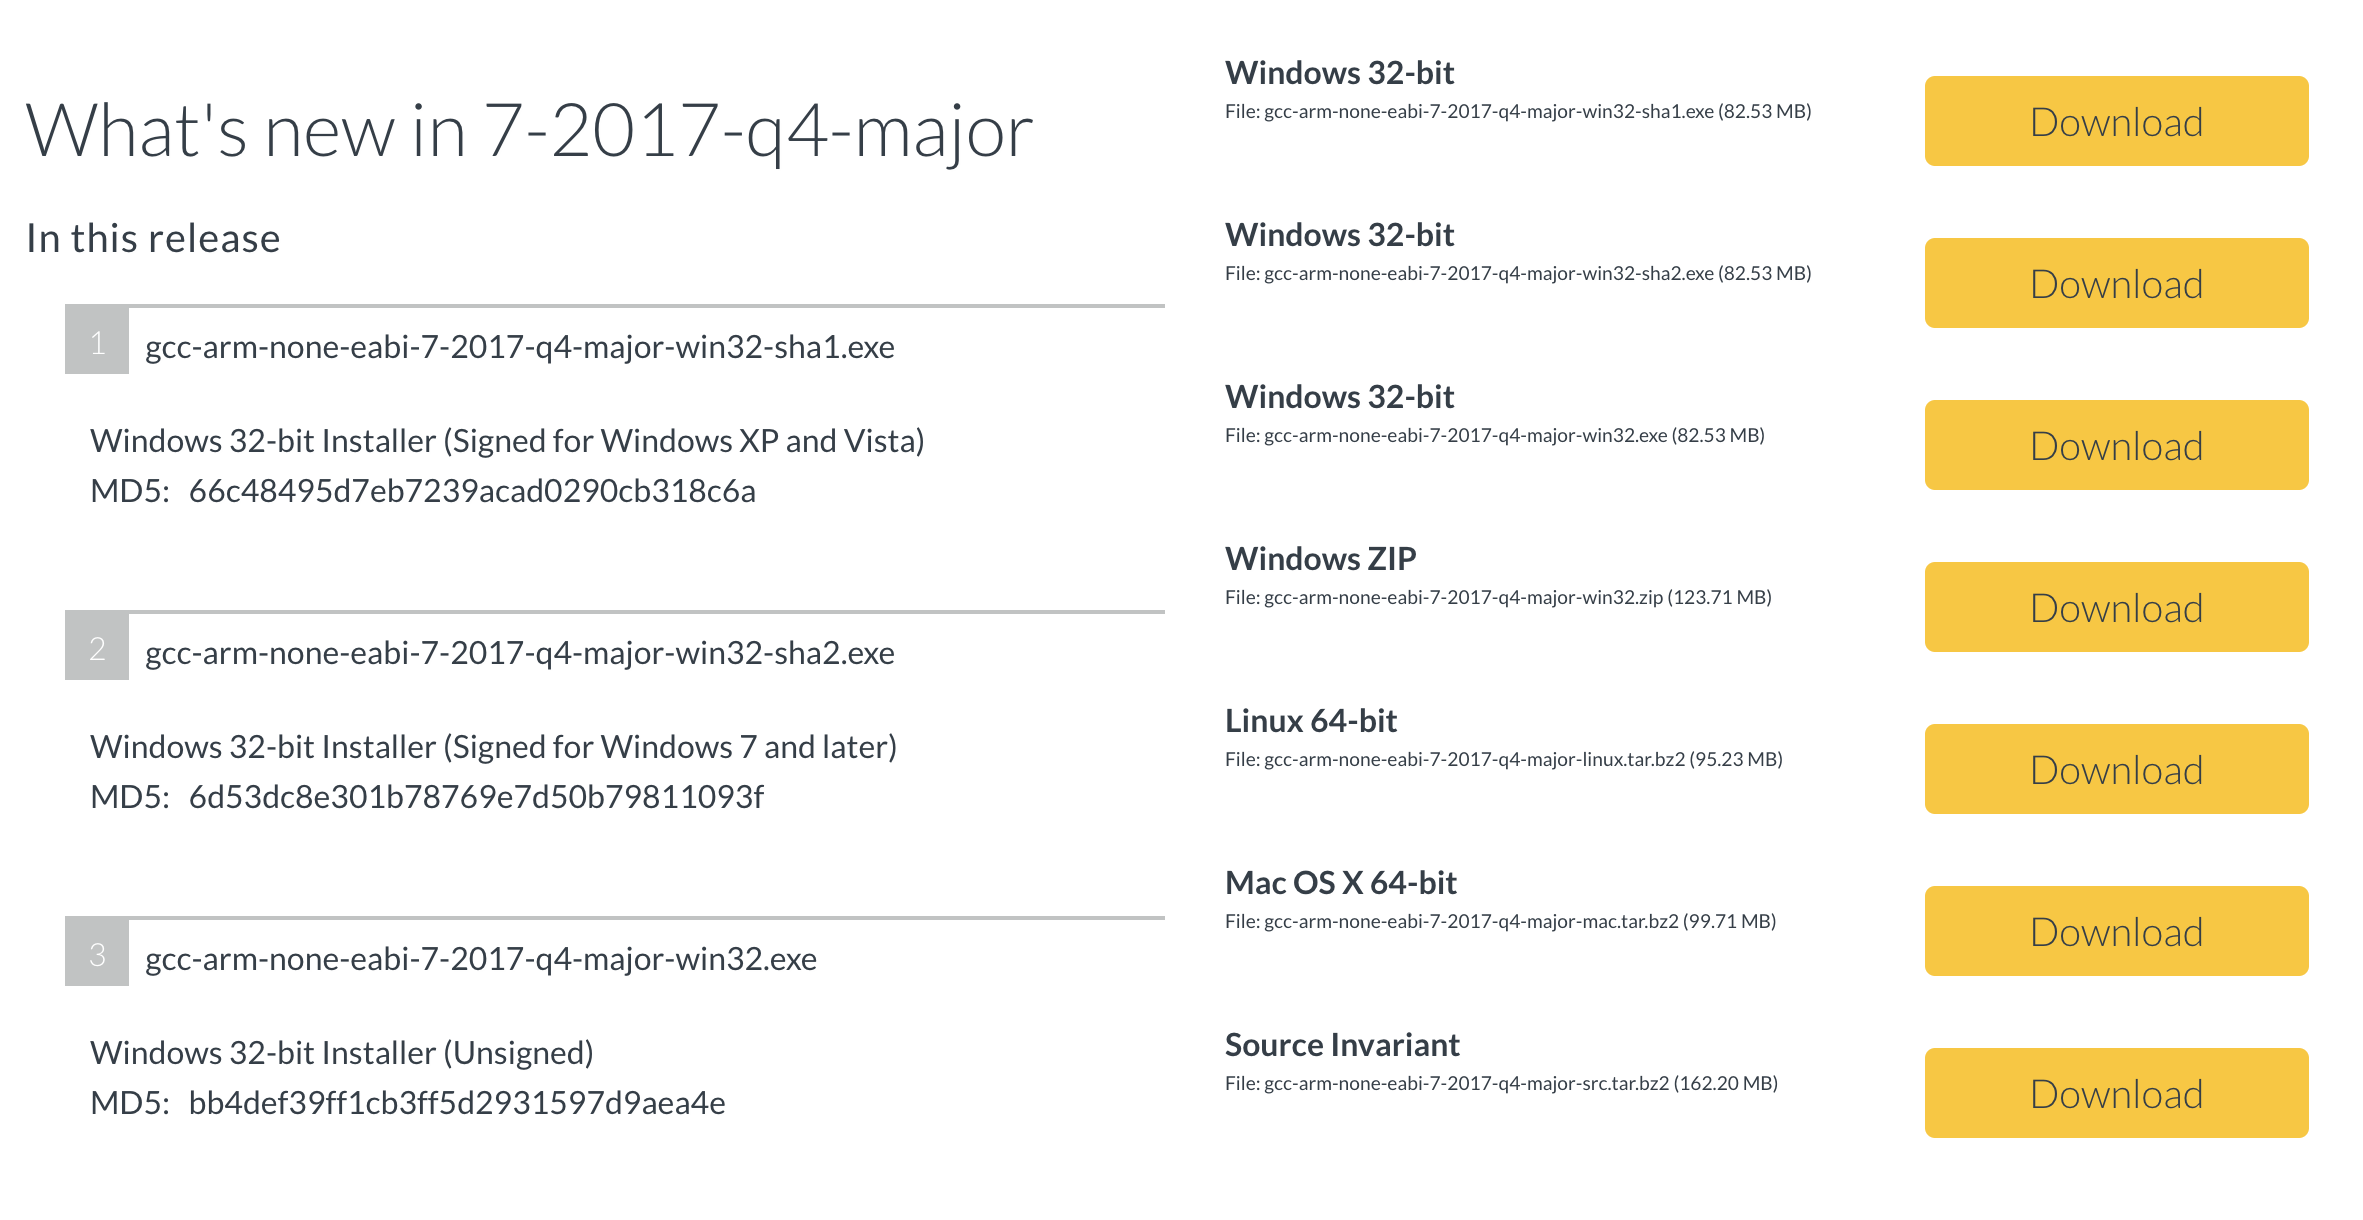
After you download the package, simply extract it to your folder of choice.
5. Serial Terminal Program
My choice for a terminal program that I use across projects is a program called CoolTerm. What I like about this program is its simplicity and that it supports all the major platforms (Windows, macOS, and Linux).
For now, all you need to do is download it, open the package and copy the application file to your Mac Applications folder so you could launch it in the later steps.
6. Adding the Necessary Folders to $PATH
In order to access the necessary commands that we’ll be calling from anywhere in your system, you need to add their paths to the system $PATH environment variable.
To do that, open up a Terminal session and type the following:
$ vi ~/.bash_profile
Once you’ve done that, go ahead and add the following lines to the bottom of the file:
export PATH = "<Your Folder>/nRF-Command-Line-Tools_9_8_1_OSX/nrfjprog":$PATH
export PATH = "<Your Folder>/gcc-arm-none-eabi-7-2017-q4-major/bin":$PATH
Make sure to replace <Your Folder> with the appropriate folder name where you placed those packages on your system.
We don’t need to add any paths for the SEGGER J-Link software because it ran as an installer and would have already added the necessary binaries to our system.
After you’re done editing and saving the paths file, close the Terminal and then start a new session to make sure the updated paths file gets loaded. Alternatively, you could just execute the following command to reload .bash_profile:
$ source ~/.bash_profile
To verify, you can type the following command:
$ echo $PATH
/usr/local/bin:/usr/bin:/bin:/usr/sbin:/sbin:/Users/mafaneh/Memfault/nRF-Command-Line-Tools_9_8_1_OSX/nrfjprog:/Users/mafaneh/Memfault/gcc-arm-none-eabi-7-2017-q4-major/bin
That’s it for the setup part, now on to the fun part!
Developing the nRF52 BLE Peripheral Application
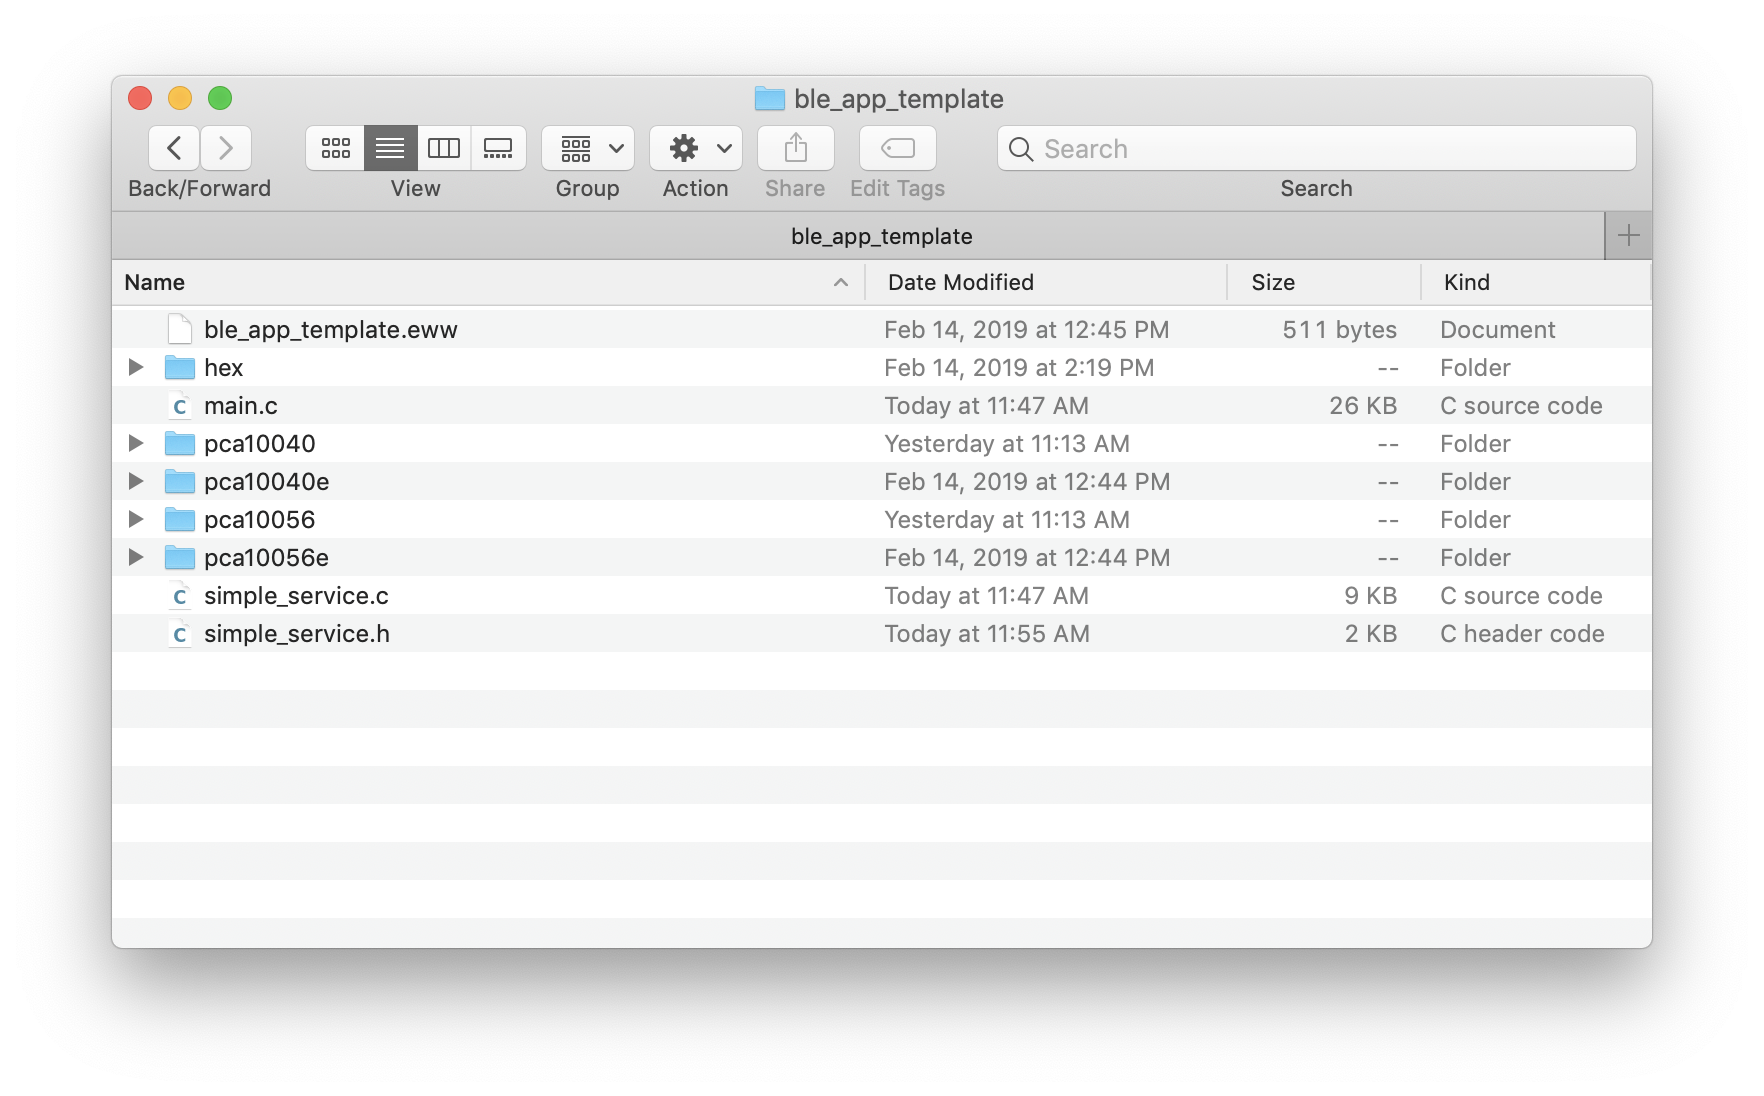
We will be using one of the BLE examples provided as part of the nRF5 SDK as a starting point. The example is called “ble_app_template” and is located at:
<nRF5_SDK_Folder>/examples/ble_peripheral/ble_app_template/
The example is provided as a boilerplate template that you could use whenever you’re developing an nRF52 BLE application from scratch. Here’s a screenshot of the contents of this example’s folder:

The example consists of a single source file named main.c, which we’ll be modifying to do the following:
- Enable advertising as a BLE Peripheral that accepts a connection from a BLE Central device.
- Define a GATT service which we’ll call “simple service” which consists of one characteristic:
- A “Button 1” Characteristic (exposes the current state of the development kit’s Button 1: pressed (0x01) or released (0x00)). The Characteristic will allow both reads and notifications to allow a client to read the value and get notified only when the value changes (instead of polling for the value waiting for a change to occur).
- Handling of the Button 1 events (presses and releases).
Let’s go through the steps and code changes needed to implement our application. All the code used in this blog post is available on GitHub.
Enabling the nRF Log Module
In order to enable logging and see debug data, you need to do the following (some of these may already be enabled in your template application) in pca10056/s140/config/sdk_config.h:
-
Enable the
NRF_LOG_ENABLEDmacro:// <e> NRF_LOG_ENABLED - nrf_log - Logger //========================================================== #ifndef NRF_LOG_ENABLED #define NRF_LOG_ENABLED 1 #endif -
Set the log level to 3 (or 4 more debugging information):
// <o> NRF_LOG_DEFAULT_LEVEL - Default Severity level // <0=> Off // <1=> Error // <2=> Warning // <3=> Info // <4=> Debug #ifndef NRF_LOG_DEFAULT_LEVEL #define NRF_LOG_DEFAULT_LEVEL 3 #endif -
Since we’ll be using a terminal program (such as CoolTerm), we need to enable logging via the UART backend. This is done by enabling the
NRF_LOG_BACKEND_UART_ENABLEDas follows:// <e> NRF_LOG_BACKEND_UART_ENABLED - nrf_log_backend_uart - Log UART backend //========================================================== #ifndef NRF_LOG_BACKEND_UART_ENABLED #define NRF_LOG_BACKEND_UART_ENABLED 1 #endif
That’s it! Now you have logging enabled and you will be able to see log messages show up in your terminal program of choice. We’ll get to configuring the terminal program in the “Testing” section.
Handling the Button Presses
The application already comes ready with code that sets up the LEDs and Buttons to be used. However, we’ll be modifying it to utilize an nRF module called the “App Button” module. This module simplifies the code for handling button events compared to the originally included BSP library.
You can find more about the App Button library here:
nRF5 SDK Button Handler Library
We will need to add three different segments of code to main.c to enable handling of Button 1 events:
-
Configure the button we’ll be using (Button 1 on the dev kit). We also add a forward declaration of the function responsible for handling the button events:
static void button_event_handler(uint8_t pin_no, uint8_t button_action); #define NUM_OF_BUTTONS 1 static const app_button_cfg_t app_buttons[NUM_OF_BUTTONS] = { {BUTTON_1, false, BUTTON_PULL, button_event_handler}, }; -
The button event handler function. The function handles the Button 1 press and release events, and then calls a function to update our characteristic value that’s associated with the button.
static void button_event_handler(uint8_t pin_no, uint8_t button_action) { switch (pin_no) { case BUTTON_1: NRF_LOG_INFO("Button 1 %s\r\n", button_action == 1 ? "pressed":"released"); button_1_characteristic_update(&m_simple_service, &button_action); break; default: APP_ERROR_HANDLER(pin_no); break; } } -
The function to initialize and configure the LEDs and Buttons. We will change the following code:
  static void buttons_leds_init(bool * p_erase_bonds)
  {
      ret_code_t err_code;
      bsp_event_t startup_event;

      err_code = bsp_init(BSP_INIT_LEDS | BSP_INIT_BUTTONS, bsp_event_handler);
      APP_ERROR_CHECK(err_code);

      err_code = bsp_btn_ble_init(NULL, &startup_event);
      APP_ERROR_CHECK(err_code);

      *p_erase_bonds = (startup_event == BSP_EVENT_CLEAR_BONDING_DATA);
  }
to
  static void buttons_leds_init(bool * p_erase_bonds))
  {
      ret_code_t err_code;
      bsp_event_t startup_event;

      err_code = bsp_init(BSP_INIT_LEDS, bsp_event_handler);
      APP_ERROR_CHECK(err_code);

      err_code = bsp_btn_ble_init(NULL, &startup_event);
  APP_ERROR_CHECK(err_code);

      //init app_button module, 50ms detection delay (button debouncing)
      err_code = app_button_init((app_button_cfg_t *)app_buttons,
                                     NUM_OF_BUTTONS,
                                     APP_TIMER_TICKS(50));
      APP_ERROR_CHECK(err_code);

      err_code = app_button_enable();
      APP_ERROR_CHECK(err_code);

      *p_erase_bonds = (startup_event == BSP_EVENT_CLEAR_BONDING_DATA);
  }
Notice we removed the initialization of the buttons from the
bsp_init()call and instead used theapp_button_init()API. We also pass the buttons array to the API to configure only Button 1.
Those are all the changes needed to handle the Button 1 press and release events.
Initializing GATT Services and Characteristics
The boilerplate example provides example code to initialize your own Service (which in turn initializes its Characteristics) in the following function in main.c:
/**@brief Function for initializing services that will be used by the application.
 */
static void services_init(void)
{
    ret_code_t         err_code;
    nrf_ble_qwr_init_t qwr_init = {0};

    // Initialize Queued Write Module.
    qwr_init.error_handler = nrf_qwr_error_handler;

    err_code = nrf_ble_qwr_init(&m_qwr, &qwr_init);
    APP_ERROR_CHECK(err_code);

    /* YOUR_JOB: Add code to initialize the services used by the application.
       ble_xxs_init_t                     xxs_init;
       ble_yys_init_t                     yys_init;

       // Initialize XXX Service.
       memset(&xxs_init, 0, sizeof(xxs_init));

       xxs_init.evt_handler                = NULL;
       xxs_init.is_xxx_notify_supported    = true;
       xxs_init.ble_xx_initial_value.level = 100;

       err_code = ble_bas_init(&m_xxs, &xxs_init);
       APP_ERROR_CHECK(err_code);

       // Initialize YYY Service.
       memset(&yys_init, 0, sizeof(yys_init));
       yys_init.evt_handler                  = on_yys_evt;
       yys_init.ble_yy_initial_value.counter = 0;

       err_code = ble_yy_service_init(&yys_init, &yy_init);
       APP_ERROR_CHECK(err_code);
     */
}
Let’s modify this function to initialize our own service “simple_service” which we’ll provide the code for in the next section.
/**@brief Function for initializing services that will be used by the application.
 */
static void services_init(void)
{
    ret_code_t         err_code;
    nrf_ble_qwr_init_t qwr_init = {0};

    // Initialize Queued Write Module.
    qwr_init.error_handler = nrf_qwr_error_handler;

    err_code = nrf_ble_qwr_init(&m_qwr, &qwr_init);
    APP_ERROR_CHECK(err_code);

    // Initialize the Simple service
    err_code = ble_simple_service_init(&m_simple_service, NULL);
    APP_ERROR_CHECK(err_code);
}
Another change we need to make to main.c is to include our Service header file simple_service.h. We do this towards the top of main.c:
#include "simple_service.h"
We also need to instantiate a variable for our Simple Service. This is done by adding the following code:
BLE_SIMPLE_SERVICE_DEF(m_simple_service);
The final change we want to make in main.c is to change the advertised device name. By default, it’s set to "Nordic_Template". Let’s change it to the following:
#define DEVICE_NAME "Memfault_Example" /**< Name of device. Will be included in the advertising data. */
That’s it for main.c! The source code for main.c is available on GitHub.
Implementation of the GATT Services and Characteristics
For implementation of our Simple Service we will create two source files: simple_service.h and simple_service.c and place them in the same folder as main.c.
GATT Service and Characteristic UUIDs
Before we go through the implementation of each of these, we need to assign the GATT Service and Characteristic their own custom UUIDs (a 128-bit value), which we can simply autogenerate using an online tool called Online GUID Generator.
“A UUID is a universally unique identifier that is guaranteed to be unique across all space and all time” (Bluetooth 5.1 spec, Vol 3, Part B, section 2.5.1 UUID).
The one restriction for use of a UUID for a custom BLE Service or Characteristic is that it does not overlap with the Bluetooth SIG Adopted UUIDs. Adopted UUIDs are represented with 16-bit value and its equivalent 128-bit value is computed as follows:
128-bit value = 16-bit-value * 2^96 + BluetoothBaseUUID
where the BluetoothBaseUUID is 00000000-0000-1000-8000-00805F9B34FB
Examples include:
0x180F -> Battery Service UUID (128-bit UUID: 0000180F-0000-1000-8000-00805F9B34FB)
0x2A00 -> Device Name Characteristic UUID (128-bit UUID: 00002A00-0000-1000-8000-00805F9B34FB)
The digits in bold represent the 16-bit value.
We can simply generate one UUID for the Service and increment it for the Characteristic, and as long as it doesn’t use the same “base” as the SIG Adopted UUIDs, we’ll be good!
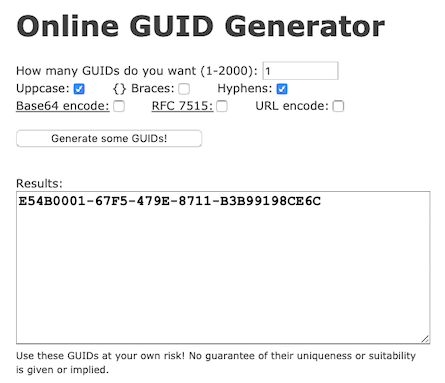
So, we’ll use:
Simple Service UUID: E54B0001-67F5-479E-8711-B3B99198CE6C
Button 1 Characteristic UUID: E54B0002-67F5-479E-8711-B3B99198CE6C (simply increment the bold digits)
Now on to developing the code for our GATT Service and Characteristic.
simple_service.h
The simple_service.h file serves as the header file for our Simple Service. We’ll cover the most important parts of the code (the full source code is available on GitHub for your reference).
First, we’ll define the macro that gets used in main.c to instantiate a Simple Service object:
#define BLE_SIMPLE_SERVICE_DEF(_name)                                                               \
static ble_simple_service_t _name;                                                                  \
NRF_SDH_BLE_OBSERVER(_name ## _obs,                                                                 \
                     BLE_LBS_BLE_OBSERVER_PRIO,                                                     \
                     ble_simple_service_on_ble_evt, &_name)
This is code that you’ll find used in many of the Nordic examples, and we simply customized it to our needs.
Next, we’ll define the “base” UUID to use along with the 16-bit definitions for each of the Simple Service and the Button 1 Characteristic. The following method is the common method of defining custom (also referred to as vendor-specific) Services and Characteristics in Nordic nRF applications.
// Simple service:                     E54B0001-67F5-479E-8711-B3B99198CE6C
//   |--> Button 1 press characteristic:    E54B0002-67F5-479E-8711-B3B99198CE6C

// The bytes are stored in little-endian format, meaning the
// Least Significant Byte is stored first
// (reversed from the order they're displayed as)

// Base UUID: E54B0000-67F5-479E-8711-B3B99198CE6C
#define BLE_UUID_SIMPLE_SERVICE_BASE_UUID  {0x6C, 0xCE, 0x98, 0x91, 0xB9, 0xB3, 0x11, 0x87, 0x9E, 0x47, 0xF5, 0x67, 0x00, 0x00, 0x4B, 0xE5}

// Service & characteristics UUIDs
#define BLE_UUID_SIMPLE_SERVICE_UUID        0x0001
#define BLE_UUID_BUTTON_1_PRESS_CHAR_UUID   0x0002
Following that we define the data structure for the Simple Service:
typedef struct ble_simple_service_s ble_simple_service_t;
Next, we define the events for Notifications getting enabled or disabled for the Button 1 Characteristic:
typedef enum
{
    BLE_BUTTON_1_PRESS_EVT_NOTIFICATION_ENABLED,
    BLE_BUTTON_1_PRESS_EVT_NOTIFICATION_DISABLED,
} ble_simple_evt_type_t;

typedef struct
{
    ble_simple_evt_type_t evt_type;
} ble_simple_evt_t;
In the following code we define the function prototype for the BLE event handler:
typedef void (*ble_simple_evt_handler_t) (ble_simple_service_t * p_simple_service, ble_simple_evt_t * p_evt);
We then define the actual structure of the Simple Service which holds the crucial information needed by the Service:
typedef struct ble_simple_service_s
{
    uint16_t                         conn_handle;
    uint16_t                         service_handle;
    uint8_t                          uuid_type;
    ble_simple_evt_handler_t         evt_handler;
    ble_gatts_char_handles_t         button_1_press_char_handles;

} ble_simple_service_t;
Finally, we declare the APIs exposed by the Simple Service. This includes functions for: initialization, the BLE event handler (which is needed by the Nordic SoftDevice), and the function for updating the Characteristic value (called when Button 1 is pressed or released:
uint32_t ble_simple_service_init(ble_simple_service_t * p_simple_service, ble_simple_evt_handler_t app_evt_handler);

void ble_simple_service_on_ble_evt(ble_evt_t const * p_ble_evt, void * p_context);

void button_1_characteristic_update(ble_simple_service_t * p_simple_service, uint8_t *button_action);
That’s the end of the header file. Next, we’ll move on to the source file implementation.
simple_service.c
Let’s go over the most important parts of simple_service.c.
-
A couple of global variables needed for storing the Button 1 Characteristic name and one for tracking whether Notifications are enabled or not.
static const uint8_t Button1CharName[] = "Button 1 press"; static bool button_notifications_enabled = false; -
A function for handling the connection event. In this function, we store the connection handle and make sure the
button_notifications_enabledboolean is disabled.static void on_connect(ble_simple_service_t * p_simple_service, ble_evt_t const * p_ble_evt) { p_simple_service->conn_handle = p_ble_evt->evt.gap_evt.conn_handle; button_notifications_enabled = false; } -
A function for handling the disconnection event. In this function, we invalidate the connection handle and make sure the
button_notifications_enabledboolean is disabled.static void on_disconnect(ble_simple_service_t * p_simple_service, ble_evt_t const * p_ble_evt) { UNUSED_PARAMETER(p_ble_evt); p_simple_service->conn_handle = BLE_CONN_HANDLE_INVALID; button_notifications_enabled = false; } -
A function for handling the Characteristic Write event. In this function, we handle writing to the CCCD (Client Characteristic Configuration Descriptor) which is used for enabling or disabling Notifications. The event is then passed up to the application layer via the application event handler that’s set during the initialization of the Service.
static void on_write(ble_simple_service_t * p_simple_service, ble_evt_t const * p_ble_evt) { ble_gatts_evt_write_t const * p_evt_write = &p_ble_evt->evt.gatts_evt.params.write; // Custom Value Characteristic Written to. if ( (p_evt_write->handle == p_simple_service->button_1_press_char_handles.cccd_handle) && (p_evt_write->len == 2)) { ble_simple_evt_t evt; if (ble_srv_is_notification_enabled(p_evt_write->data)) { NRF_LOG_INFO("Notifications ENABLED for button 1 press"); evt.evt_type = BLE_BUTTON_1_PRESS_EVT_NOTIFICATION_ENABLED; button_notifications_enabled = true; } else { NRF_LOG_INFO("Notifications DISABLED for button 1 press"); evt.evt_type = BLE_BUTTON_1_PRESS_EVT_NOTIFICATION_DISABLED; button_notifications_enabled = false; } if (p_simple_service->evt_handler != NULL) { // CCCD written, call application event handler. p_simple_service->evt_handler(p_simple_service, &evt); } } } - A function for adding the Button 1 Characteristic to the BLE stack. This function handles:
- Setting the CCCD permissions to allow subscribing to Notifications.
- Setting the Characteristic value permissions to allow read only (no write permissions).
- Setting the Characteristic name.
- Setting the UUID for the Characteristic.
- Defining the size of the Characteristic value (1 byte: 0x00 for released state and 0x01 for pressed state).
- Finally, calling the
sd_ble_gatts_characteristic_add()API to add the Characteristic.
static uint32_t button_1_press_char_add(ble_simple_service_t * p_simple_service) { ble_gatts_char_md_t char_md; ble_gatts_attr_md_t cccd_md; ble_gatts_attr_t attr_char_value; ble_uuid_t ble_uuid; ble_gatts_attr_md_t attr_md; uint8_t init_value = 0; memset(&char_md, 0, sizeof(char_md)); memset(&cccd_md, 0, sizeof(cccd_md)); memset(&attr_md, 0, sizeof(attr_md)); memset(&attr_char_value, 0, sizeof(attr_char_value)); // Set permissions on the CCCD and Characteristic value BLE_GAP_CONN_SEC_MODE_SET_OPEN(&cccd_md.read_perm); // Set Security to Mode 1 Level 2 (Encryption, No Authentication (no MITM protection)) // Refer to <nRF5_SDK>/components/softdevice/s140/headers/ble_gap.h for macros to set // specific Security Modes and Levels BLE_GAP_CONN_SEC_MODE_SET_ENC_NO_MITM(&cccd_md.write_perm); BLE_GAP_CONN_SEC_MODE_SET_NO_ACCESS(&attr_md.write_perm); BLE_GAP_CONN_SEC_MODE_SET_OPEN(&attr_md.read_perm); // CCCD settings (needed for notifications and/or indications) cccd_md.vloc = BLE_GATTS_VLOC_STACK; // Characteristic Metadata char_md.char_props.read = 1; char_md.char_props.notify = 1; char_md.p_char_user_desc = Button1CharName; char_md.char_user_desc_size = sizeof(Button1CharName); char_md.char_user_desc_max_size = sizeof(Button1CharName); char_md.p_char_pf = NULL; char_md.p_user_desc_md = NULL; char_md.p_cccd_md = &cccd_md; char_md.p_sccd_md = NULL; // Define the Button ON press Characteristic UUID ble_uuid.type = p_simple_service->uuid_type; ble_uuid.uuid = BLE_UUID_BUTTON_1_PRESS_CHAR_UUID; // Attribute Metadata settings attr_md.vloc = BLE_GATTS_VLOC_STACK; attr_md.rd_auth = 0; attr_md.wr_auth = 0; attr_md.vlen = 0; // Attribute Value settings attr_char_value.p_uuid = &ble_uuid; attr_char_value.p_attr_md = &attr_md; attr_char_value.init_len = sizeof(uint8_t); attr_char_value.init_offs = 0; attr_char_value.max_len = sizeof(uint8_t); attr_char_value.p_value = &init_value; return sd_ble_gatts_characteristic_add(p_simple_service->service_handle, &char_md, &attr_char_value, &p_simple_service->button_1_press_char_handles); } - A function to initialize the Service. It handles the following:
- Assigning the application level event handler (if passed in).
- Assigning the Service UUID and adding it to the BLE stack.
- Adding the Service to the BLE stack.
- Finally, adding the Button 1 Characteristic to the Service.
uint32_t ble_simple_service_init(ble_simple_service_t * p_simple_service, ble_simple_evt_handler_t app_evt_handler) { uint32_t err_code; ble_uuid_t ble_uuid; // Initialize service structure p_simple_service->conn_handle = BLE_CONN_HANDLE_INVALID; if (app_evt_handler != NULL) { p_simple_service->evt_handler = app_evt_handler; } // Add service UUID ble_uuid128_t base_uuid = {BLE_UUID_SIMPLE_SERVICE_BASE_UUID}; err_code = sd_ble_uuid_vs_add(&base_uuid, &p_simple_service->uuid_type); if (err_code != NRF_SUCCESS) { return err_code; } // Set up the UUID for the service (base + service-specific) ble_uuid.type = p_simple_service->uuid_type; ble_uuid.uuid = BLE_UUID_SIMPLE_SERVICE_UUID; // Set up and add the service err_code = sd_ble_gatts_service_add(BLE_GATTS_SRVC_TYPE_PRIMARY, &ble_uuid, &p_simple_service->service_handle); if (err_code != NRF_SUCCESS) { return err_code; } // Add the different characteristics in the service: // Button 1 press characteristic: E54B0002-67F5-479E-8711-B3B99198CE6C err_code = button_1_press_char_add(p_simple_service); if (err_code != NRF_SUCCESS) { return err_code; } return NRF_SUCCESS; } -
A function to handle the different BLE events reported by the SoftDevice. The three events handled are: the connected event, disconnected event, and the Characteristic write event.
void ble_simple_service_on_ble_evt(ble_evt_t const * p_ble_evt, void * p_context) { ble_simple_service_t * p_simple_service = (ble_simple_service_t *)p_context; switch (p_ble_evt->header.evt_id) { case BLE_GAP_EVT_CONNECTED: on_connect(p_simple_service, p_ble_evt); break; case BLE_GAP_EVT_DISCONNECTED: on_disconnect(p_simple_service, p_ble_evt); break; case BLE_GATTS_EVT_WRITE: on_write(p_simple_service, p_ble_evt); break; default: // No implementation needed. break; } } - Finally, a function to handle updates to the Button 1 Characteristic value. This function handles:
- Setting the corresponding value to the Characteristic based on whether a Button 1 press or release event has occurred. This gets called by the application layer (in
main.c). - Sending a Notification along with the updated value to the Client if it has enabled Notifications.
void button_1_characteristic_update(ble_simple_service_t * p_simple_service, uint8_t *button_action) { uint32_t err_code = NRF_SUCCESS; ble_gatts_value_t gatts_value; if (p_simple_service->conn_handle != BLE_CONN_HANDLE_INVALID) { // Initialize value struct. memset(&gatts_value, 0, sizeof(gatts_value)); gatts_value.len = sizeof(uint8_t); gatts_value.offset = 0; gatts_value.p_value = button_action; // Update database. err_code = sd_ble_gatts_value_set(p_simple_service->conn_handle, p_simple_service->button_1_press_char_handles.value_handle, &gatts_value); APP_ERROR_CHECK(err_code); if (button_notifications_enabled) { NRF_LOG_INFO("Sending notification for button 1 press/release"); uint16_t len = sizeof (uint8_t); ble_gatts_hvx_params_t hvx_params; memset(&hvx_params, 0, sizeof(hvx_params)); hvx_params.handle = p_simple_service->button_1_press_char_handles.value_handle; hvx_params.type = BLE_GATT_HVX_NOTIFICATION; hvx_params.offset = 0; hvx_params.p_len = &len; hvx_params.p_data = (uint8_t*)button_action; err_code = sd_ble_gatts_hvx(p_simple_service->conn_handle, &hvx_params); APP_ERROR_CHECK(err_code); } } } - Setting the corresponding value to the Characteristic based on whether a Button 1 press or release event has occurred. This gets called by the application layer (in
Custom (Vendor-Specific) Services and Characteristics in nRF Applications
Before we can build the application, there’s one last important change that we need to make. This change will be in the sdk_config.h file (located at ble_app_template/pca10056/s140/config/sdk_config.h).
We need to modify a macro responsible for telling the SoftDevice (Nordic’s BLE stack) about the number of vendor-specific UUIDs used in the application. This change is needed since it requires some (extra) dedicated memory for storing these UUIDs. We only need to increment this macro for each “base” UUID, basically for each time the sd_ble_uuid_vs_add() API is called. So, in our case we only need to increment it by 1 (since the Service and Characteristic share the same “base”).
Look for the macro named NRF_SDH_BLE_VS_UUID_COUNT in sdk_config.h and change its value from 0 to 1:
// <o> NRF_SDH_BLE_VS_UUID_COUNT - The number of vendor-specific UUIDs.
#ifndef NRF_SDH_BLE_VS_UUID_COUNT
#define NRF_SDH_BLE_VS_UUID_COUNT 1
#endif
Along with this change, we will need to make a change in the RAM offset and size — we’ll get to this in the Testing section since it requires us to actually run the application and get the appropriate values from the log output.
Running our Application
As we mentioned earlier, we’ll be using command line for almost everything in this post. For compiling the application, we’ll be using ARM GCC and GNU Make. For flashing the application to the board, we’ll be using the Nordic Command Line Tools (specifically, the nrfjprog command).
1. Compiling the Application
Before we can compile the application, we need to make a couple of modifications:
-
Add the new Simple Service source code file to
Makefile. We add$(PROJ_DIR)/simple_service.cto theMakefilefile which is located atble_peripheral/ble_app_template/pca10056/s140/armgcc/Makefile:$(PROJ_DIR)/main.c \ $(PROJ_DIR)/simple_service.c \ $(SDK_ROOT)/external/segger_rtt/SEGGER_RTT.c \ -
Update the
Makefile.posixfile to point to the correct location and version of the armgcc compiler. Edit the file located at<nRF5 SDK Folder>/components/toolchain/gcc/Makefile.posix:GNU_INSTALL_ROOT ?= <Toolchain Folder>/gcc-arm-none-eabi-7-2017-q4-major/bin/ GNU_VERSION ?= 7.2.1 GNU_PREFIX ?= arm-none-eabiMake sure you replace
<Toolchain Folder>with the appropriate path based on where you installed the armgcc toolchain.
Now that we’ve made these changes, we’re ready to compile our application and flash it to the development board.
In the same folder where Makefile is located (ble_peripheral/ble_app_template/pca10056/s140/armgcc/), run the following command.
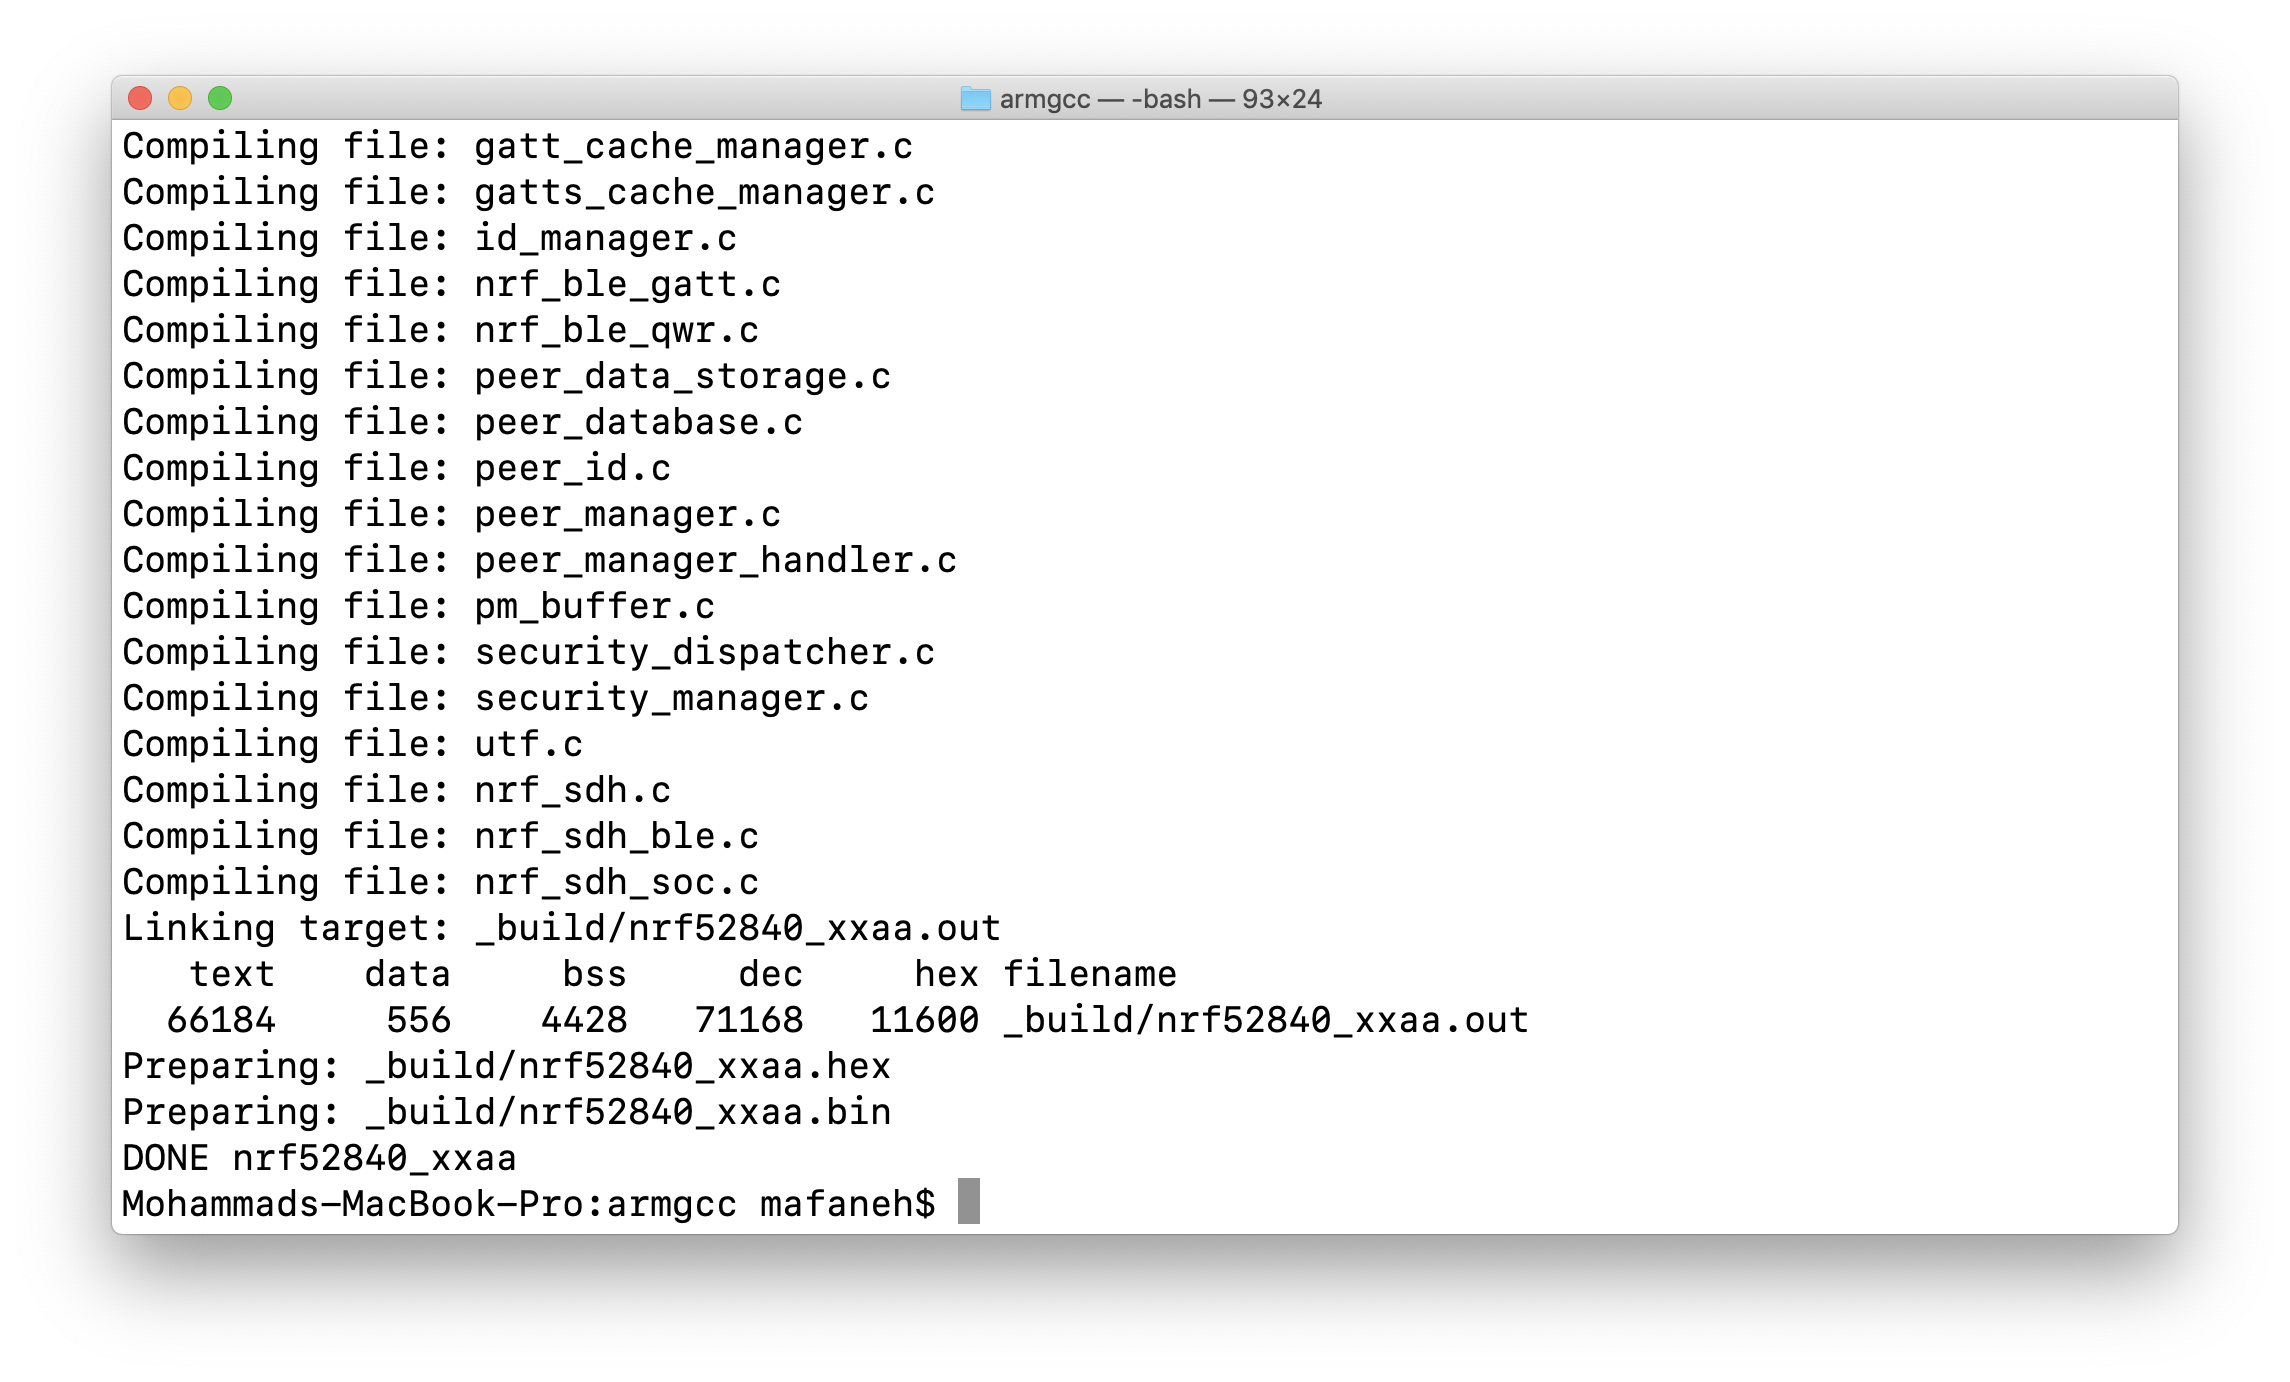
$ make
Sometimes, it’s a good idea to run make clean before running make just to make sure you are starting from a clean state. You should see an output similar to this when it finishes:
2. Hardware Setup
The second step is to get the hardware set up to run the example.
Here are the steps to accomplish this:
- Connect the development kit to your computer (via the micro-USB to USB-A cable)
- Make sure the development kit jumpers are in the right settings:
- SW6 set to “Default” (not “nRF ONLY”)
- SW9 (nRF power source) set to “VDD”
- Power set to “ON”

-
Erase the development kit by running the following command. This will erase the chipset on the board, just to make sure we are starting from a clean slate.
$ nrfjprog -f NRF52 --eraseall -
Next, we will flash the chipset with Nordic’s SoftDevice which acts as both the BLE stack and RTOS (Real-Time Operating System) for the nRF52 chipset. This is crucial before flashing our application (since the binaries compile separately).
To do this, run the following command:
$ nrfjprog -f NRF52 --program <nRF5 SDK Folder>/components/softdevice/s140/hex/s140_nrf52_6.1.1_softdevice.hex --chiperase --verifyDon’t forget to change the
<nRF5 SDK Folder>portion to match the location where you installed/unzipped the nRF5 SDK. -
The final step is to flash the application binary to the chipset. To do this, run the following command:
$ nrfjprog -f NRF52 --program _build/nrf52840_xxaa.hex --verify
That’s it! Our application should now be running on the board. To verify that, we will be using a serial terminal program.
In the next section, we’ll go through setting up the terminal program and then verify that the application is running correctly.
3. Serial Terminal Program Setup
As we mentioned earlier, we’ll be using a program called CoolTerm.
There are three parts to get this working:
- Run the CoolTerm application
-
Make sure the serial port settings are correct (listed at this link):
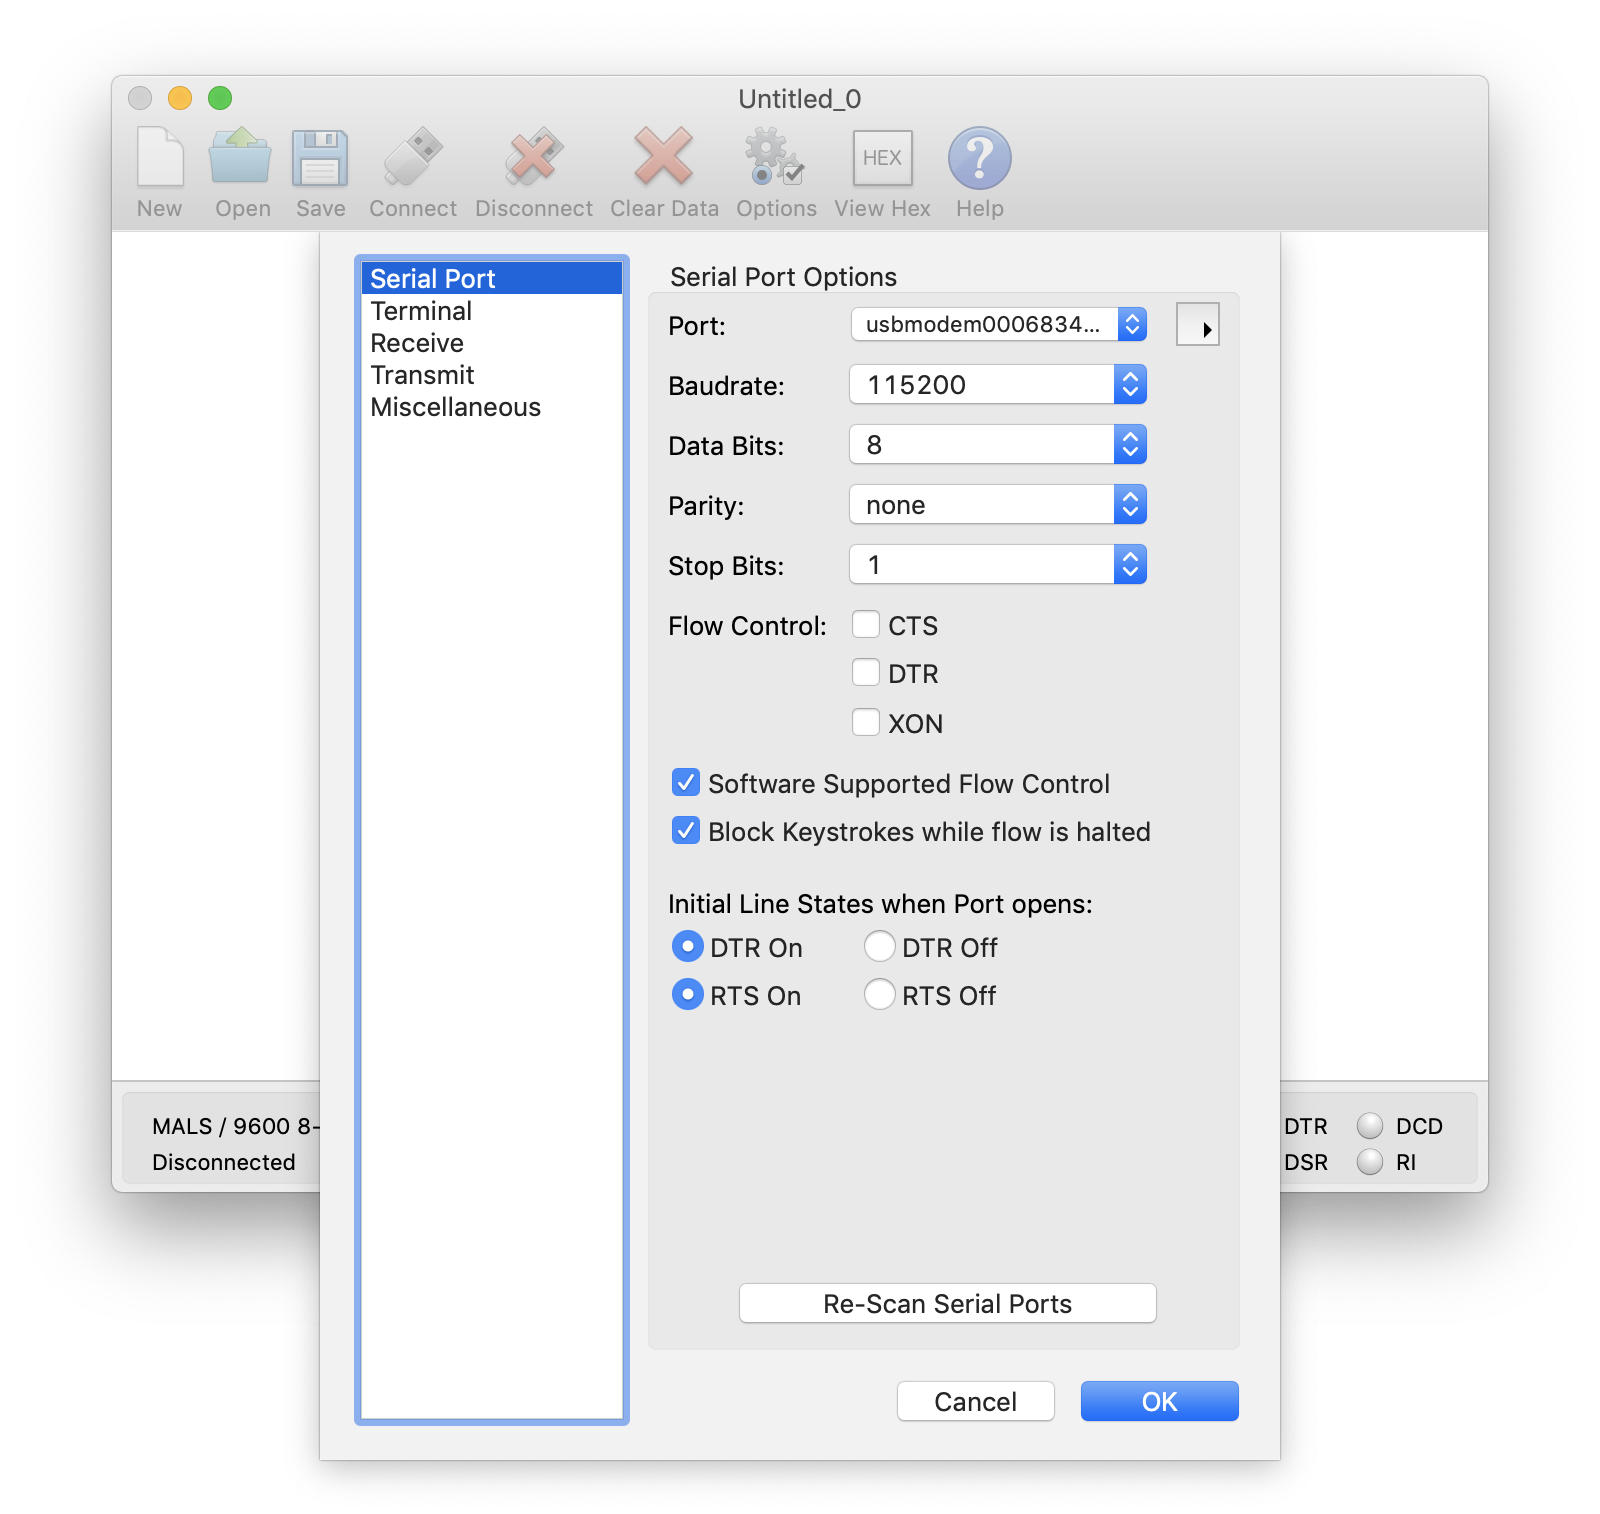
Now, hit OK.
-
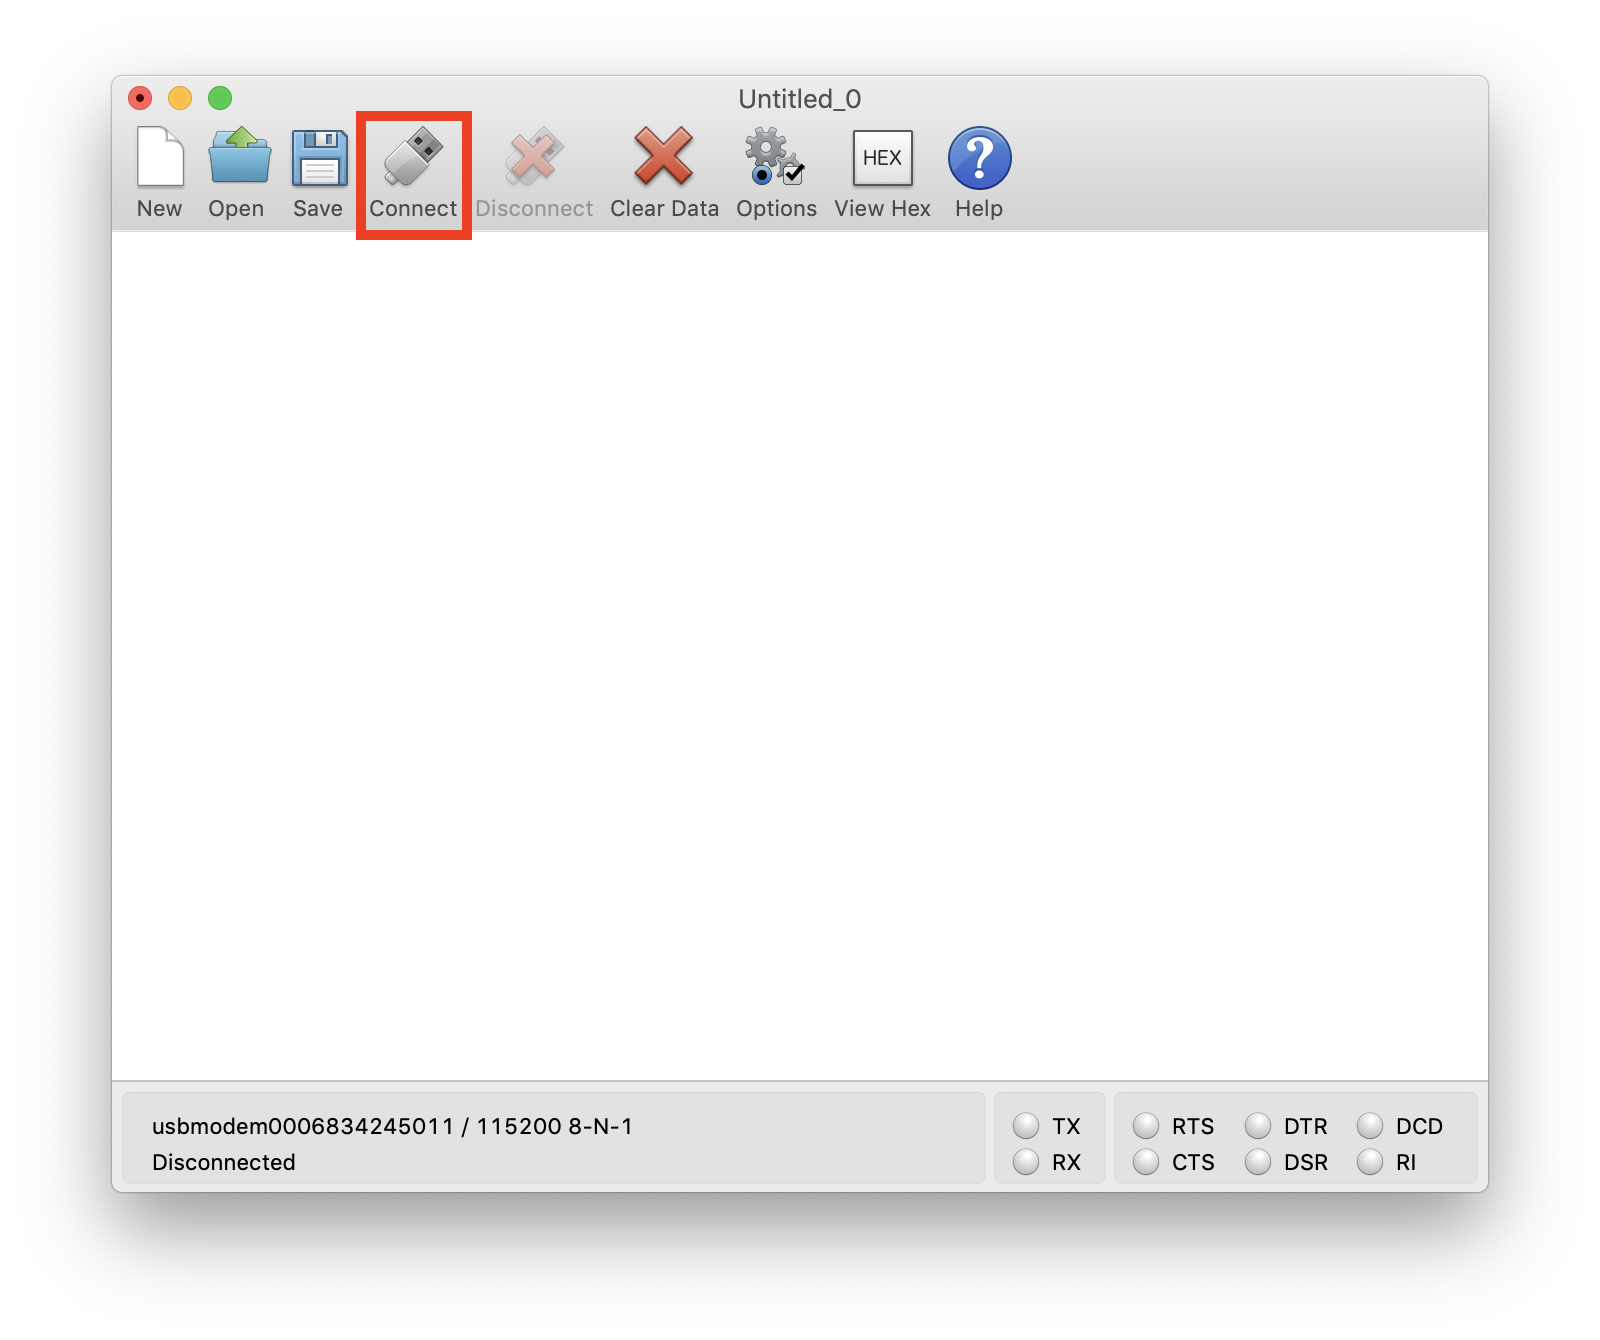
Finally, connect to the serial port by clicking the “Connect” button:
You may not see any output since the program probably started before you connected. To reset the development board, we can simply run the following command from the Terminal:
$ nrfjprog -f NRF52 --reset
The first time you run the application you’ll most likely get an error that looks something like this:
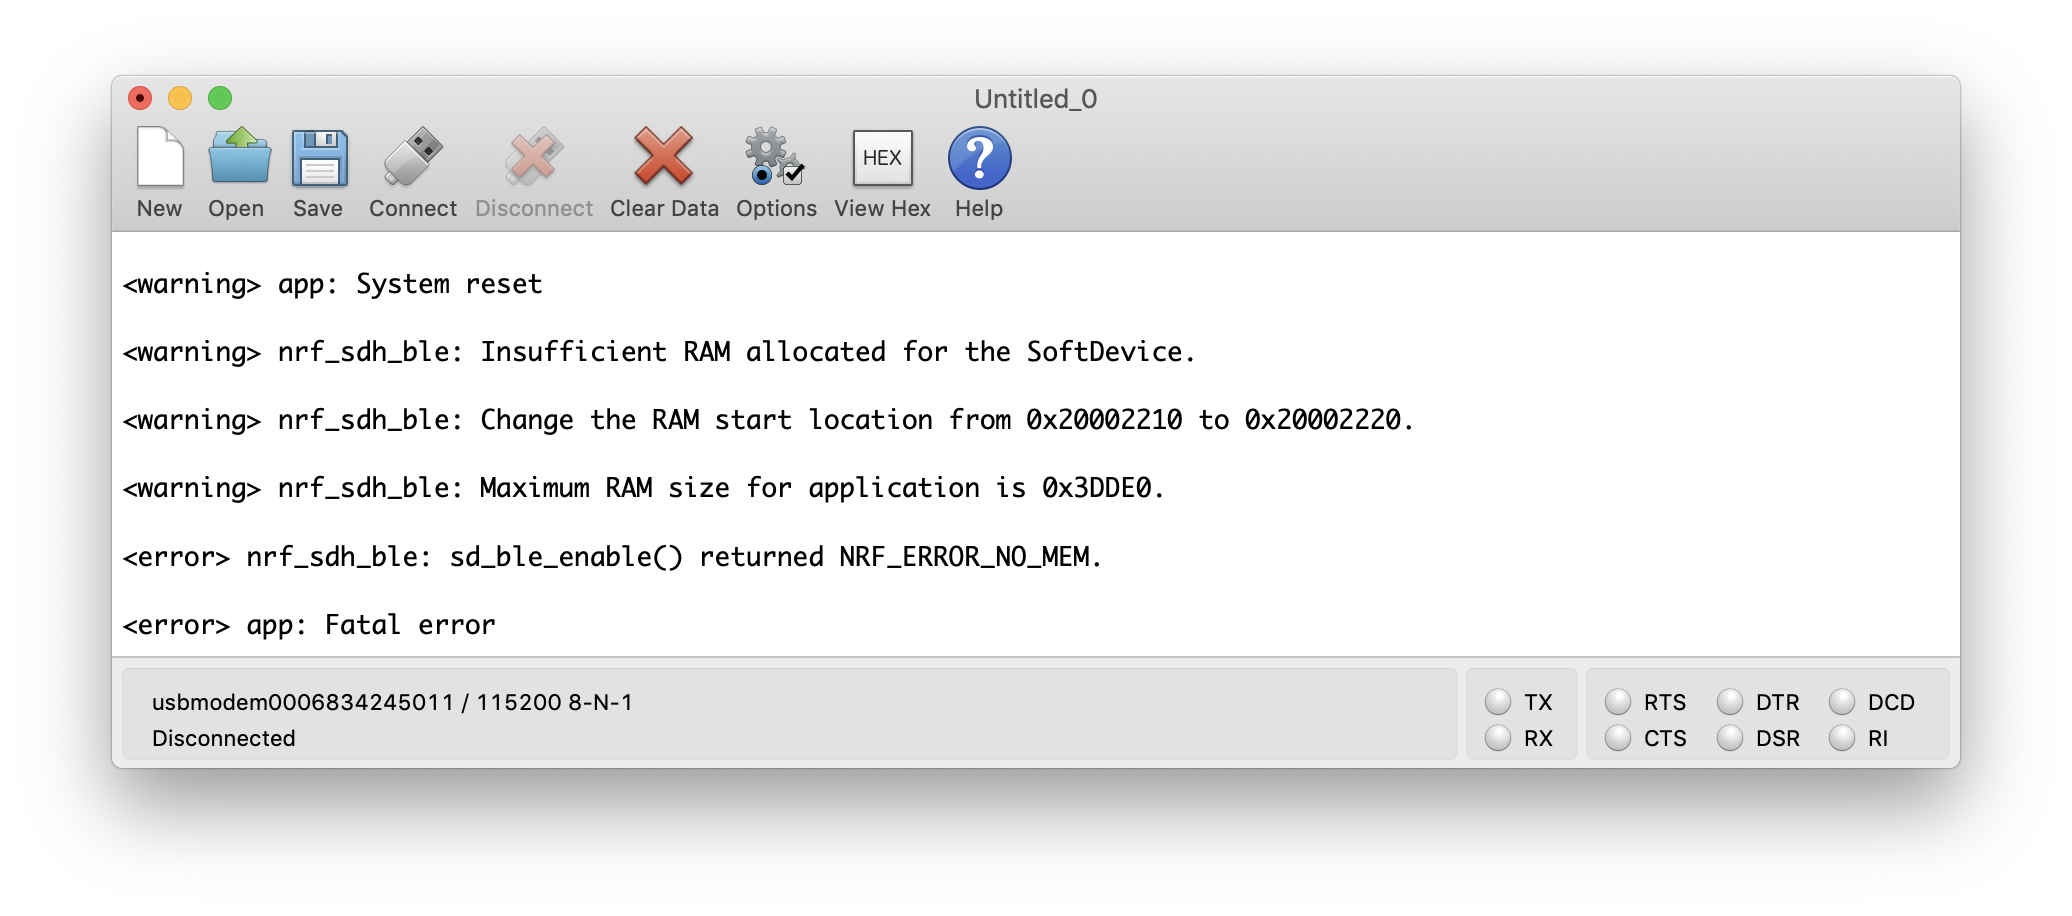
This is due to the fact that we modified the value of the macro for the number of vendor-specific UUIDs in the SoftDevice. The good part is that the log output tells us exactly which values we need to use for RAM offset and RAM size to fix this problem.
In order to apply the fix, we need to edit the file named ble_app_template_gcc_nrf52.ld located at ble_app_template/pca10056/s140/armgcc/ and modify the values of
RAM (rwx) : ORIGIN
and
RAM (rwx) : LENGTH
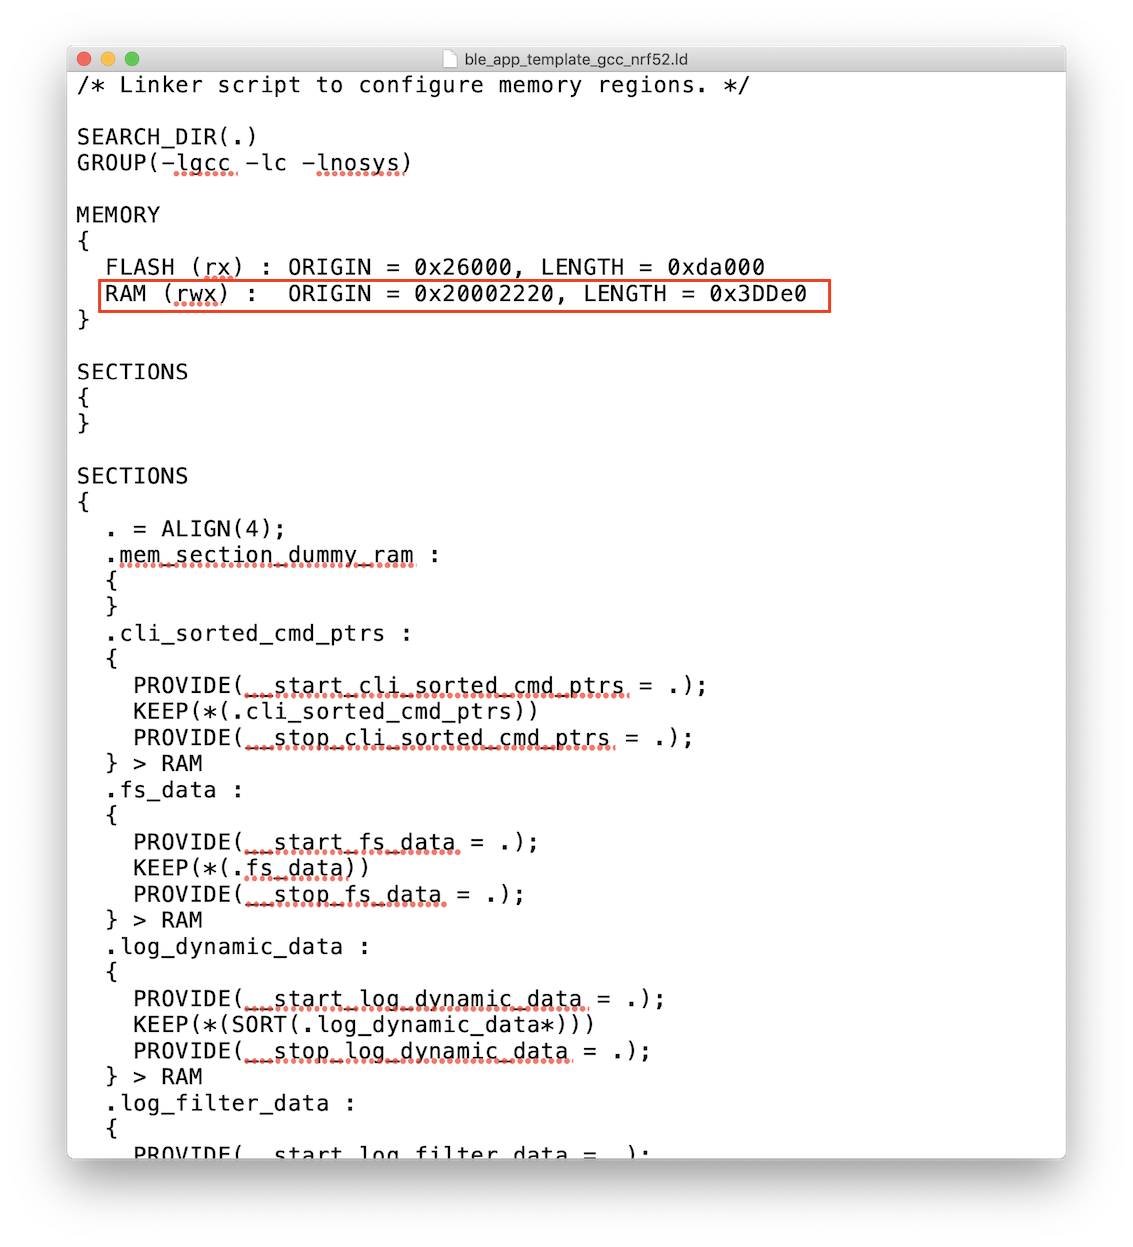
Now we just need to repeat the steps of cleaning, building, and flashing the SoftDevice, and application to the target.
If all goes well, you should now see the following printed in the Terminal window:
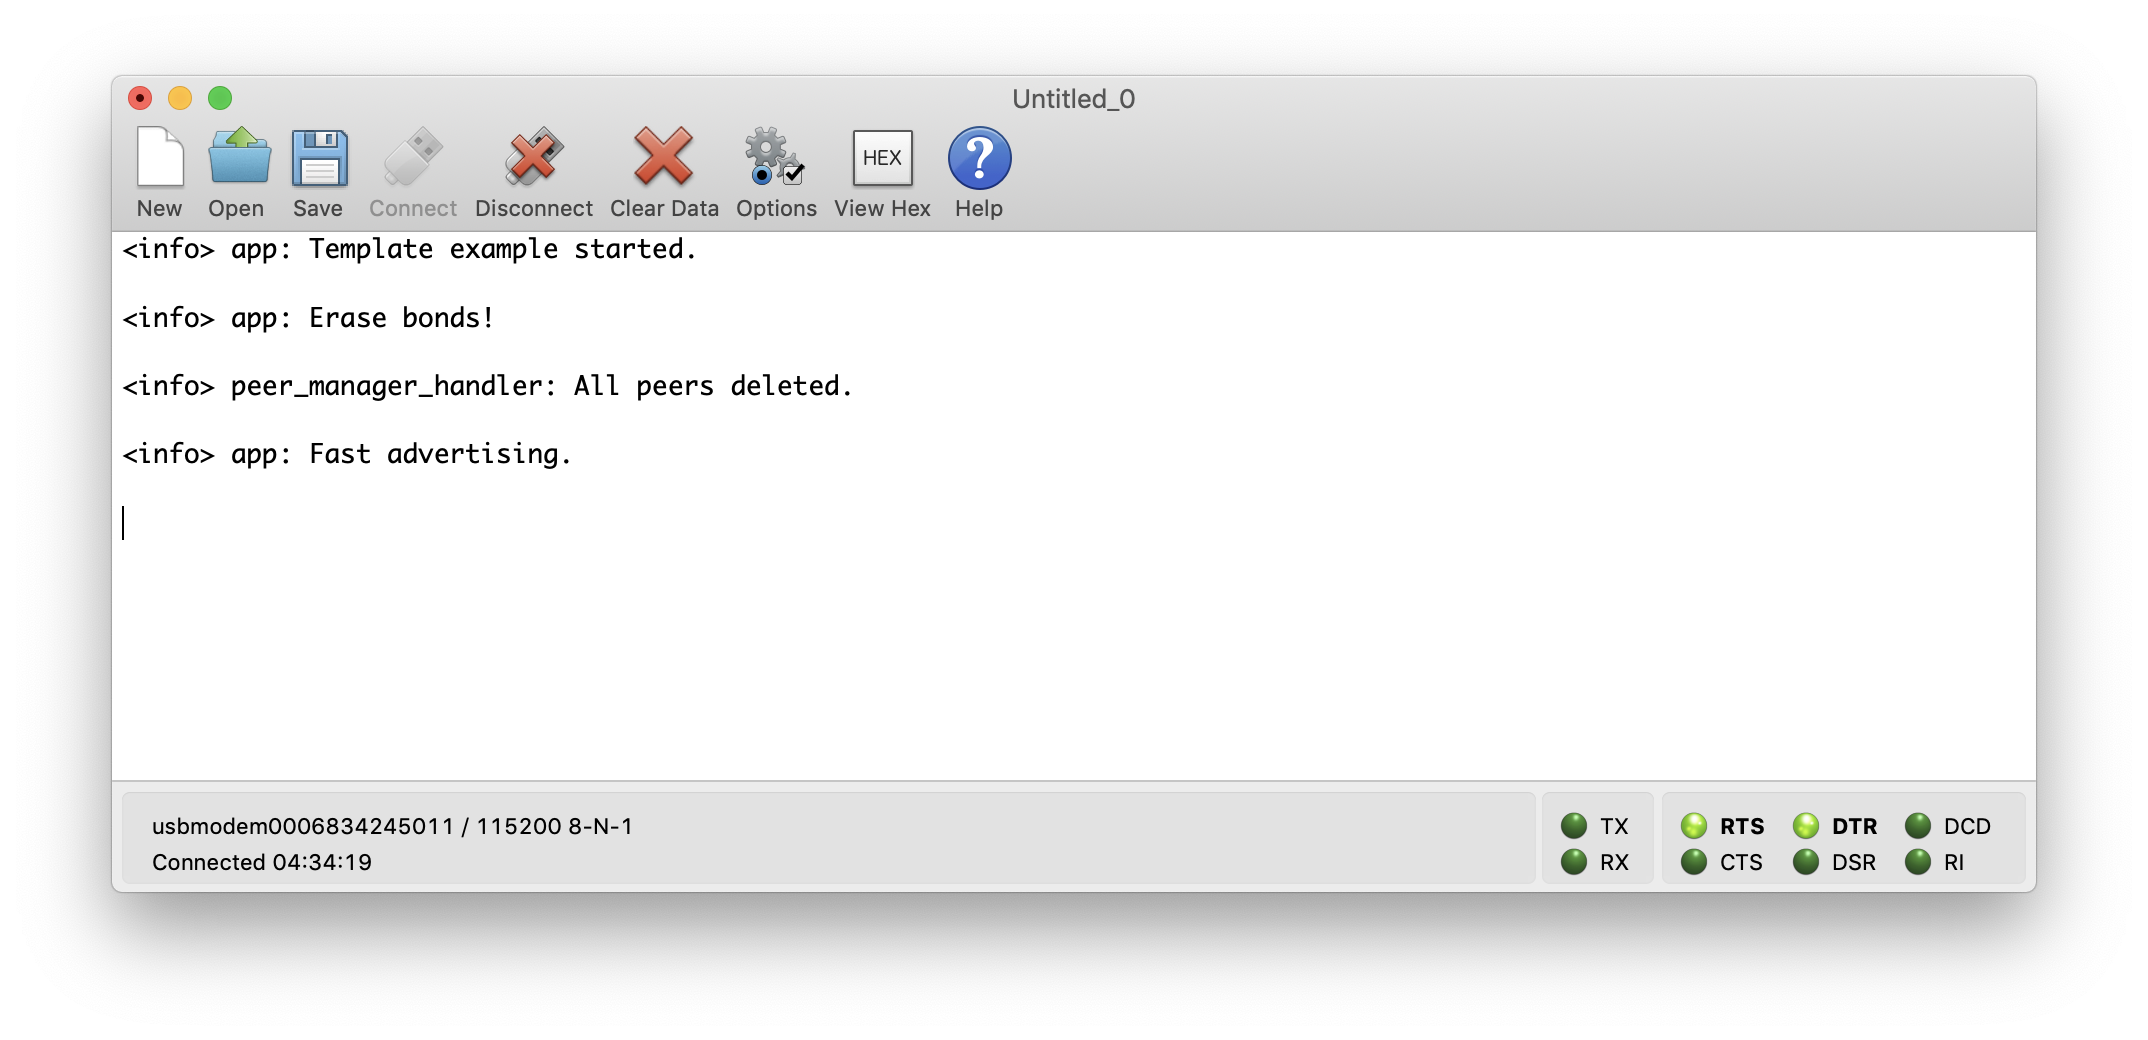
Testing the Application
Even though we verified that our application is running correctly and no errors show up in the terminal window, we still need to verify its BLE functionality. The easiest way to do so is by running a BLE Central mobile app such as nRF Connect (iOS or Android) or LightBlue (iOS or Android).
The different aspect we want to test include:
- Making sure the BLE Peripheral advertises and can be discovered by the BLE Central.
- Making sure we can connect to the Peripheral.
- Verifying that we can discover the Simple Service and its Button 1 Characteristic.
- Verifying that we can read the state of Button 1 (pressed: 0x01 or released: 0x00).
- Verifying that we can subscribe to Notifications and get notified when Button 1’s state changes.
Let’s go through each of these tests. We’ll be using LightBlue for our tests here.
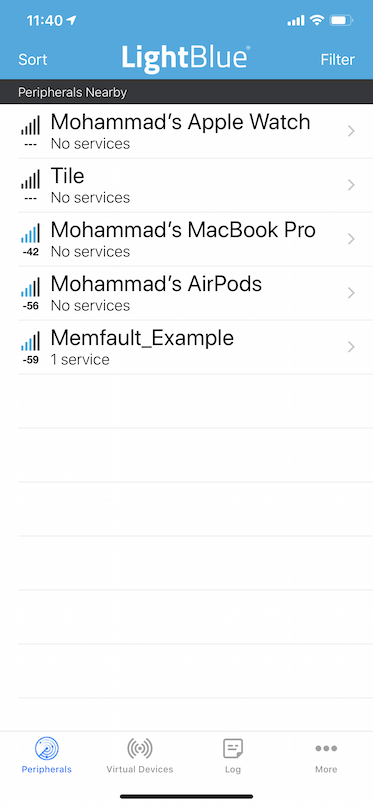
1. Advertisements
Once you launch LightBlue, you’ll be presented with a screen showing all the BLE devices advertising in the vicinity. Make sure you have Bluetooth enabled on your phone first.
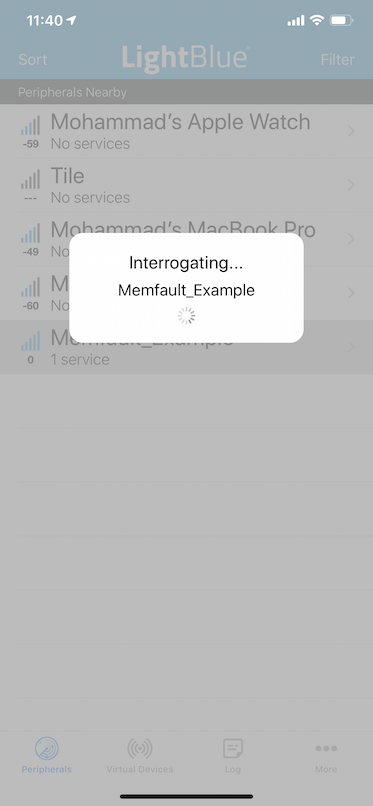
2. Connection
Now that we verified that we can discover our device (“Memfault_Example”), we can attempt to connect to it. Simply click on the device and it should initiate a connection. You should momentarily see a message similar to the following before it establishes the connection:
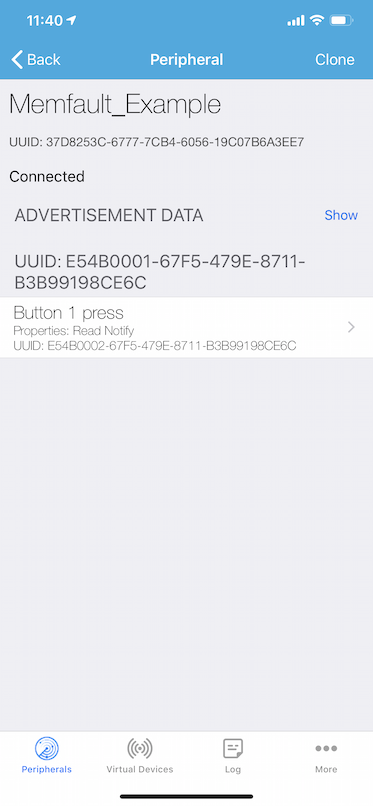
After the connection is established, you will be presented with a screen similar to this:
3. GATT Service & Characteristic Discovery
The previous screen also verifies that the Simple Service was discovered correctly and it contains our Button 1 Characteristic.
If we click on the Simple Service, we should see the Button 1 Characteristic:
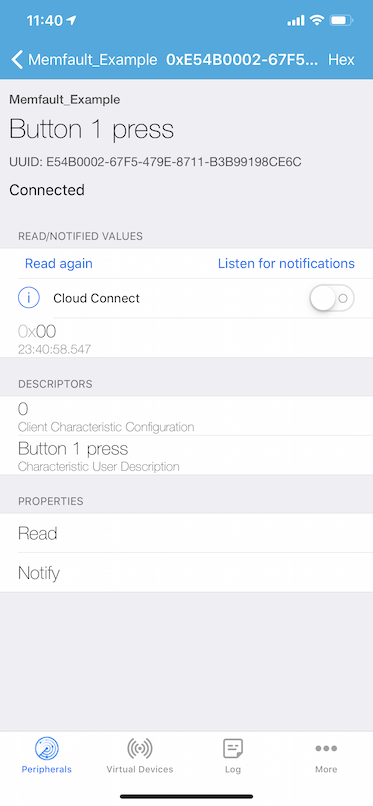
4. Characteristic Value Read
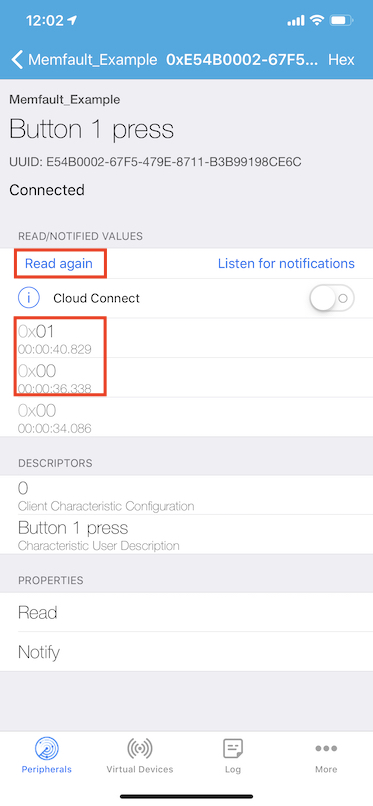
To verify that we can read the value of the Button 1 Characteristic, we can tap on “Read again”. To verify further, we can hold down Button 1 on the development board and then click “Read again”. This time it should display a value of 0x01.
5. Notifications
Finally, let’s verify that we can get notified when the Button 1 state changes. We can do so by clicking on the “Listen for notifications” button.
Once you click on it, you can test it by pressing Button 1 and releasing it a few times. You should see the updated values come in as you press and release the button:
Notifications disabled:

Notifications enabled:

Closing
That’s it for this post. We covered a whole lot here!
There’s a lot more to Bluetooth Low Energy including security, Bluetooth 5 features (long-range, high-speed, increased advertising capacity), GATT design, beacons, low-power optimization, and many more..
To recap, we went over:
- The basics of Bluetooth Low Energy (BLE)
- A comparison between BLE and Bluetooth Classic
- BLE Peripherals and Centrals
- Advertising
- Connections
- The Generic Access Profile (GAP)
- The Generic Attribute Profile (GATT), including Services and Characteristics
- Implementation of a simple BLE Peripheral application on the nRF52 development kit
- Interacting with the BLE Peripheral from a mobile phone
Be sure to let us know if you have any comments or suggestions on additional BLE-related topics you’d like us to cover in the discussion section below.
As a reminder, all the code used in this blog post is available on GitHub.
 Mohammad Afaneh is the founder and CEO of Novel Bits, a company that focuses on providing comprehensive tutorials, resources, and online training for Bluetooth developers.